

How to Hide or Show Windows Security Notification Area Icon in Windows 10
The Windows Security app is a client interface on Windows 10 version 1703 and later that makes it is easier for you to view and control the security protections you choose and better understand the security features already protecting you on your Windows 10 device.
Windows Defender Security Center has seven areas that protect your device and let you specify how you want your device protected:
- Virus & threat protection - Has information and access to antivirus ransomware protection settings and notifications, including the Controlled folder access feature of Windows Defender Exploit Guard and sign-in to Microsoft OneDrive.
- Account protection - Makes it easier for users to protect their identity when signing in to Windows with the new Account Protection pillar in Windows Defender Security Center. Account Protection will encourage password users to set up Windows Hello Face, Fingerprint or PIN for faster sign in, and will notify Dynamic lock users if Dynamic lock has stopped working because their phone or device Bluetooth is off.
- Firewall & network protection - Has information and access to firewall settings, including Windows Defender Firewall.
- App & browser control - Windows Defender SmartScreen settings and Exploit protection mitigations.
- Device security - Provides access to built-in device security settings.
- Device performance & health - Has information about drivers, storage space, and general Windows Update issues.
- Family options - Includes access to parental controls along with tips and information for keeping kids safe online.
- Protection history - The Protection History page in the Windows Security app is where you can go to view actions that Microsoft Defender Antivirus has taken on your behalf, Potentially Unwanted Apps that have been removed, or key services that are turned off.
This tutorial will show you how to hide or show the Windows Security notification area icon on the taskbar for your account or all accounts in Windows 10.
Contents
- Option One: Hide or Show Windows Security Notification Area Icon for Current User in Taskbar Settings
- Option Two: Hide or Show Windows Security Notification Area Icon for Current User in Startup Settings
- Option Three: Hide or Show Windows Security Notification Area Icon for Current User in Task Manager
- Option Four: Enable or Disable Windows Security Notification Area Icon for All Users in Local Group Policy Editor
- Option Five: Enable or Disable Windows Security Notification Area Icon for All Users using a REG file
EXAMPLE: Windows Security notification area icon on taskbar


1 Change your notification area icons settings to either Always show all icons in the notification area or turn on (show) or off (hide) Windows Security notification icon (see screenshot below)
How to Hide or Show Notification Area Icons on Taskbar in Windows 10
If you disable the icon using this option, it will override OPTION ONE above.
1 Open Settings, and click/tap on the Apps icon.
2 Click/tap on Startup on the left side, and turn on (show - default) or off (hide) Windows Security notification icon for what you want. (see screenshots below)
3 Close Settings.
4 Sign out and sign in to apply.
If you disable the icon using this option, it will override OPTION ONE above.
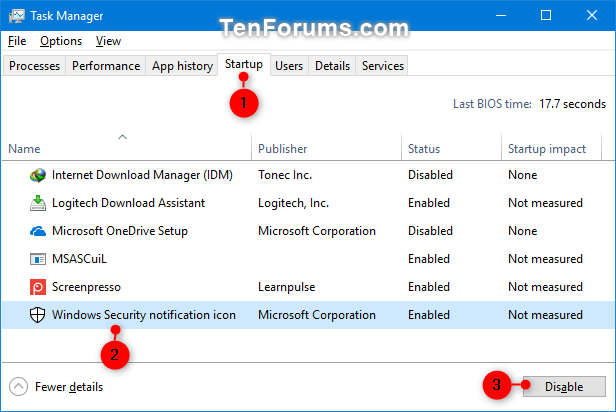
1 Open Task Manager into the More details view, and click/tap on the Startup tab. (see screenshots below)
2 Select the Windows Security notification icon startup item, and enable (show - default) or disable (hide) based on the current status for what you want.
3 Sign out and sign in to apply.
You must be signed in as an administrator to be able to do this option.
This option is only available starting with Windows 10 version 1803.
The Local Group Policy Editor is only available in the Windows 10 Pro, Enterprise, and Education editions.
All editions can use Option Five below.
1 Open the Local Group Policy Editor.
2 In the left pane of Local Group Policy Editor, navigate to the location below. (see screenshot below)
Computer Configuration\Administrative Templates\Windows Components\Windows Security\Systray
3 In the right pane of Systray in Local Group Policy Editor, double click/tap on the Hide Windows Security Systray policy to edit it. (see screenshot above)
4 Do step 5 (enable) or step 6 (disable) below for what you would like to do.
A) Select (dot) Not Configured or Disabled, click/tap on OK, and go to step 7 below. (see screenshot below)
Not Configured is the default setting.
7 When finished, you can close the Local Group Policy Editor.
8 Restart the computer to apply.
You must be signed in as an administrator to be able to do this option.
This option is only available starting with Windows 10 version 1803.
The downloadable .reg files below will add and modify the DWORD value in the registry key below.
HKEY_LOCAL_MACHINE\SOFTWARE\Policies\Microsoft\Windows Defender Security Center\Systray
HideSystray DWORD
0 or delete = Enable
1 = Disable
(Enable using step 2 will make sure the default values below are correct)
HKEY_LOCAL_MACHINE\SOFTWARE\Microsoft\Windows\CurrentVersion\Explorer\StartupApproved\Run
SecurityHealth REG_BINARY
06,00,00,00,00,00,00,00,00,00,00,00
HKEY_LOCAL_MACHINE\SOFTWARE\Microsoft\Windows\CurrentVersion\Run
SecurityHealth REG_EXPAND_SZ
%windir%\system32\SecurityHealthSystray.exe
1 Do step 2 (enable) or step 3 (disable) below for what you would like to do.
This is the default setting.
A) Click/tap on the Download button below to download the file below, and go to step 4 below.
Enable_Windows_Security_notification_icon_for_all_users.reg
Download
A) Click/tap on the Download button below to download the file below, and go to step 4 below.
Disable_Windows_Security_notification_icon_for_all_users.reg
Download
4 Save the .reg file to your desktop.
5 Double click/tap on the downloaded .reg file to merge it.
6 When prompted, click/tap on Run, OK (UAC), Yes, and OK to approve the merge.
7 Restart the computer to apply.
8 If you like, you can delete the downloaded .reg file if you like.
That's it,
Shawn Brink
Related Tutorials
- How to Reset Windows Security App in Windows 10
- How to Enable or Disable Windows Security in Windows 10
- How to Hide or Show Notification Area Icons on Taskbar in Windows 10
- How to Turn On or Off Microsoft Defender Antivirus in Windows 10
- How to Enable or Disable Real-time Protection for Microsoft Defender Antivirus in Windows 10
- How to Add or Remove Exclusions for Windows Defender in Windows 10
- How to Create a Windows Defender Settings shortcut in Windows 10
- How to Add or Remove Microsoft Defender context menu in Windows 10
- How to Add or Remove 'Scan with Microsoft Defender' Context Menu in Windows 10
- How to Turn On or Off Windows Defender Enhanced Notifications in Windows 10
- How to Create Windows Security Shortcut in Windows 10
- How to Manually Scan Files, Folders, and Drives with Windows Defender in Windows 10
- How to View Security Providers in Windows Security app in Windows 10
- How to Add or Remove Windows Security context menu in Windows 10
Hide or Show Windows Security Notification Area Icon in Windows 10
-
New #1
Question: Windows Defender does show in my system tray when malware is detected, so will this tutorial make it show permanently? Also I unchecked the option to always show icons and notifications; will this affect Windows Defender from showing?
-
New #2
Hello TON, :)
This tutorial basically adds the Windows Defender icon to run at startup so it will always show.
If you set to not always how all icons in the notification area, Windows Defender will be in the expansion menu of notification area icons instead.
-
New #3
-
-
New #5
Is there a way for the desktop context menu items from Windows Defender context menu - Add in Windows 10 - Windows 10 Forums to appear in here instead? So when I right click the defender icon in the notification area, I get 'Update', 'Quick Scan' etc. That will consolidate things nicely in one place..
-
New #6
Hello Krytoned, :)
That would be great if so, but there's not a way to add them that I'm aware of.
Please send feedback to Microsoft for this requested feature to hopefully have it added one day.
https://www.tenforums.com/tutorials/7...dows-10-a.html
-
New #7
Thanks Brink it works like a charm, now the icon shows on restart and I can update it when I choose rather than going to settings etc etc and it showing makes me feel like its doing something rather than chasing it down only to find the 'Scan Now' deal in orange staring me in the face....good job!
-
-
-
New #9
I love these articles and scripts you do, thanks very much for them they save me heaps of time (while costing lots of yours) so thank you :)

Hide or Show Windows Security Notification Area Icon in Windows 10
How to Hide or Show Windows Security Notification Area Icon in Windows 10Published by Shawn BrinkCategory: Security System
01 Nov 2022

 Quote
QuoteTutorial Categories

Related Discussions
