How to Limit Bandwidth to Download and Upload Windows and App Updates in Windows 10
Delivery Optimization has been synonymous with “Peer-to-peer” but few people are aware that it is also used as the main downloader for content downloaded from Windows Update and Windows Store. Delivery Optimization, even without P2P, is what makes downloads from Windows Store much faster as well as makes downloads of Quality and Feature updates far more reliable. While you can enable or disable the P2P functionality, Delivery Optimization is still used when downloading updates and apps directly from Microsoft’s content servers.
By default, Windows dynamically optimizes the amount of network bandwidth your device uses to download and upload Windows and app updates, and other Microsoft products.
Delivery Optimization continuously measures your available bandwidth during a download and dynamically adjusts the amount of bandwidth used in background downloads to ensure these downloads won’t interrupt your use of your device. However, Delivery Optimization may not be aware of download activity that takes place on other devices in your household. If you have limited connectivity and would like to minimize the impact you can now use the Download settings to throttle your download speed for background downloads.
Starting with Windows 10 build 16237, you can set a specific limit if you're worried about data usage.
Starting with Windows 10 build 17035, you can now limit the download bandwidth that is used in foreground downloads. Foreground downloads take place when you interactively start a download, for example – you click on “Check for updates” or start downloading an App from Windows Store.
Starting with Windows 10 build 18917, Microsoft heard from users with very low connection speeds that setting download throttling as a percentage of available bandwidth isn’t providing enough relief in reducing the impact on their network. That’s why Microsoft added a new option to throttle the bandwidth used by Delivery Optimization as an absolute value. You can set this separately for Foreground downloads (downloads that you initiate from Windows Store for example) or background downloads. This option already exists for IT Pros who use Group Policies or MDM policies to configure Delivery Optimization. In this build, Microsoft made it easier to set via the settings page.
This tutorial will show you how to limit how much bandwidth is used for downloading and uploading Windows and app updates on your Windows 10 PC.
You must be signed in as an administrator to limit the bandwidth of Windows and app updates.
Contents
- Option One: Limit Bandwidth of Windows Update and Store App Updates in Settings
- Option Two: Limit Bandwidth of Windows Update and Store App Updates in Registry Editor
1 Open Settings, and click/tap on the Update & security icon.
2 Click/tap on Delivery Optimization on the left side, and click/tap on the Advanced options link on the right side. (see screenshot below)
If you like, you can click/tap on the Activity monitor link to see the overall bandwidth used in downloads of OS Updates including Feature and Quality updates as well as Store App downloads and updates on your device. You will also be able to see exactly the amount of data coming from other PCs on your local network or other PC on the Internet based on your settings.
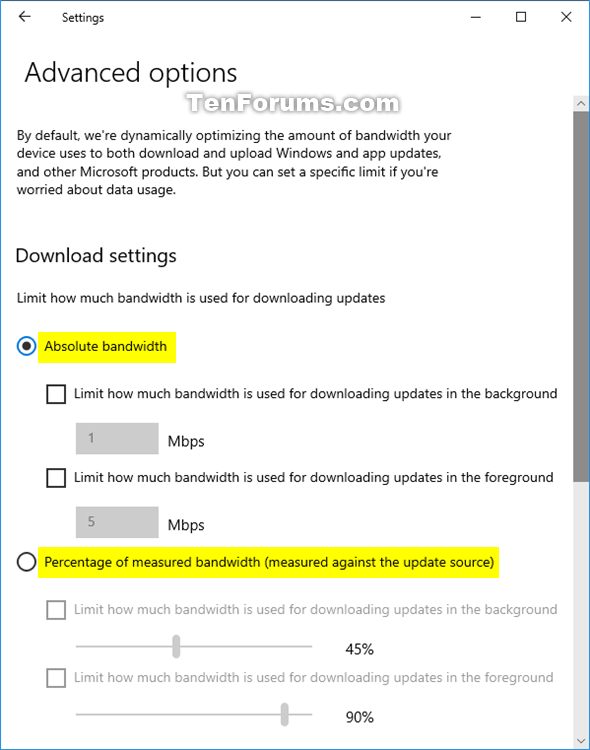
3 Starting with Windows 10 build 18912, you will need to select (dot) Absolute bandwidth or Percentage of measured bandwidth for what you want for Download settings on the right side. (see screenshot below)
4 You can now check (turn on) and adjust or uncheck (turn off - default) the download and upload settings below for what you want. (see screenshots below)
- Limit how much bandwidth is used for downloading updates in the background
- Limit how much bandwidth is used for downloading updates in the foreground
- Limit how much bandwidth is used for uploaded updates to other PCs on the Internet
- Monthly upload limit
5 When finished, you can close Settings if you like.

1 Press the Win + R keys to open Run, type regedit into Run, and click/tap on OK to open Registry Editor.
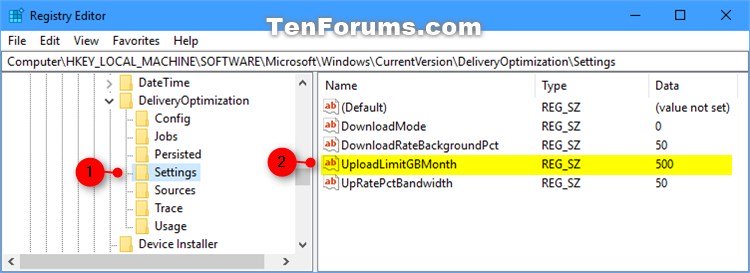
2 Navigate to the key below in the left pane of Registry Editor. (see screenshot below)
HKEY_USERS\S-1-5-20\SOFTWARE\Microsoft\Windows\CurrentVersion\DeliveryOptimization\Settings
3 Do the steps below for what you want to do.
- step 4 (Limit bandwidth for downloading updates in background)
- step 5 (Limit bandwidth for downloading updates in foreground)
- step 6 (Limit bandwidth for uploaded updates to other PCs on Internet)
- step 7 (Monthly upload limit)
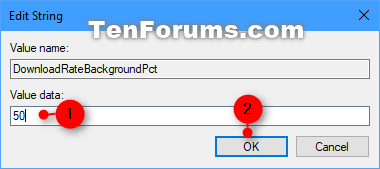
A) In the right pane of the Settings key, double click/tap on the DownloadRateBackgroundPct string value (REG_SZ) to modify it. (see screenshot below)
If you do not have a DownloadRateBackgroundPct string value (REG_SZ), then right click on an empty area in the right pane of the Settings key, click/tap on New, click/tap on String Value, type DownloadRateBackgroundPct, and press Enter.
To turn off (default) this setting, right click or press and hold on the DownloadRateBackgroundPct string value (REG_SZ), click/tap on Delete, click/tap on Yes to confirm when prompted, and go to step 8 below.
B) Type in a number between 5 to 100 for the percentage of bandwidth you want to limit to be used for downloading updates in the background, click/tap on OK, and go to step 8 below.(see screenshot below)
A) In the right pane of the Settings key, double click/tap on the DownloadRateForegroundPct string value (REG_SZ) to modify it. (see screenshot below)
If you do not have a DownloadRateForegroundPct string value (REG_SZ), then right click on an empty area in the right pane of the Settings key, click/tap on New, click/tap on String Value, type DownloadRateForegroundPct, and press Enter.
To turn off (default) this setting, right click or press and hold on the DownloadRateForegroundPct string value (REG_SZ), click/tap on Delete, click/tap on Yes to confirm when prompted, and go to step 8 below.
B) Type in a number between 5 to 100 for the percentage of bandwidth you want to limit to be used for downloading updates in the foreground, click/tap on OK, and go to step 8 below.(see screenshot below)
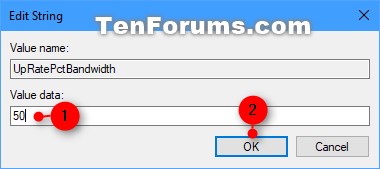
A) In the right pane of the Settings key, double click/tap on the UpRatePctBandwidth string value (REG_SZ) to modify it. (see screenshot below)
If you do not have a UpRatePctBandwidth string value (REG_SZ), then right click on an empty area in the right pane of the Settings key, click/tap on New, click/tap on String Value, type UpRatePctBandwidth, and press Enter.
To turn off (default) this setting, right click or press and hold on the UpRatePctBandwidth string value (REG_SZ), click/tap on Delete, click/tap on Yes to confirm when prompted, and go to step 8 below.
B) Type in a number between 5 to 100 for the percentage of bandwidth you want to limit to be used for uploading updates to other PCs on the Internet, click/tap on OK, and go to step 8 below.(see screenshot below)
A) In the right pane of the Settings key, double click/tap on the UploadLimitGBMonth string value (REG_SZ) to modify it. (see screenshot below)
If you do not have a UploadLimitGBMonth string value (REG_SZ), then right click on an empty area in the right pane of the Settings key, click/tap on New, click/tap on String Value, type UpRatePctBandwidth, and press Enter.
To turn off (default) this setting, right click or press and hold on the UploadLimitGBMonth string value (REG_SZ), click/tap on Delete, click/tap on Yes to confirm when prompted, and go to step 8 below.
B) Type in a number between 5 to 500 for how many gigabytes (GB) you want to set as the monthly upload limit, click/tap on OK, and go to step 8 below.(see screenshot below)
8 When finished, you can close Registry Editor if you like.
That's it,
Shawn
Related Tutorials
- How to See OS and Store Update Network Bandwidth Usage in Windows 10 Activity Monitor
- How to Check for and Install Windows Updates in Windows 10
- Choose How Windows and Store App Updates are Downloaded in Windows 10
- How to Specify How Windows and Store App Updates are Downloaded in Windows 10
- How to Enable or Disable Automatic Updates for Windows Update in Windows 10
- How to Turn On or Off Give Updates for Other Microsoft Products in Windows 10
- How to Check for App Updates in the Store in Windows 10
- Turn On or Off Automatic Download and Install of App Updates by Store in Windows 10
- How View Network Data Usage Details in Windows 10
- How to Reset Network Data Usage in Windows 10
- Set Wireless Network as Metered or Non-Metered Connection in Windows 10
- How to Set Ethernet Connection as Metered or Non-Metered in Windows 10
- How to Turn On or Off Allow VPN over Metered Networks in Windows 10
- Enable or Disable Allow Automatically Download Updates over Metered Connections in Windows 10
- How to Set Data Limit for Wi-Fi and Ethernet in Windows 10
- How to Restrict Background Data Usage for Wi-Fi and Ethernet in Windows 10
- How to Add Data Usage Live Tile to Start in Windows 10
Limit Bandwidth of Windows Update and Store App Updates in Windows 10

Limit Bandwidth of Windows Update and Store App Updates in Windows 10
How to Limit Bandwidth to Download and Upload Windows and App Updates in Windows 10Published by Shawn BrinkCategory: Network & Sharing
16 Feb 2020
Tutorial Categories


Related Discussions


