

How to Setup or Remove a Kiosk Account using Assigned Access in Windows 10
You can use the assigned access (Kiosk mode) feature in Windows 10 Pro, Windows 10 Enterprise, and Windows 10 Education editions to restrict a local standard user account on a PC so that it only has access to a single Universal Windows Platform (UWP) app you select.
When you set up and account with the assigned access feature, the user does not have access to the desktop, Start Menu, or any other part of the PC. The account can only access and use the selected UWP app.
To exit assigned access, press the Ctrl+Alt+Del keys.
Starting with Windows 10 version 1809, Microsoft introduced a simplified assigned access configuration experience in Settings that allows device administrators to easily set up a PC as a kiosk or digital sign. A wizard experience walks you through kiosk setup including creating a kiosk account that will automatically sign in when a device starts.
For a more secure kiosk experience, you can make the following configuration changes to the device:
- Put device in Tablet mode.
- Hide Ease of access feature on the sign in screen.
- Go to Control Panel > Ease of Access > Ease of Access Center, and turn off all accessibility tools.
- Disable the hardware power button.
- Remove the power button from the sign-in screen.
- Disable the camera.
- Turn off app notifications on the lock screen.
- Go to Group Policy Editor > Computer Configuration > Administrative Templates\System\Logon\Turn off app notifications on the lock screen.
- Disable removable media.
- Go to Group Policy Editor > Computer Configuration > Administrative Templates\System\Device Installation\Device Installation Restrictions. Review the policy settings available in Device Installation Restrictions for the settings applicable to your situation.
For more information about assigned access, see:
- What's new in Windows 10, version 1809 | Microsoft Docs
- Configure kiosks and digital signs on Windows desktop editions (Windows 10) | Microsoft Docs
- Set up a single-app kiosk (Windows 10) | Microsoft Docs
- Guidelines for choosing an app for assigned access (Windows 10) | Microsoft Docs
- Create a Windows 10 kiosk that runs multiple apps (Windows 10) | Microsoft Docs
This tutorial will show you how to add and remove a kiosk account using assigned access for kiosk mode in Windows 10 Pro, Windows 10 Enterprise, or Windows 10 Education.
You must be signed in as an administrator to turn on or off assigned access for a local standard user account.
Contents
- Option One: Set up a Kiosk Account for Assigned Access
- Option Two: Remove Kiosk Account for Assigned Access
1 Open Settings, and click/tap on the Accounts icon.
2 Click/tap on Family & other users on the left side, and click/tap on Assigned access under Set up a kiosk on the right side. (see screenshot below)
3 Click/tap on Get started. (see screenshot below)
4 Do step 5 (create account) or step 6 (choose existing account) for the account you want to use in kiosk mode.
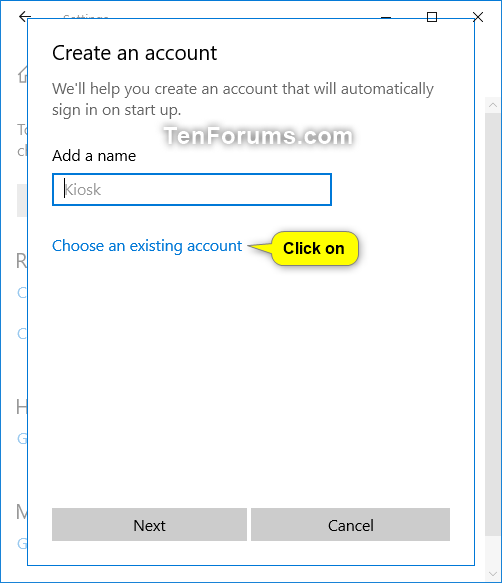
A) Type a name (ex: "Kiosk") you want to use to create an account for kiosk, click/tap on Next, and go to step 7 below. (see screenshot below)
A) Click/tap on the Choose an existing account link. (see screenshot below)
B) Select an existing account (ex: "Brink2") on the PC you want to use, click/tap on Next, and go to step 7 below. (see screenshot below)
7 Select an available app (ex: "Tips") you want to use in kiosk mode, and click/tap on Next. (see screenshot below)
Guidelines for choosing an app for assigned access (Windows 10) | Microsoft Docs
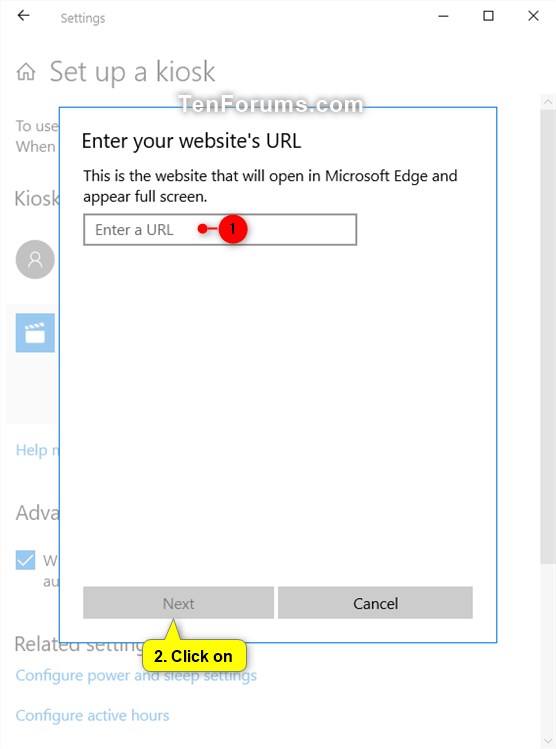
8 If you selected the Microsoft Edge app, you will need to select how this kiosk app displays when running in kiosk mode, and click/tap on Next: (see screenshots below)
Deploy Microsoft Edge kiosk mode | Microsoft Docs
As a digital sign or interactive display, the default URL shows in full screen, without browser controls.
As a public browser, the default URL shows in a browser view with limited browser controls.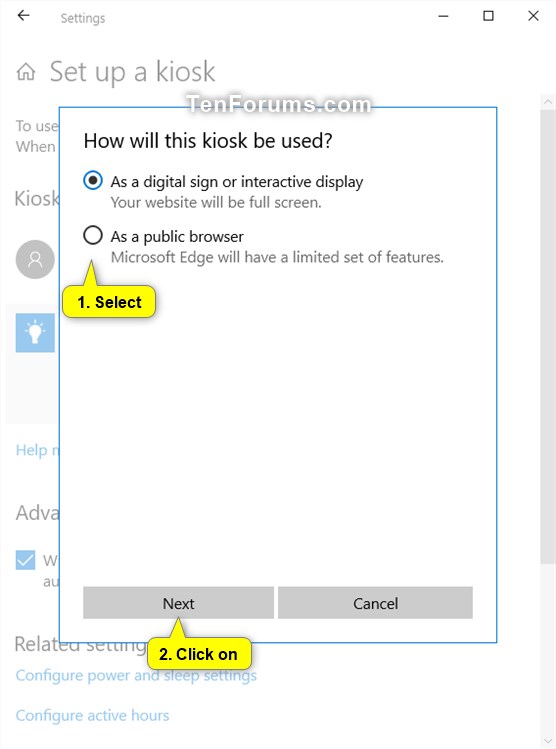
9 Click/tap on Close. (see screenshot below)
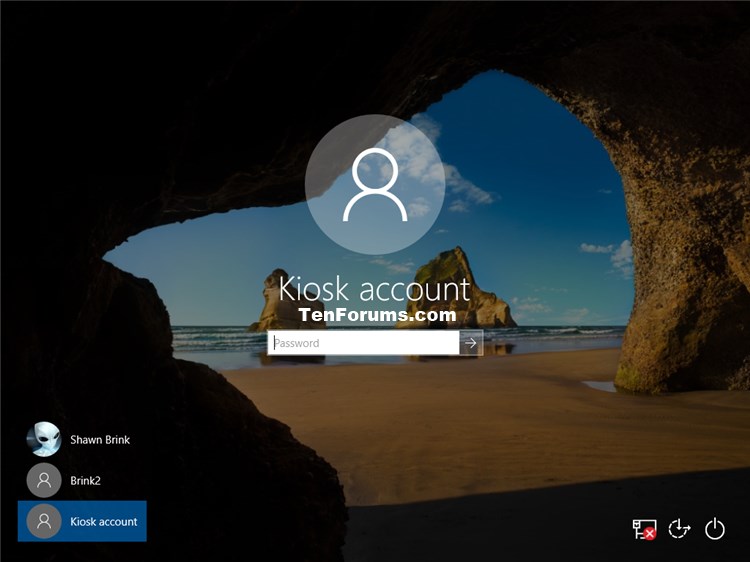
10 To use this device as a kiosk, sign in with the kiosk account (ex: "Kiosk") you set up. (see screenshots below)
If you like, you could set Windows 10 to always automatically sign in to the kiosk account at startup to not see the sign in screen.
1 Open Settings, and click/tap on the Accounts icon.
2 Click/tap on Family & other users on the left side, and click/tap on Assigned access under Set up a kiosk on the right side. (see screenshot below)
3 Click/tap on the kiosk account name (ex: "Kiosk"), and click/tap on Remove kiosk. (see screenshot below)
4 Click/tap on Remove to confirm. (see screenshot below)
5 You can now close Settings if you like.
That's it,
Shawn Brink
Related Tutorials
- How to Add a Guest Account in Windows 10
- How to Change Kiosk App in Windows 10
- How to Turn On or Off Auto Restart when Windows 10 Crashes while in Kiosk Mode
Setup or Remove a Kiosk Account using Assigned Access in Windows 10
-
New #1
Do you have any documentation on setting up the Kiosk account using a script?
Thanks!
-
New #2
Hello Sara, and welcome.
You might see if the document below from Microsoft may help for this.
https://learn.microsoft.com/en-us/wi...ows-powershell
-
New #3
Yes thanks!!
After posting I found the Kiosk with single-use app information, so I am looking at that.
Sara
-
-
New #5
Today I delved into information about having some kind of multi-app kiosk in Win10 My head hurts. Does anybody's head not hurt? Is there nothing that approaches the realm of reasonable?
Hoping for suggestions.

Setup or Remove a Kiosk Account using Assigned Access in Windows 10
How to Setup or Remove a Kiosk Account using Assigned Access in Windows 10Published by Shawn BrinkCategory: User Accounts
06 Mar 2022


 Quote
Quote
Tutorial Categories

Related Discussions
