

How to Enable or Disable Real-time Protection for Microsoft Defender Antivirus in Windows 10
Starting with Windows 10 version 2004, Windows Defender Antivirus as been renamed to Microsoft Defender Antivirus.
Windows 10 includes Windows Security, which provides the latest antivirus protection. Your device will be actively protected from the moment you start Windows 10. Windows Security continually scans for malware (malicious software), viruses, and security threats. In addition to this real-time protection, updates are downloaded automatically to help keep your device safe and protect it from threats.
Microsoft Defender Antivirus is the next-generation protection component of Microsoft Defender Advanced Threat Protection (Microsoft Defender ATP). Next-generation protection brings together machine learning, big-data analysis, in-depth threat resistance research, and the Microsoft cloud infrastructure to protect devices in your enterprise organization. Next-generation protection services include the following:
- Behavior-based, heuristic, and real-time antivirus protection. This includes always-on scanning using file and process behavior monitoring and other heuristics (also known as "real-time protection"). It also includes detecting and blocking apps that are deemed unsafe, but may not be detected as malware.
- Cloud-delivered protection. This includes near-instant detection and blocking of new and emerging threats.
- Dedicated protection and product updates. This includes updates related to keeping Microsoft Defender Antivirus up to date.
Microsoft Defender Antivirus helps protect your PC against malware (malicious software) like viruses, spyware, and other potentially unwanted software. Malware can infect your PC without your knowledge: it might install itself from an email message, when you connect to the Internet, or when you install certain apps using a USB flash drive, CD, DVD, or other removable media. Some malware can also be programmed to run at unexpected times, not only when it's installed.
In Windows 10, you can turn off Microsoft Defender Antivirus real-time protection, but it will only be temporary unless disabled. Windows will automatically turn real-time protection back on if it's off for a while.
Always-on protection consists of real-time protection, behavior monitoring, and heuristics to identify malware based on known suspicious and malicious activities.
These activities include events, such as processes making unusual changes to existing files, modifying or creating automatic startup registry keys and startup locations (also known as auto-start extensibility points, or ASEPs), and other changes to the file system or file structure.
See also:
- Microsoft Defender Antivirus in the Windows Security app | Microsoft Docs
- Microsoft Defender Antivirus | Microsoft Windows
- Next-generation protection in Windows 10, Windows Server 2016, and Windows Server 2019 | Microsoft Docs
- Mitigate threats by using Windows 10 security features | Microsoft Docs
This tutorial will show you how to turn on or off real-time protection for Microsoft Defender Antivirus for all users in Windows 10.
You must be signed in as an administrator to turn on or off real-time protection for Microsoft Defender Antivirus.
When you install some 3rd party antivirus (AV) programs, they may automatically turn off Microsoft Defender Antivirus. In this case you may not be able to turn on Microsoft Defender Antivirus again until the 3rd party AV program has been disabled (turned off) or completely uninstalled.
If you have a 3rd party AV program installed and disable Microsoft Defender Antivirus, this will also disable periodic scanning.
If you have Windows 10 build 18305 or higher installed, you will need to turn off Tamper Protection to be able to disable Microsoft Defender Antivirus.
Contents
- Option One: Turn Off Real-time Protection for Microsoft Defender Antivirus in Windows Security
- Option Two: Turn On Real-time Protection for Microsoft Defender Antivirus in Windows Security
- Option Three: Turn On or Off Real-time Protection for Microsoft Defender Antivirus in PowerShell
- Option Four: Turn On or Off Real-time Protection for Microsoft Defender Antivirus in Command Prompt
- Option Five: Enable or Disable Real-time Protection for Microsoft Defender Antivirus in Group Policy
- Option Six: Enable or Disable Real-time Protection for Microsoft Defender Antivirus using a REG file
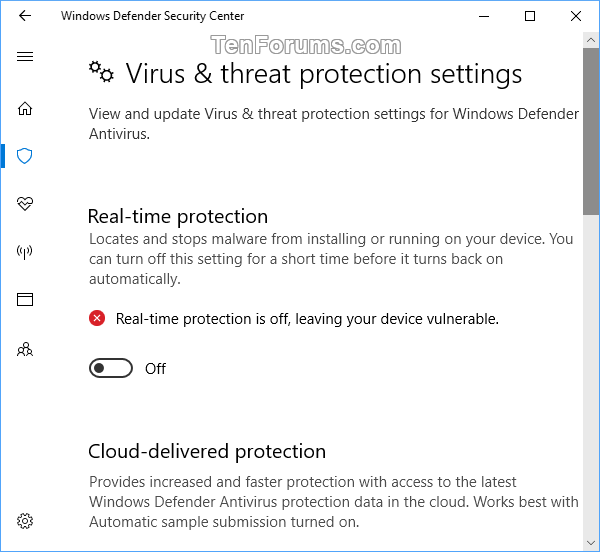
EXAMPLE: Real-time Protection for Microsoft Defender Antivirus disabled
If you use this option to turn off real-time protection for Microsoft Defender Antivirus, it will only be temporary. When it's off for a while, Windows will turn it back on automatically.
Option Five and Option Six below will override this option.
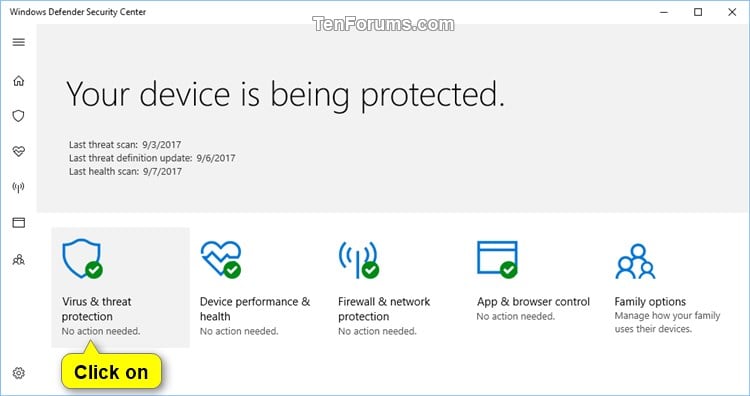
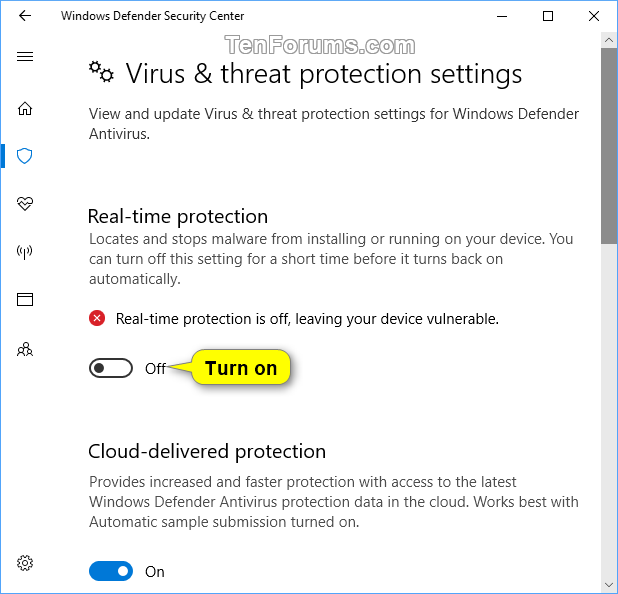
1 Open Windows Security, and click/tap on the Virus & threat protection icon. (see screenshot below)
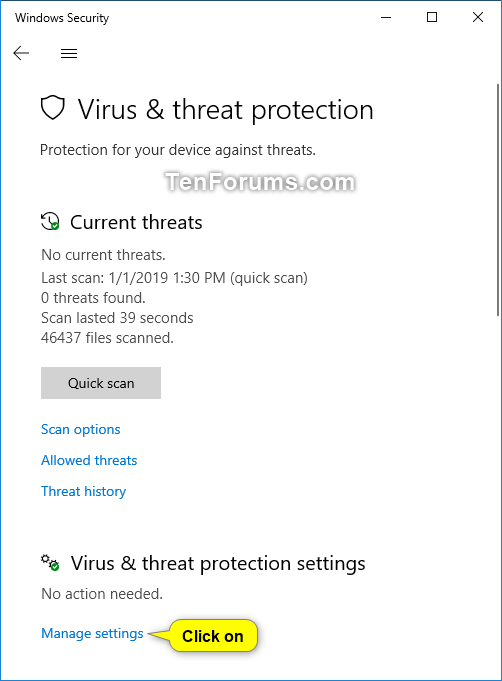
2 Click/tap on the Manage settings link under Virus & threat protection settings. (see screenshot below)
3 Turn off Real-time Protection. (see screenshot below)
4 Click/tap on Yes when prompted by UAC.
5 You can now close Windows Security if you like.
This is the default setting.
Option Five and Option Six below will override this option.
1 Open Windows Security.
2 Do step 3 or step 4 below for how you would like to turn on Windows Defender Real-time protection.
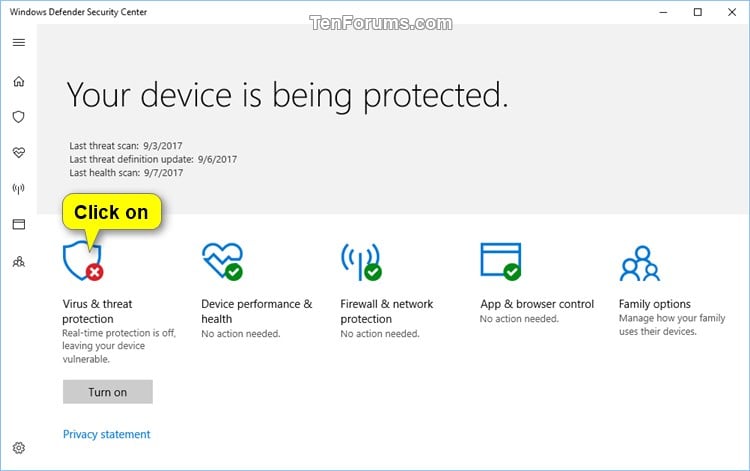
3 Click/tap on the Turn on button under the Virus & threat protection icon, and go to step 5 below. (see screenshot below)
4 Click/tap on the Virus & threat protection icon. (see screenshot below)
A) Click/tap on the Manage settings link under Virus & threat protection settings. (see screenshot below)
B) Turn on Real-time Protection, and go to step 5 below. (see screenshot below)
5 Click/tap on Yes when prompted by UAC.
6 You can now close Windows Security if you like.
If you use this option to turn off real-time protection for Microsoft Defender Antivirus, it will only be temporary. When it's off for a while, Windows will turn it back on automatically.
Option Five and Option Six below will override this option.
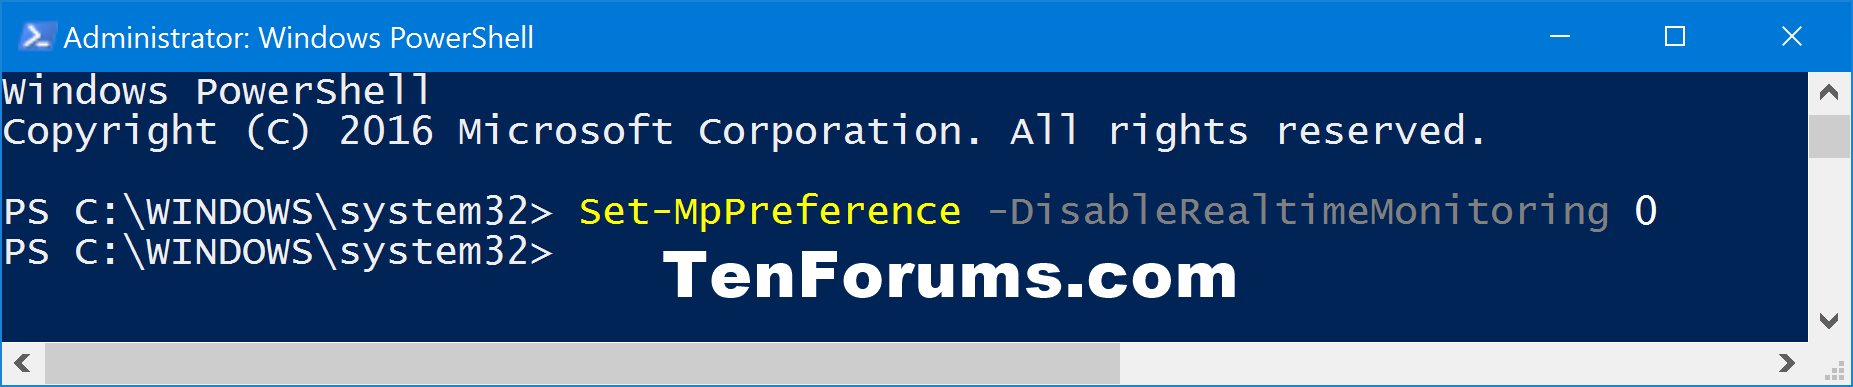
1 Open an elevated PowerShell.
2 Enter the command below you want to use into PowerShell, and press Enter. (see screenshots below)
(Turn on)
Set-MpPreference -DisableRealtimeMonitoring 0
or
Set-MpPreference -DisableRealtimeMonitoring $false
OR
(Turn off)
Set-MpPreference -DisableRealtimeMonitoring 1
or
Set-MpPreference -DisableRealtimeMonitoring $true
3 When finished, you can close PowerShell if you like.
If you use this option to turn off real-time protection for Microsoft Defender Antivirus, it will only be temporary. When it's off for a while, Windows will turn it back on automatically.
Option Five and Option Six below will override this option.
1 Open an elevated command prompt.
2 Enter the command below you want to use into the elevated command prompt, and press Enter.
(Turn on)
PowerShell Set-MpPreference -DisableRealtimeMonitoring 0
or
PowerShell Set-MpPreference -DisableRealtimeMonitoring $false
OR
(Turn off)
PowerShell Set-MpPreference -DisableRealtimeMonitoring 1
or
PowerShell Set-MpPreference -DisableRealtimeMonitoring $true
3 When finished, you can close the elevated command prompt if you like.
The Local Group Policy Editor is only available in the Windows 10 Pro, Enterprise, and Education editions.
All editions can use Option Six below.
This option is the same as Option Six below, and will let you disable Windows Defender Real-time Protection without being prompted it is turned off, and without it getting automatically turned back on later by Windows.
When disabled, you will not be able to do Option One, Option Two, Option Three, or Option Four.
1 Open the Local Group Policy Editor.
2 In the left pane of Local Group Policy Editor, navigate to the location below. (see screenshot below)
Computer Configuration/Administrative Templates/Windows Components/Microsoft Defender Antivirus/Real-time Protection
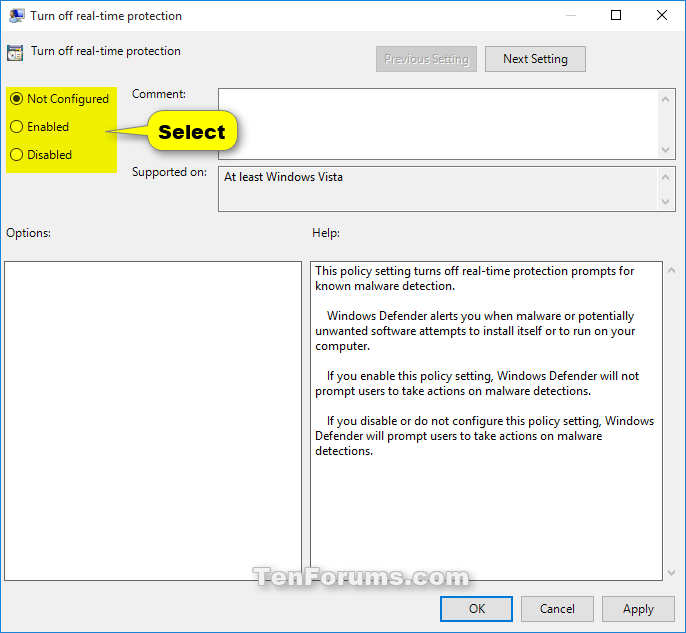
3 In the right pane of Real-time Protection in Local Group Policy Editor, double click/tap on the Turn off real-time protection policy to edit it. (see screenshot above)
4 Do step 5 (enable) or step 6 (disable) below for what you would like to do.
A) Select (dot) Not Configured or Disabled, click/tap on OK, and go to step 7 below. (see screenshot below)
Not Configured is the default setting.
7 When finished, you can close the Local Group Policy Editor if you like.
This option is the same as Option Five above and will let you disable Windows Defender Real-time Protection without being prompted it is turned off, and without it getting automatically turned back on later by Windows.
When disabled, you will not be able to do Option One, Option Two, Option Three, or Option Four.
The downloadable .reg files below will add and modify the DWORD value in the registry key below.
HKEY_LOCAL_MACHINE\SOFTWARE\Policies\Microsoft\Windows Defender\Real-Time Protection
DisableRealtimeMonitoring DWORD
(delete) = enable
1 = disable
1 Do step 2 (enable) or step 3 (disable) below for what you would like to do.
This is the default setting.
A) Click/tap on the Download button below to download the file below, and go to step 4 below.
Enable_Windows_Defender_Real-Time_Protection.reg
Download
A) Click/tap on the Download button below to download the file below, and go to step 4 below.
Disable_Windows_Defender_Real-Time_Protection.reg
Download
4 Save the .reg file to your desktop.
5 Double click/tap on the downloaded .reg file to merge it.
6 When prompted, click/tap on Run, Yes (UAC), Yes, and OK to approve the merge.
7 Restart the computer to apply.
8 If you like, you can now delete the downloaded .reg file.
That's it,
Shawn
Related Tutorials
- How to Turn On or Off Windows Defender in Windows 10
- How to Turn On or Off Windows 10 Limited Periodic Scanning with Windows Defender
- How to Enable or Disable Windows Defender Block at First Sight in Windows 10
- How to Add or Remove Exclusions for Windows Defender in Windows 10
- How to Create a Windows Defender Settings shortcut in Windows 10
- How to Add or Remove Windows Defender context menu in Windows 10
- How to Hide or Show Windows Defender Notification Area Icon in Windows 10
- How to Add or Remove 'Scan with Windows Defender' Context Menu in Windows 10
- How to Enable or Disable Scan Archive Files by Windows Defender in Windows 10
- Enable or Disable Scan Mapped Network Drives with Windows Defender in Windows 10
- Enable or Disable Scan Removable Drives during Windows Defender Full Scan in Windows 10
- How to Manually Scan Files, Folders, and Drives with Windows Defender in Windows 10
- How to Enable or Disable Windows Defender Exploit Guard Controlled Folder Access in Windows 10
- How to Add Windows Defender Antivirus to Control Panel in Windows 10
- Hide or Show Virus and Threat Protection in Windows Defender Security Center in Windows 10
- How to Turn On or Off Windows Defender Block Suspicious Behaviors in Windows 10
- How to Update Security Intelligence Definition Version for Windows Defender Antivirus in Windows 10
- How to Find Windows Defender Antivirus Version in Windows 10
- How to Enable or Disable Scan Network Files with Windows Defender Antivirus in Windows 10
- How to Enable or Disable Microsoft Defender Antivirus Potential Unwanted App (PUA) Protection in Windows 10
- Enable or Disable Microsoft Defender Antivirus Updates Over Metered Connections in Windows 10
Turn On or Off Real-time Protection for Microsoft Defender Antivirus
-
New #1
Tutorial updated for Windows 10 Technical Preview build 10074.
 NoteIn Windows 10 Technical Preview build 10074, you can turn off Windows Defender real-time protection temporarily, but it's off for a while, Windows will turn it back on automatically.
-
New #2
You can disable Windows Defender Real-time Protection in Local Group Policy Editor (Run: gpedit.msc then select: Computer Configuration/Administrative Templates/Windows Components/Windows Defender/Real-time Protection and enable the "Turn off Real-time Protection" setting). It won't turn back on automatically and Windows Defender doestn't even notice that there's something wrong (it will stay green).
-
-
New #4
You could also use this below to completely disable Windows Defender. :)
https://www.tenforums.com/tutorials/5...dows-10-a.html
-
New #5
-
New #6
Agreed. Tutorial updated to add this. :)Last edited by Brink; 06 Jul 2015 at 13:33. Reason: update
-
New #7
Using the merge registry to enable WD on the above method, have noticed that while running Emsisoft Emergency Kit (EEK) that the registry created by the utility (Enable_Windows_Defender_Real-Time_Protection.reg) is when EEK is run listed as a (from the log file):
Scan start: 11/8/2015 10:44:19 PMValue: HKEY_USERS\S-1-5-21-2610782532-1500699501-3633152452-1000\SOFTWARE\MICROSOFT\WINDOWS\CURRENTVERSION\RUN -> WINDOWS DEFENDER detected: Backdoor.Win32.BlackShades (A)
realizing this may be a false/positive curious as to why it would see the registry file as such.
-
-
-
New #9
On an upgrade to W10 from W7 the WD icon didn't show so I used the above utility to enable it. Then a little later ran EEK it latched on the registry file the utility created showing it as a BackDoor.BlackShades. Let me make this clear the BackDoor did not show in EEK til I ran the utility. It did not show prior to running the utility. The utility itself creates the registry file that EEK finds as a Trojan. I can remove the reg file and EEK shows nothing I can re-run the utility and EEK will again show it as a Trojan.
I am aware of the fact that malware likes to disable A/V but this particular issue is caused by triggering the icon to show in the task bar.

Turn On or Off Real-time Protection for Microsoft Defender Antivirus
How to Enable or Disable Real-time Protection for Microsoft Defender Antivirus in Windows 10Published by Shawn BrinkCategory: Security System
02 Feb 2021


 Quote
QuoteTutorial Categories

Related Discussions
