

How to Add Custom Shortcuts to Win+X Quick Link Menu in Windows 10
The Win+X Quick Link menu is a pop-up menu from the Start button that includes shortcuts of common management, configuration, and other power user Windows tools.
This tutorial will show you how to add any custom shortcuts you want to the Win+X Quick Link menu for your account in Windows 10.
For a Windows 11 version of this tutorial, see:
Add Custom Shortcuts to Win+X Quick Link Menu in Windows 11
EXAMPLE: Default shortcuts and groups on Win+X Quick Link menu
Here's How:
1 Download the hashlnk_0.2.0.0.zip file by Rafael Rivera on GitHub.
2 Unblock the hashlnk_0.2.0.0.zip file.
3 Extract (drag and drop) the hashlnk.exe file from the hashlnk_0.2.0.0.zip file, and save the hashlnk.exe file to where (ex: Desktop) you like.
4 Open File Explorer (Win+E).
5 Copy and paste %LocalAppdata%\Microsoft\Windows\WinX into the address bar of File Explorer, and press Enter.
6 Open the Group1 (bottom), Group2 (middle), or Group3 (top) folder for the Win+X Quick Link menu group you want to add a shortcut to. (see screenshot below)
If you would like to add more group(s) to the top of the Win+X menu, then you can create a new Group4, Group5, etc... folder to open and add shortcuts to.
7 Create a shortcut for any app or item (ex: "Registry Editor") you want in this Group1, Group2, Group3, etc... folder. Leave this File Explorer window open. (see screenshots below)
If you wanted to remove a shortcut from your Win+X Quick Link menu, you can just delete the shortcut from the Group1, Group2, Group3, etc... folder, and go to step 11.
- Complete List of Windows 10 Shell Commands
- List of Shortcuts to Directly Open Pages in Settings in Windows 10
- List of Commands to Open Microsoft Store Apps in Windows 10
- How to Create Shortcuts to Open Control Panel Items in Windows 10
- Complete List of Windows 10 CLSID Key (GUID) Shortcuts
- List of Rundll32 Commands for Windows 10


8 Open a command prompt.
9 Perform the following actions in the command prompt: (see screenshot below)
A) Copy and paste the full path wrapped in quotes of the hashlnk.exe file from step 3 into the command prompt.
B) Add a Space after the path above.
C) Copy and paste the full path wrapped in quotes of the new shortcut from step 7 into the command prompt.
D) Press Enter.
For example:
"C:\Users\Brink\Desktop\hashlnk.exe" "C:\Users\Brink\AppData\Local\Microsoft\Windows\WinX\Group2\Registry Editor.lnk"
10 You can now close the command prompt and File Explorer if you like, and delete the hashlnk.exe file from step 3 if you like.
11 Restart the explorer process or sign out and sign in to apply your changes to the Win+X Quick Link menu.
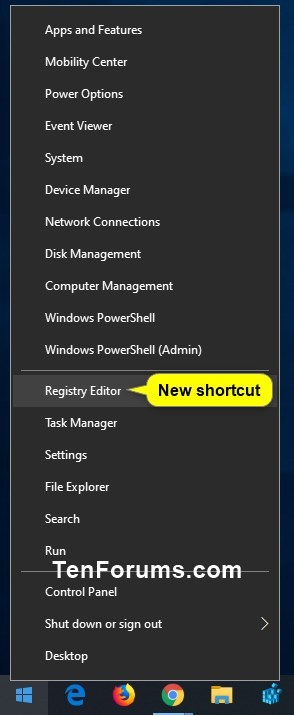
12 You can now open your Win+X Quick Link menu to see your new shortcut (ex: "Registry Editor") added. (see screenshot below)
That's it,
Shawn Brink
Related Tutorials
- How to Open Win+X Quick Link Menu in Windows 10
- How to Add or Remove Default Items on Win+X Quick Link Menu in Windows 10
- How to Rename Shortcuts in Win+X Quick Link Menu in Windows 10
- How to Add Win+X Classic Menu to context menu in Windows 10
- How to Show Command Prompt or Windows PowerShell on Win+X menu in Windows 10
- How to Add or Remove Control Panel on Win+X Menu in Windows 10
- How to Add or Remove Settings on Win+X Menu in Windows 10
- Open Apps and Features from Win+X Menu to Control Panel or Settings in Windows 10
- How to Open Power Options from Win+X Menu to Control Panel or Settings in Windows 10
- How to Open System from Win+X Menu to Control Panel or Settings in Windows 10
- How to Change Network Connections in Win+X to Open from Control Panel or Settings in Windows 10
Add Custom Shortcuts to Win+X Quick Link Menu in Windows 10
-
New #1
une question, what does the hashlnk.exe file do? and what if ...in the example "C:\Users\Brink\Desktop\hashlnk.exe" "C:\Users\Brink\AppData\Local\Microsoft\Windows\WinX\Group2\Registry Editor.lnk"
i do NOT use the full path of the link i copied into 1/2/3 groups but i choose to keep all the links for example in the DESKTOP and i replace the pathname with the one who links to the desktop?
...sorry but, basically i think that the command at point 9 creates the LABEL linked to the real shortcut, but the real shortcut can also be outside there 3 folders, am i right? shortcuts can be anywhere in the hd the important thing is to write "C:\Users\Brink\Desktop\hashlnk.exe" "C:\realPathName"
-
New #2
Hello realista87,
Shortcuts for the Win+X menu won't work unless they are hash files. The hashlink.exe file is a command tool that will make the shortcut a hash file.
The shortcuts need to be in the 1/2/3 group folders when you use the hashlink.exe file (command) on them, or they will not work or be in the Win+X menu.
-
New #3
-
-
New #5
Hello Brink and thanks a lot! :)
I have also found that the name of the shortcut in the Win+X menu is first of all taken from the "Comment" part found in the shortcut properties. If the comment is empty it is taken from the name of the .lnk file. And if the shortcut is already in the menu, we can simply add a comment (or rename it) and restart the explorer process (no need of hashlnk.exe for this).
UPDATES:
I have played with it for a while and this is what I have found out so far. Use it as you wish... and BACKUP first.
Update 1: The folder does not have to be called "Group" and it is in ASCENDING alphabetical order. Eg. The folder "00 Group" will be at the very bottom (numbers go first), followed by the "Group1" folder above. The folder "Other shortcuts" will be the next and the folder "ZZZZZ" is going to be at the top.
Update 2: The same goes with the shortcuts within the folder. As the "comment" is primary for the name, we can set the order by the shortcut names and give it the name in the comment part of the properties. Eg. "01-Something.lnk", "02-Something else.lnk", "03-My shortcut at the top.lnk". And their specific names are in the comments.
Update 3: If you want to split the groups by "a double line", just create an empty folder between them. Eg. A double line between folders "Group3" and Group4" will be created by an empty folder called (for example) "Group3B".
Update 4: If you want a shorter list of the Win-X menu, you can simply "hide" the shortcuts you do not use. Simply create a new folder in the existing folder and move the shortcut there, you can easily restore it back whenever you need. Eg. I don't use the "File Explorer" in "Group2", so I created a new folder in that folder and moved the File Explorer.lnk there.
Update 5: Whatever folders and shortcuts you have, there will always be "Shut down or sign out" as the second from the bottom. I would prefer it to be at the bottom. Not sure where it comes from (registry?), but I can live with it. Somehow... :)
Just restart the explorer process to apply any changes.
(I found out the alphabetical order when I moved some of the default shortcuts into another folder and it became something like "4 - Services", after I refreshed the folder it came back to it's common name.)Last edited by me22dec; 07 Mar 2019 at 18:10.
-
New #6
Last edited by Brink; 07 Mar 2019 at 17:53.
-
New #7
Hashlink did not work for me
When I tried this I typed:
"C:\Users\Kenneth\Desktop\hashlnk.exe" "C:\Users\Kenneth\AppData\Local\Microsoft\Windows\WinX\Group2\Control Panel.lnk"
It failed and I got this:
The code execution cannot proceed because MSVCR100.dll was not found. Reinstalling the program may fix this problem.
-
New #8
Hello,
MSVCR100.dll is a Microsoft Visual C++ file that is a system file of Windows.
It's located at: "C:\Windows\System32\msvcr100.dll"
It looks to be missing from the error you got, so you could try running a SFC /SCANNOW command to see if it may be able to fix/replace the file.
Run SFC Command in Windows 10
-
-
New #9
I got the file from somewhere and it still gave me the same error. I found another program called WinX Editor which worked.
Now after creating the shortcuts with WinX Editor I have saved them and used them in other computers.Last edited by IndieArchive; 01 Jan 2020 at 02:59.

Add Custom Shortcuts to Win+X Quick Link Menu in Windows 10
How to Add Custom Shortcuts to Win+X Quick Link Menu in Windows 10Published by Shawn BrinkCategory: Customization
11 Oct 2022


 Quote
Quote


Tutorial Categories

Related Discussions
