

How to Enable or Disable Privacy Settings Experience at Sign-in in Windows 10
In Windows 10, you can choose how much information you want to share with Microsoft by changing your privacy settings.
With Microsoft's continuing commitment to your privacy with Windows 10, it's important to make sure your privacy settings are also ready. If youre updating your device to a new Windows 10 version, you may be prompted to review or choose your privacy settings after the update when you sign in with an administrator account.
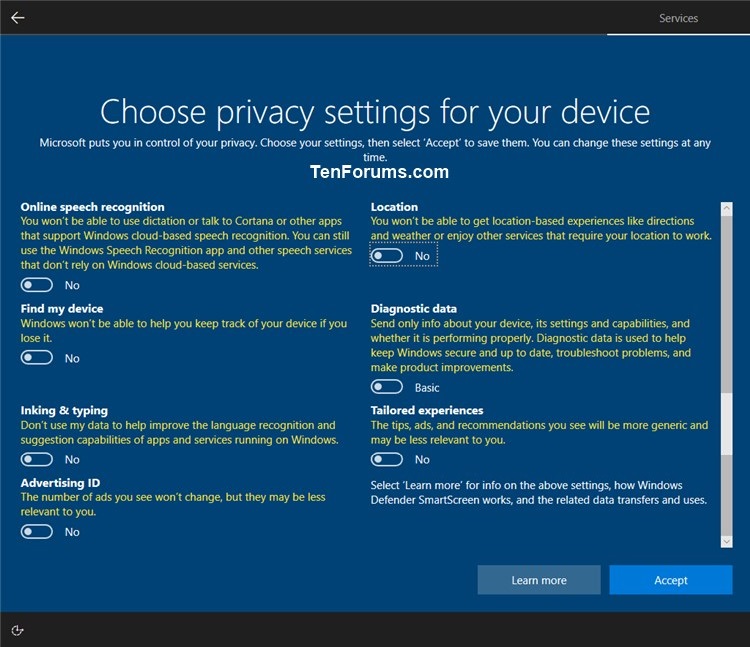
Starting with Windows 10 version 1809, when signing in to a new user account for the first time or after an upgrade (ex: new build or version of Windows 10), that user will be presented with a screen that prompts the user to review or choose privacy settings for their account. This is called the privacy settings experience.
Users will always be able to change their privacy settings at anytime in Windows 10.
- How to Turn On or Off Online Speech Recognition in Windows 10
- How to Turn On or Off Location Service in Windows 10
- How to Turn On or Off Find My Device in Windows 10
- How to Change Diagnostic and Usage Data Settings in Windows 10
- How to Turn On or Off Improve Inking & Typing Recognition in Windows 10
- How to Turn On or Off Tailored experiences with diagnostic data in Windows 10
- How to Enable or Disable Let Apps use Advertising ID for Relevant Ads in Windows 10
While the privacy settings experience is helpful to make sure users review their privacy settings in case they may have been reset after an update, you may find it annoying and want to disable the privacy settings experience.
This tutorial will show you how to enable or disable launching the privacy settings experience at sign-in for all users in Windows 10.
You must be signed in as an administrator to enable or disable launching the privacy settings experience at sign-in.
For a Windows 11 version of this tutorial, see:
Enable or Disable Choose Privacy Settings Experience at Sign-in in Windows 11
- Option One: Enable or Disable Privacy Settings Experience at Sign-in in Local Group Policy Editor
- Option Two: Enable or Disable Privacy Settings Experience at Sign-in using a REG file
EXAMPLE: Privacy settings experience at sign-in

All editions can use Option Two.
1. Open the Local Group Policy Editor.
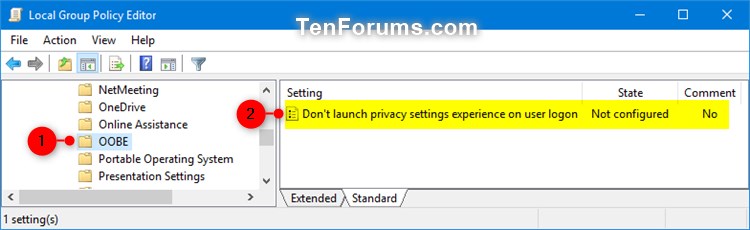
2. In the left pane of Local Group Policy Editor, navigate to the location below. (see screenshot below)
Computer Configuration\Administrative Templates\Windows Components\OOBE
3. In the right pane of OOBE, double click/tap on the Don't launch privacy settings experience on user logon policy to edit it. (see screenshot above)
4. Do step 5 (enable) or step 6 (disable) below for what you would like to do.
A) Select (dot) either Not Configured or Disabled, click/tap on OK, and go to step 7 below. (see screenshot below)
7. When finished, you can close Local Group Policy Editor if you like.
HKEY_LOCAL_MACHINE\SOFTWARE\Policies\Microsoft\Windows\OOBE
DisablePrivacyExperience DWORD
(delete) = Enable
1 = Disable
1. Do step 2 (enable) or step 3 (disable) below for what you would like to do.
A) Click/tap on the Download button below to download the file below, and go to step 4 below.
Enable_Privacy_settings_experience_on_user_logon.reg
Download
A) Click/tap on the Download button below to download the file below, and go to step 4 below.
Disable_Privacy_settings_experience_on_user_logon.reg
Download
4. Save the .reg file to your desktop.
5. Double click/tap on the downloaded .reg file to merge it.
6. When prompted, click/tap on Run, Yes (UAC), Yes, and OK to approve the merge.
7. You can now delete the downloaded .reg file if you like.
That's it,
Shawn Brink
Enable or Disable Privacy Settings Experience at Sign-in in Windows 10

Enable or Disable Privacy Settings Experience at Sign-in in Windows 10
How to Enable or Disable Privacy Settings Experience at Sign-in in Windows 10Published by Shawn BrinkCategory: User Accounts
19 Jan 2023

Tutorial Categories

Related Discussions
