

How to Set Default Start Layout for Users in Windows 10
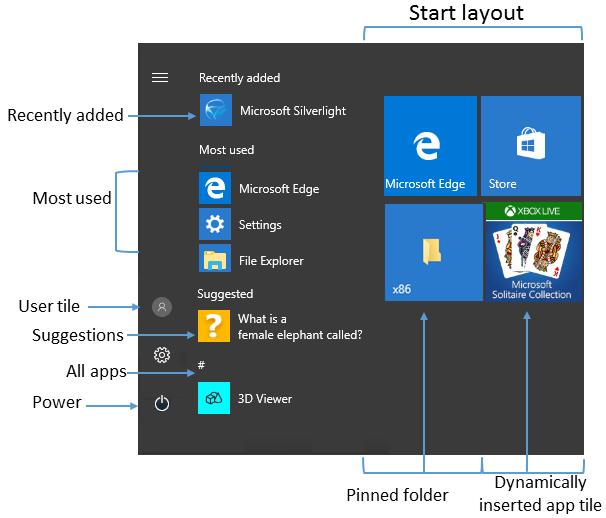
The layout of your Start menu includes full screen or not Start, pinned items, how the tiles of pinned items are sized, arranged into groups, group names, and used in Live Folders.
If you like, you can specify a default Start layout in Windows 10 for users and prevent them from changing it.
This tutorial will show you how to set a default Start screen layout for specific or all users in Windows 10.
This policy doesn't affect users from being able to resize the Start menu.
You must be signed in as an administrator to set a default Start layout.
Contents
- In Preparation: To Export a Start Layout
- Option One: Set Default Start Layout for All Users in Local Group Policy Editor
- Option Two: Set Default Start Layout for Specific Users in Local Group Policy Editor
- Option Three: Set Default Start Layout for All Users in Registry Editor
EXAMPLE: Start layout in Windows 10
1 Set the Start layout to resize the Start menu or full screen Start, pinned items, how the tiles of pinned items are sized, arranged into groups, group names, and used in Live Folders for how you want it to be applied to users.
2 When finished, open PowerShell.
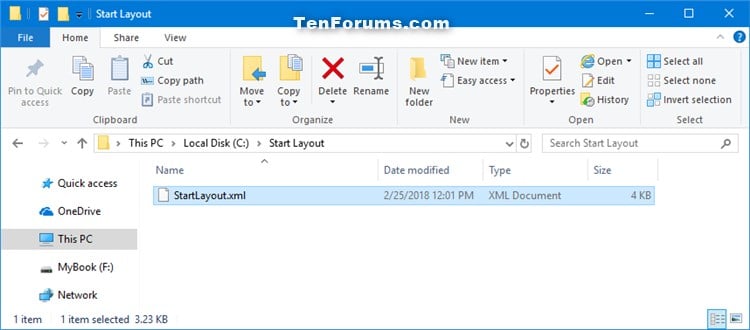
3 Copy and paste the command below into PowerShell, and press Enter to export the Start layout as a StartLayout.xml file on your desktop. (see screenshot below)
Export-StartLayout -Path "$env:UserProfile\Desktop\StartLayout.xml"
4 You can close the PowerShell window if you like.
5 Move this StartLayout.xml file from your desktop to where you want to keep it saved at (ex: "C:\Start Layout"). (see screenshot below)
6 Make note of the full path of this StartLayout.xml file (ex: "C:\Start Layout\StartLayout.xml"). You will need to know this in Option One,
Option Two, or Option Three below.
The Local Group Policy Editor is only available in the Windows 10 Pro, Enterprise, and Education editions.
All editions can use Option Three below.
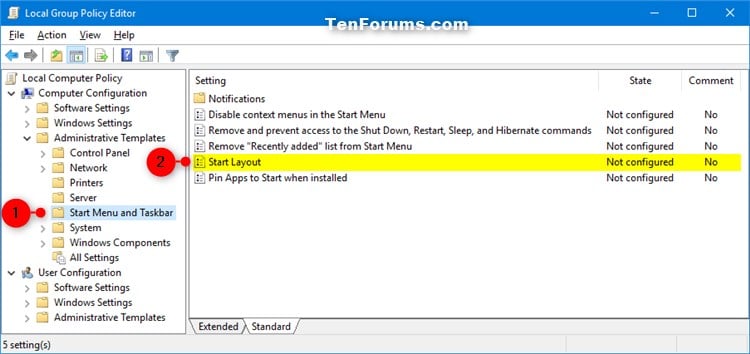
1 Open the Local Group Policy Editor.
2 In the left pane of the Local Group Policy Editor, click/tap on to expand Computer Configuration, Administrative Templates, and Start Menu and Taskbar. (see screenshot below)
3 In the right pane of Start Menu and Taskbar, double click/tap on the Start Layout policy to edit it. (see screenshot above)
4 Do step 5 (set) or step 6 (unset) below for what you would like to do.
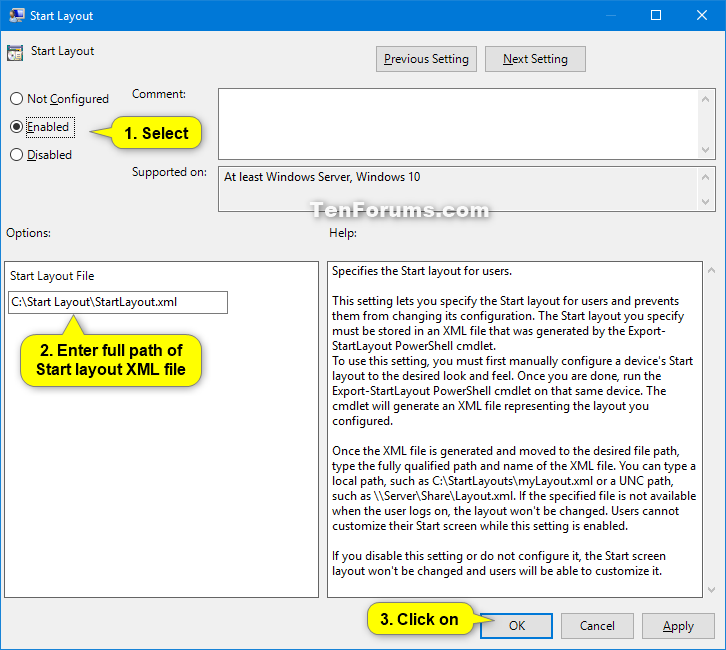
A) Select (dot) Enabled. (see screenshot below)
B) Enter the full path of the StartLayout.xml file (ex: "C:\Start Layout\StartLayout.xml") from In Preparation above into the Start Layout File field in Options.
C) Click/tap on OK, and go to step 7 below.
A) Select (dot) Not Configured or Disabled, click/tap on OK, and go to step 7 below. (see screenshot below)
Not Configured is the default setting.
7 Close the Local Group Policy Editor.
8 Restart the computer to apply.
The Local Group Policy Editor is only available in the Windows 10 Pro, Enterprise, and Education editions.
All editions can use Option Three below.
1 Open the all users, specific users or groups, or all users except administrators Local Group Policy Editor for how you want this policy applied.
2 In the left pane of the Local Group Policy Editor, click/tap on to expand User Configuration, Administrative Templates, and Start Menu and Taskbar. (see screenshot below)
3 In the right pane of Start Menu and Taskbar, double click/tap on the Start Layout policy to edit it. (see screenshot above)
4 Do step 5 (set) or step 6 (unset) below for what you would like to do.
A) Select (dot) Enabled. (see screenshot below)
B) Enter the full path of the StartLayout.xml file (ex: "C:\Start Layout\StartLayout.xml") from In Preparation above into the Start Layout File field in Options.
C) Click/tap on OK, and go to step 7 below.
A) Select (dot) Not Configured or Disabled, click/tap on OK, and go to step 7 below. (see screenshot below)
Not Configured is the default setting.
7 Close the Local Group Policy Editor.
8 Restart the computer to apply.
1 Press the Win + R keys to open Run, type regedit into Run, and click/tap on OK to open Registry Editor.
2 Navigate to the key below in the left pane of Registry Editor. step 5 (undo) below. (see screenshot below)
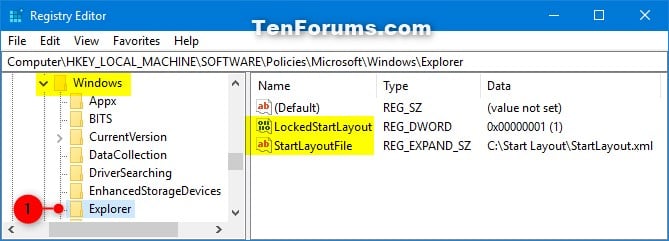
HKEY_LOCAL_MACHINE\SOFTWARE\Policies\Microsoft\Windows\Explorer
If you do not have an Explorer key, then right click on the Windows key, click/tap on New, click/tap on Key, type Explorer for the name, and press Enter.
3 Do step 4 (set) or step 5 (unset) below for what you would like to do.
A) In the right pane of the Explorer key, double click/tap on the LockedStartLayout DWORD value to modify it. (see screenshot below step 2)
If you do not have a LockedStartLayout DWORD, then right click on an empty area in the right pane of the Explorer key, click/tap on New, click/tap on DWORD (32-bit) Value, type LockedStartLayout for the name, and press Enter.
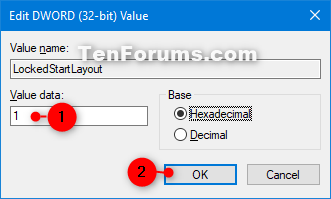
B) Type 1, and click/tap on OK. (see screenshot below)
This prevents users from being able to change the Start layout. Setting this to 0 instead, will allow them to.
C) In the right pane of the Explorer key, double click/tap on the StartLayoutFile REG_EXPAND_SZ value to modify it. (see screenshot below step 2)
If you do not have a StartLayoutFile REG_EXPAND_SZ, then right click on an empty area in the right pane of the Explorer key, click/tap on New, click/tap on Expandable String Value, type StartLayoutFile for the name, and press Enter.
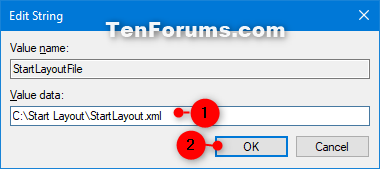
D) Enter the full path of the StartLayout.xml file (ex: "C:\Start Layout\StartLayout.xml") from In Preparation above, click/tap on OK, and go to step 6 below. (see screenshot below)
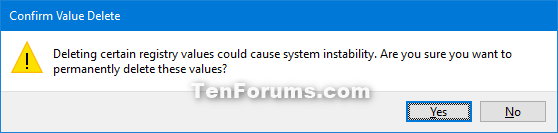
A) In the right pane of the Explorer key, select and right click on the LockedStartLayout DWORD StartLayoutFile REG_EXPAND_SZ values, and click/tap on Delete. (see screenshot below step 2)
B) Click/tap on Yes to confirm, and go to step 6 below. (see screenshot below)
6 Close Registry Editor.
7 Restart the computer to apply.
That's it,
Shawn
Related Tutorials
- How to Enable or Disable Changing Start Layout in Windows 10
- How to Backup and Restore Start Menu Layout in Windows 10
- How to Reset Start Menu Layout to Default in Windows 10
Set Default Start Layout for Users in Windows 10
-
New #1
Hello,
Thanks for the post. However following option 3 (to use in a script) it only makes the changes for the admin account and not all users. What am I missing?
Thanks,
YonY
-
New #2
Hello YonY, and welcome to Ten Forums.
Just to verify, did you do the "In Preparation" section to get the .xml file, and restart the computer after doing Option 3?
-
New #3
Hello Brink! Thanks for the quick response. I love this site BTW! You guys rock!
I had my previously exported xml file I was using but to be sure I followed the "in preparation" section again with the same result. Yes I restarted few times. Also, I'm using a local user account with administrator privilege. We rename and disable the local administrator account.
Let me know if you have any other tips.
Thanks!
-
New #4
I just tested this on my system to see if anything may have changed, and the resizing of the Start is no longer included, but everything else should still be.
If the users don't have an app installed that was included in the Start layout, it won't be available on their Start menu/screen.
Just to verify, did you save the .xml file to the root of your Windows drive?
-
New #5
I moved the xml file to c:\windows\temp folder. Also, I'm just trying to pin standard Windows tools like calculator, My PC, Settings and ControlPanel. I'm also working with an MDT image (Windows 10 1803 OS Build 17134.407)
-
New #6
Test with the .xml file located at "C:\Windows" instead to see if that makes a difference. Be sure to change the registry values for it.
-
New #7
That was the trick! Good catch! I thought Windows\Temp would be accessible. Thanks a lot Brink!
One more quick question. How about the task bar? I would like to just have Edge and File Explorer pinned for All Users. Let me know if there's a different thread I should join or if I should start one.
-
New #8
Great news.
I suppose you could backup and restore the pinned taskbar items, then disable "Pin to taskbar" and "Unpin from taskbar" to prevent change.
Backup and Restore Pinned Apps on Taskbar in Windows 10 | Tutorials
Enable or Disable Pin and Unpin Apps on Taskbar in Windows | Tutorials
-
-
New #9
C:\>powershell Export-StartLayout -Path "C:\layout.xml"
From size (503 bytes) of resultant file we know that the file is worthless.
Just a few elements, ONE of which contains content.
<StartLayoutCollection>
<defaultlayout:StartLayout GroupCellWidth="6" />
</StartLayoutCollection>
Ideas?
Set Default Start Layout for Users in Windows 10
How to Set Default Start Layout for Users in Windows 10Published by Shawn BrinkCategory: Customization
06 Jan 2020


 Quote
QuoteTutorial Categories

Related Discussions
