

How to Create a Windows Security Shortcut in Windows 10
Windows 10 includes Windows Security, which provides the latest antivirus protection. Your device will be actively protected from the moment you start Windows 10. Windows Security continually scans for malware (malicious software), viruses, and security threats. In addition to this real-time protection, updates are downloaded automatically to help keep your device safe and protect it from threats.
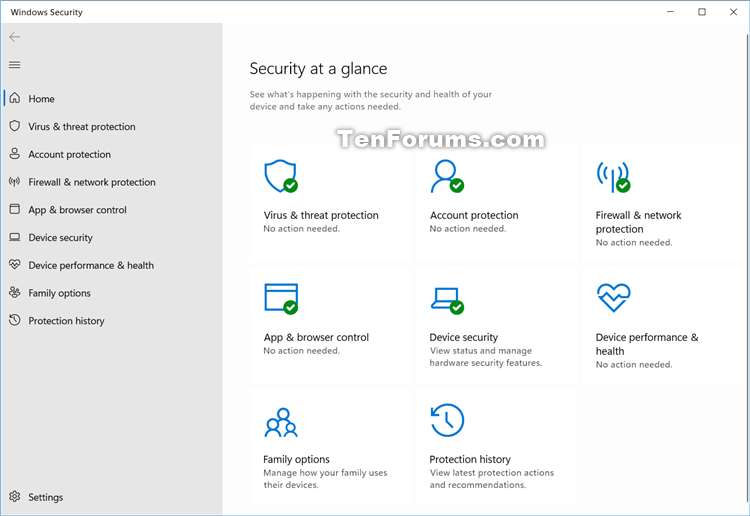
Windows Security is your home to manage the tools that protect your device and your data:
- Virus & threat protection - Monitor threats to your device, run scans, and get updates to help detect the latest threats. (Some of these options are unavailable if you're running Windows 10 in S mode.)
- Account protection - Access sign-in options and account settings, including Windows Hello and dynamic lock.
- Firewall & network protection - Manage firewall settings and monitor whats happening with your networks and internet connections.
- App & browser control - Update settings for Microsoft Defender SmartScreen to help protect your device against potentially dangerous apps, files, sites, and downloads. You'll have exploit protection and you can customize protection settings for your devices.
- Device security - Review built-in security options to help protect your device from attacks by malicious software.
- Device performance & health - View status info about your devices performance health, and keep your device clean and up to date with the latest version of Windows 10.
- Family options - Keep track of your kids online activity and the devices in your household.
- Protection history - The Protection History page in the Windows Security app is where you can go to view actions that Microsoft Defender Antivirus has taken on your behalf, Potentially Unwanted Apps that have been removed, or key services that are turned off.
- Security providers - Manage the apps and services that protect your device.
- Notifications - Windows Security will send notifications and critical information about the health and security of your device. You can specify which informational notifications you want.
This tutorial will show you how to create or download a Windows Security shortcut in Windows 10.
Contents
- Option One: To Download a Windows Security Shortcut
- Option Two: To Manually Create a Windows Security Shortcut
EXAMPLE: Windows Security
1 Click/tap on the Download button below to download the .zip file below.
2 Save the .zip file to your desktop.
3 Unblock the .zip file..
4 Open the .zip file, and extract (drag and drop) the shortcuts you want to your desktop.
5 If you like, you can Pin to Taskbar, Pin to Start, add to All apps, add to Quick Launch, assign a keyboard shortcut to, or move the shortcut(s) to where you like for easy use.
6 When finished, you can delete the downloaded .zip file if you like.
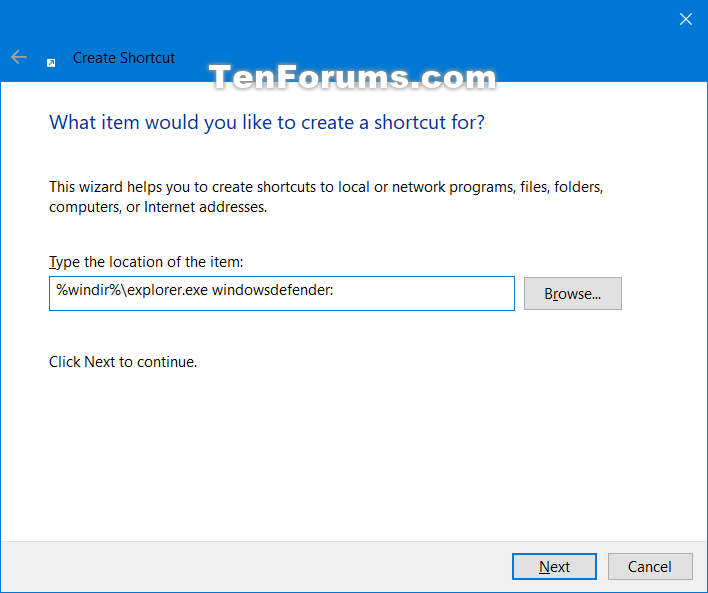
1 Right click or press and hold on an empty area on your desktop, and click/tap on New and Shortcut.
2 Copy and paste the location below you want into the location area, and click/tap on Next. (see screenshot below)
(Windows Security - Home)
%windir%\explorer.exe windowsdefender:
(Virus & threat protection)
%windir%\explorer.exe windowsdefender://threat
(Account protection)
%windir%\explorer.exe windowsdefender://account
(Firewall and network protection)
%windir%\explorer.exe windowsdefender://network
(App & browser control)
%windir%\explorer.exe windowsdefender://appbrowser
(Device security)
%windir%\explorer.exe windowsdefender://devicesecurity
(Device performance & health)
%windir%\explorer.exe windowsdefender://perfhealth
(Family options)
%windir%\explorer.exe windowsdefender://family
(Protection history)
%windir%\explorer.exe windowsdefender://history
(Security providers)
%windir%\explorer.exe windowsdefender://providers
(Notifications)
%windir%\explorer.exe windowsdefender://settings
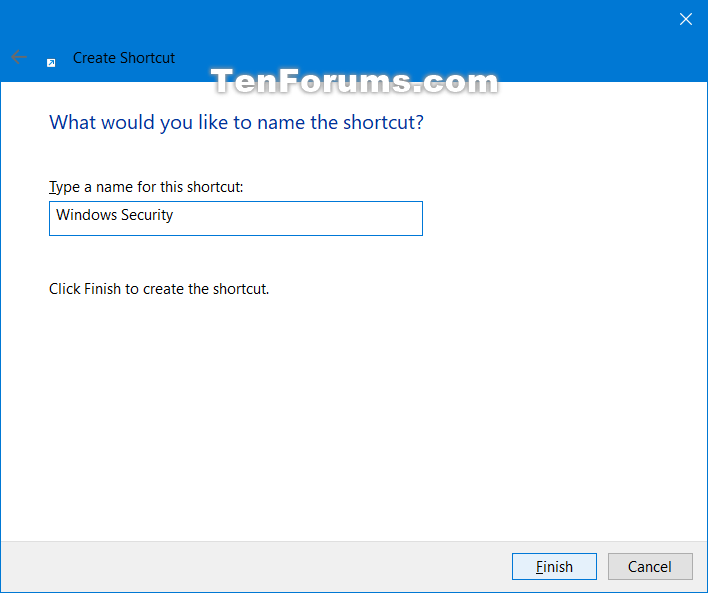
3 Type Windows Security for the name, and click/tap on the Finish button. (see screenshot below)
You can name this shortcut anything you would like though.
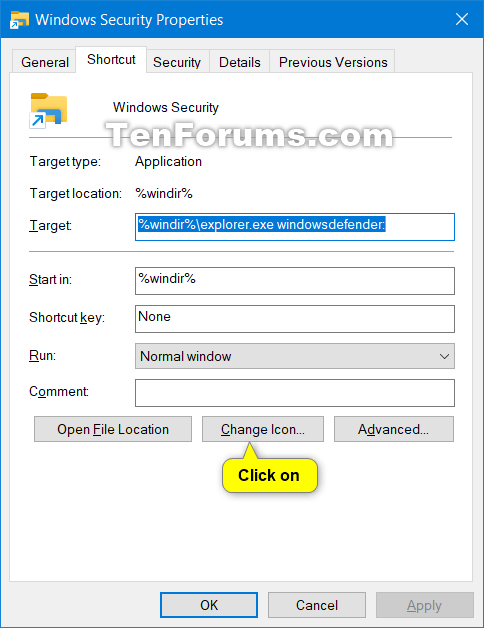
4 Right click or press and hold on the new Windows Security shortcut, and click/tap on Properties.
5 Click/tap on the Shortcut tab, then click/tap on the Change Icon button. (see screenshot below)
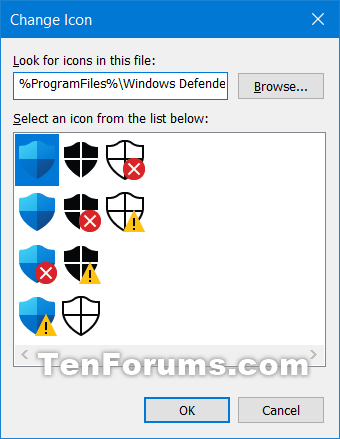
6 In the line under "Look for icons in this file", copy and paste the location below, and press Enter. (see screenshot below)
%ProgramFiles%\Windows Defender\EppManifest.dll
7 Select the icon highlighted in blue above, and click/tap on OK. (see screenshot above)
You can use any icon that you would like instead though.
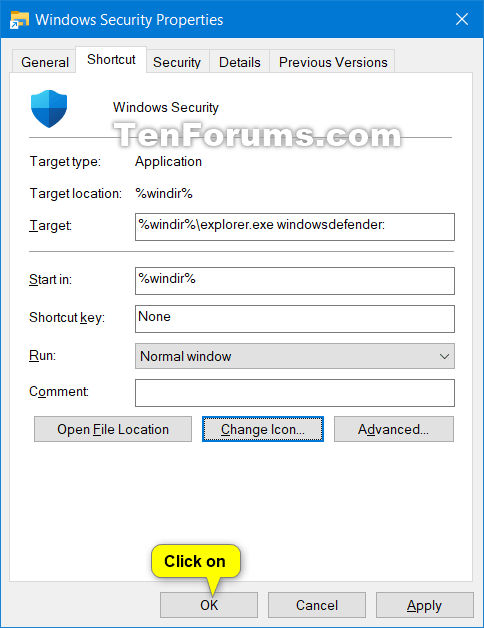
8 Click/tap on OK. (see screenshot below)
9 If you like, you can Pin to Taskbar, Pin to Start, add to All apps, add to Quick Launch, assign a keyboard shortcut to, or move this shortcut to where you like for easy use.
That's it,
Shawn Brink
Related Tutorials
- How to Enable or Disable Windows Security in Windows 10
- How to Open Windows Defender Security Center in Windows 10
- How to Reset Windows Security App in Windows 10
- How to Add or Remove Microsoft Defender context menu in Windows 10
- How to Hide or Show Windows Defender Notification Area Icon in Windows 10
- How to Manually Scan Files, Folders, and Drives with Windows Defender in Windows 10
- How to Create a Microsoft Defender Offline Scan shortcut in Windows 10
- How to Add Windows Security to Control Panel in Windows 10
- How to Add or Remove Windows Security context menu in Windows 10
How to Create a Windows Security Shortcut in Windows 10
-
New #1
I prefer the old (pre anniversary update) interface ... just use this as your link and pop it on your desktop
(or wherever your defender is stored in your Program Files (x86) folder)C:\Program Files\Windows Defender\MSASCui.exe
-
-
New #3
-

How to Create a Windows Security Shortcut in Windows 10
Published by Shawn BrinkCategory: Security System01 Nov 2022


 Quote
Quote

Tutorial Categories

Related Discussions
