

How to Enable or Disable Automatic Repair in Windows 10
If your PC crashes 2 times consecutively or fails to boot, Windows 10 will run Automatic Repair by default during the next startup in an attempt to diagnose and fix your PC. This basically involves automatically running a startup repair.
If you prefer to manually repair you PC, you can disable the automatic repair feature. Disabling the automatic repair feature can also be helpful if you should get stuck in an infinite "preparing automatic repair" loop.
This tutorial will show you how to enable or disable the automatic repair feature at boot in Windows 10.
You must be an administrator to enable or disable automatic repair.
Contents
- Option One: Enable or Disable Automatic Repair in Command Prompt at Boot
- Option Two: Enable or Disable Automatic Repair in Command Prompt in Windows 10
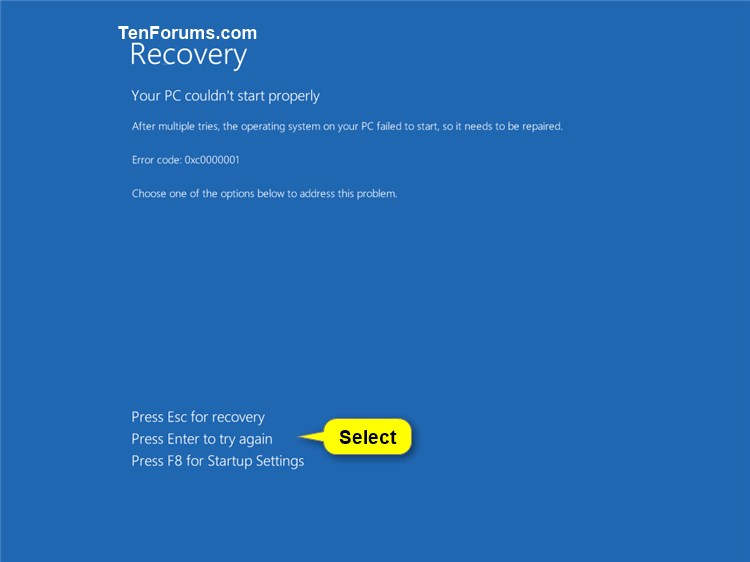
EXAMPLE: Startup Issue when Automatic Repair is Disabled
EXAMPLE: Startup Issue when Automatic Repair is Enabled

1 Open a command prompt at boot.
2 Typebcdeditinto the command prompt at boot, and press Enter. (see screenshot below)
A) Look under the Windows Boot Loader section for your Windows 10 (description), and make note of its identifier (ex: "{default}").
B) In this same section, make note if recoveryenabled is currently set to Yes (enabled) or No (disabled).
3 Type the command below you want to use into the command prompt at boot, and press Enter. (see screenshot above)
(Enable automatic repair - DEFAULT)
bcdedit /set {identifier} recoveryenabled Yes
OR
(Disable automatic repair)
bcdedit /set {identifier} recoveryenabled No
Substitute identifier in the command above with the actual identifier (ex: "{default}") from step 2 above for Windows 10.
For example:bcdedit /set {default} recoveryenabled No
4 When finished, close the command prompt at boot.
5 Click/tap on Continue to exit recovery and start Windows 10. (see screenshot below)
1 Open an elevated command prompt.
2 Typebcdeditinto the elevated command prompt, and press Enter. (see screenshot below)
3 Look under the Windows Boot Loader section for your Windows 10 (description), and make note of its identifier (ex: "{current}").
4 In this same section, make note if recoveryenabled is currently set to Yes (enabled) or No (disabled).
5 Type the command below you want to use into the elevated command prompt, and press Enter. (see screenshot above)
(Enable automatic repair - DEFAULT)
bcdedit /set {identifier} recoveryenabled Yes
OR
(Disable automatic repair)
bcdedit /set {identifier} recoveryenabled No
Substitute identifier in the command above with the actual identifier (ex: "{current}") from step 3 above for Windows 10.
For example:bcdedit /set {current} recoveryenabled No
6 When finished, you can close the elevated command prompt.
That's it,
Shawn
Related Tutorials
- How to Run a Startup Repair in Windows 10
- How to Boot to Advanced Startup Options in Windows 10
- How to Enable or Disable Always Boot to Advanced Startup Settings in Windows 10
- How to Enable or Disable F8 Advanced Boot Options in Windows 10
- How to Start Windows 10 in Safe Mode
- How to Troubleshoot Windows 10 failure to boot using Recovery Environment
- How to Perform a Clean Boot in Windows 10 to Troubleshoot Software Conflicts
- How to Use Macrium Reflect Rescue Media to Fix Windows Boot Issues
- How to Enable or Disable Windows Recovery Environment (WinRE) in Windows 10
Enable or Disable Automatic Repair in Windows 10
-
New #1
not work on my laptop with PowerShell then nowhere is show --->
how do I unlock action is denied with the Powershell.
-
-
New #3
Hey please i disabled it But it says Your PC/device needs to be repaired how Do i fix this problem i watched so many vids But nothing works Do you know how to fix this Also Im stuck at the automatic repair
-
-
New #5
What are the common causes of Windows booting into automatic repair?
What information is available about:
When should it be turned off?
When should it not be turned off?
It was suggested in this thread:
BSOD - kmode_exception_not_handled
Turning off automatic repair in this thread resulted in
Error code: (NTSTATUS) 0xc000000f = {File Not Found} The file %hs does not exist
-
New #6
Hello @zbook,
The cause of Automatic Repair is if you PC crashes 2 times consecutively or fails to boot, Windows 10 will run Automatic Repair by default.
Disabling automatic repair will only mean that you will have to manually run automatic repair if wanted or needed instead if it automatically being run when the above is true.
There really isn't a matter of if when or not it should be enabled or disabled, but just a matter of personal preference.
Disabling automatic repair shouldn't cause any issues at all other than it just will no longer automatically run when the first line above is true.
-
New #7
If there is a chkdsk flag (dirty) that had triggered the automatic repair and automatic repair is turned off does the end user generally get either more info about what had triggered the repair, a normal boot, or a new error code with failure to boot?
If there is a corrupted registry that had triggered the automatic repair and automatic repair is turned off does the end user generally get either more info about what had triggered the repair, a normal boot, or a new error code with failure to boot?
I"m wondering whether it is or is not a useful troubleshooting step when there is a spontaneous first boot automatic repair.
This is what was found via google search:
https://docs.microsoft.com/en-us/win...-boot-problems
It appears that it's best to turn it off to view an error code that triggered it?
-
-
-
New #9
seems both {current} and {default} work, interesting question though, if you disable this recovery, does it make the bootstatuspolicy redundant?

Enable or Disable Automatic Repair in Windows 10
How to Enable or Disable Automatic Repair in Windows 10Published by Shawn BrinkCategory: Performance & Maintenance
03 Jun 2020


 Quote
QuoteTutorial Categories

Related Discussions
