

How to Delete a Storage Pool for Storage Spaces in Windows 10
Storage Spaces helps protect your data from drive failures and extend storage over time as you add drives to your PC. You can use Storage Spaces to group two or more drives together in a storage pool and then use capacity from that pool to create virtual drives called storage spaces. These storage spaces typically store two copies of your data so if one of your drives fails, you still have an intact copy of your data. If you run low on capacity, just add more drives to the storage pool.
This tutorial will show you how to delete a storage pool for Storage Spaces in Windows 10.
You must be signed in as an administrator to delete a storage pool.
You must delete all storage spaces from a storage pool before you will be able to delete the storage pool.
When you delete a storage pool it will remove all added physical disks in the pool, and leave them as unallocated like below for you to disconnect or format.
Issue with some Storage Spaces configurations after updating to Windows 10, version 2004 and Windows Server, version 2004 | Microsoft Support
Workaround and recovery steps for issue with some Parity Storage Spaces after updating to Windows 10, version 2004 and Windows Server, version 2004 | Microsoft Support
Contents
- Option One: To Delete a Storage Pool in Storage Spaces Settings
- Option Two: To Delete a Storage Pool in PowerShell
1 Open Settings, click/tap on the System icon, click/tap on Storage on the left side, and click/tap on the Manage Storage Spaces link on the right side. (see screenshot below)
You can also open the Control Panel (icons view), and click/tap on the Storage Spaces icon instead.
2 Click/tap on the Change settings button, click/tap on Yes if prompted by UAC, and click/tap on the Delete pool link for the storage pool you want to delete. (see screenshot below)
3 Click/tap on Delete pool to confirm. (see screenshot below)
4 The storage pool will now be deleted. (see screenshot below)
1 Open an elevated PowerShell.
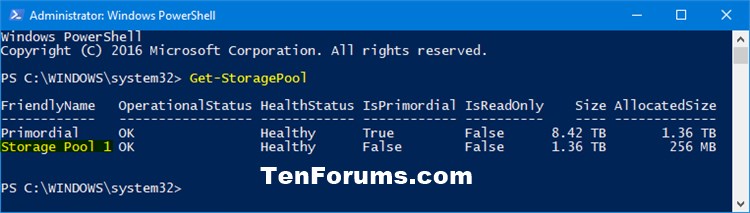
2 Type the command below into the elevated PowerShell, and press Enter. (see screenshot below)
Get-StoragePool
3 Make note of the friendly name (ex: "Storage Pool 1") of the storage pool you want to delete. (see screenshot above)
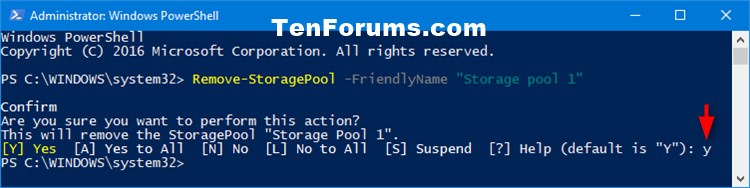
4 Type the command below into the elevated PowerShell, and press Enter. (see screenshot below)
For more Remove-StoragePool command usage options, see: Remove-StoragePool | Microsoft Docs
Remove-StoragePool -FriendlyName "Name"
Substitute Name in the command above with the actual name (ex: "Storage Pool 1") of the storage pool from step 3 above.
For example:Remove-StoragePool -FriendlyName "Storage Pool 1"
5 When prompted in PowerShell, type Y and press Enter to confirm. (see screenshot above)
6 When finished, you can close the elevated PowerShell.
That's it,
Shawn
Related Tutorials
- How to Create Storage Spaces Shortcut in Windows 10
- How to Create a New Pool and Storage Space in Windows 10
- How to Create a Storage Space for Storage Pool in Windows 10
- How to Change Storage Space in Storage Pool in Windows 10
- How to Delete a Storage Space from Storage Pool in Windows 10
- How to Add Drives to Storage Pool for Storage Spaces in Windows 10
- How to Rename Physical Drive in Storage Pool for Storage Spaces in Windows 10
- How to Remove Drive from Storage Pool for Storage Spaces in Windows 10
- How to Rename Storage Pool for Storage Spaces in Windows 10
- How to Optimize Drive Usage in Storage Pool for Storage Spaces in Windows 10
- How to Upgrade Storage Pool for Storage Spaces in Windows 10
Delete Storage Pool for Storage Spaces in Windows 10
Delete Storage Pool for Storage Spaces in Windows 10
How to Delete a Storage Pool for Storage Spaces in Windows 10Published by Shawn BrinkCategory: Hardware & Drivers
30 Nov 2020


Tutorial Categories

Related Discussions
