

How to Repair Windows 10 Image using DISM
If a Windows image becomes unserviceable, you can use the Deployment Imaging and Servicing Management (DISM) tool to update the files and correct the problem.
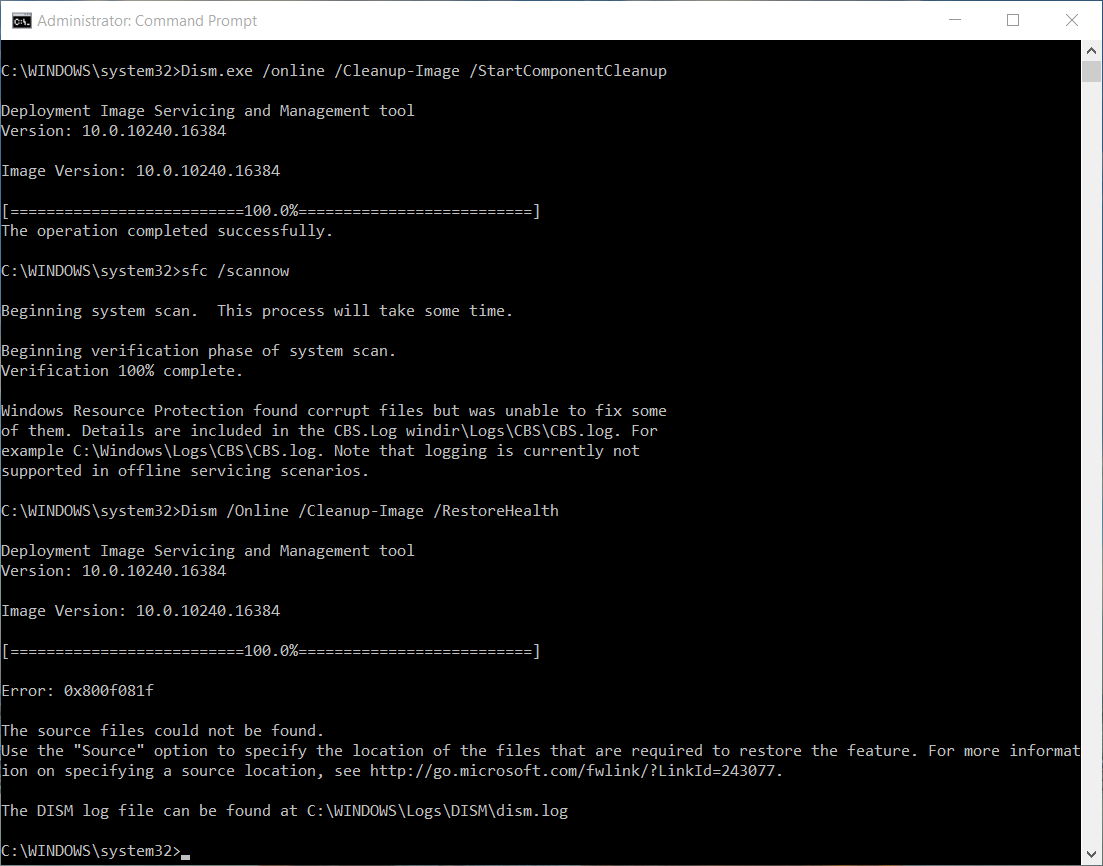
For example, you would use DISM to fix Windows component store corruption when a sfc /scannow command is unable to repair corrupted or modified system files because the component store (source) is corrupted. SFC should be able to repair the files afterwards.
For more information, see:
- DISM - Deployment Image Servicing and Management | Microsoft Docs
- Fixing component store corruption in Windows 8 and Windows Server 2012 - The Windows Servicing Guy - Site Home - Microsoft Docs
- How to Repair a Windows Image | Microsoft Hardware Dev Center
- Fix Windows Update errors by using the DISM or System Update Readiness tool
- Repair-WindowsImage | PowerShell | Microsoft Docs
The DISM /Cleanup-Image tool saves it's log files in the file locations below. To be able to view these logs, you would need to copy them from the locations below to your desktop, then open them from your desktop.
C:\Windows\Logs\CBS\CBS.log
C:\Windows\Logs\DISM\dism.log
This tutorial will show you how to do an Inbox Corruption Repair with the DISM /Cleanup-Image tool to fix component store corruption in Windows 10.
You must be signed in as an administrator to be able to do an Inbox Corruption Repair with the Deployment Imaging and Servicing Management (DISM) tool.
For a Windows 11 version of this tutorial, see:
Repair Windows Image Component Store in Windows 11
Contents
- Option One: To Run "DISM /Cleanup-Image" Tool in Command Prompt
- Option Two: To Run "DISM /Cleanup-Image" Tool in PowerShell
1 Open an elevated command prompt.
2 Do step3, step 4, step 5 (recommended), step 6, or step 7 below for what DISM command you would like to use.
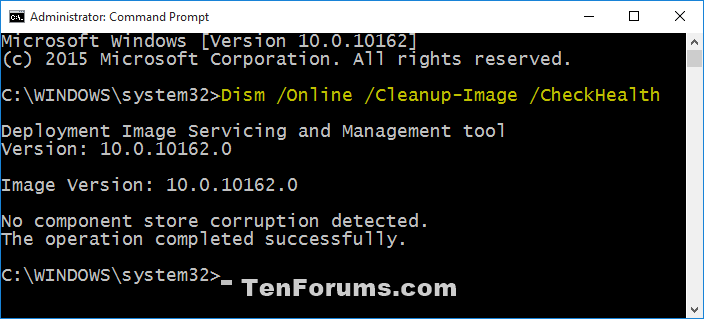
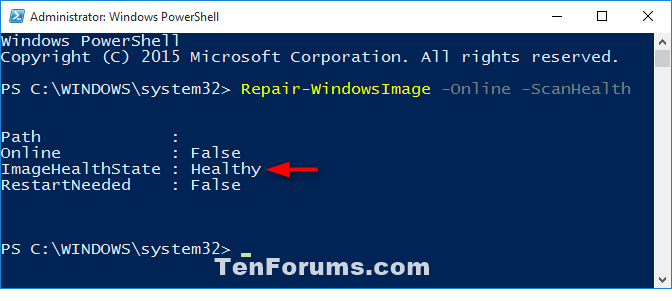
You would use /CheckHealth to only check whether the image has been flagged as corrupted by a failed process and whether the corruption can be repaired. This is just a quick way to see if corruption currently exists, and to inform you if there is corruption. This does not fix anything or create a log. This will finish running almost instantly.
A) Copy and paste theDism /Online /Cleanup-Image /CheckHealthcommand into the elevated command prompt, press Enter, and go to step 8 below. (see screenshot below)
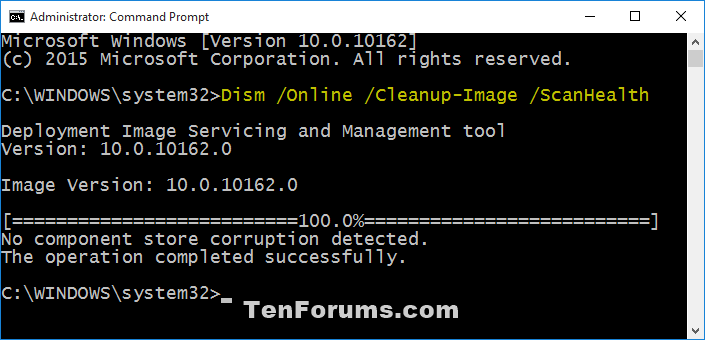
You would use /ScanHealth to scan the image for component store corruption. This option does not fix any corruption. It only checks for component store corruption and records that corruption to the log file. This can take around 5-10 minutes to finish. It will stay at 20% for a while before continuing.
A) Copy and paste theDism /Online /Cleanup-Image /ScanHealthcommand into the elevated command prompt, press Enter, and go to step 8 below. (see screenshot below)
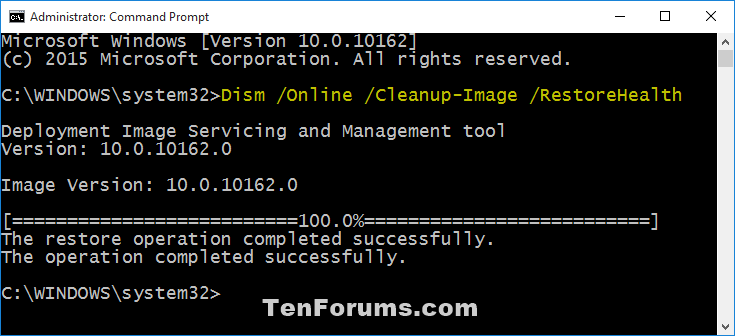
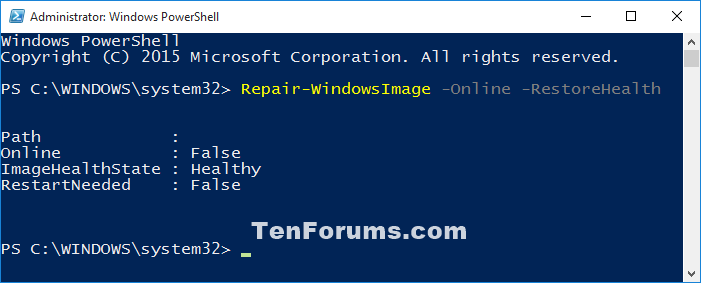
(recommended) You would use /RestoreHealth to scan the image for component store corruption, perform repair operations automatically using Windows Update as the source, and records that corruption to the log file. This can take around 10-15 minutes up to a few hours to finish depending on the level of corruption. It will stay at 20% for a while before continuing.
You will need to have an Internet connection for this command to perform repair operations automatically using Windows Update as the source.
If this command fails, then you can do step 6 or step 7 below instead.
A) Copy and paste theDism /Online /Cleanup-Image /RestoreHealthcommand into the elevated command prompt, press Enter, and go to step 8 below. (see screenshot below)
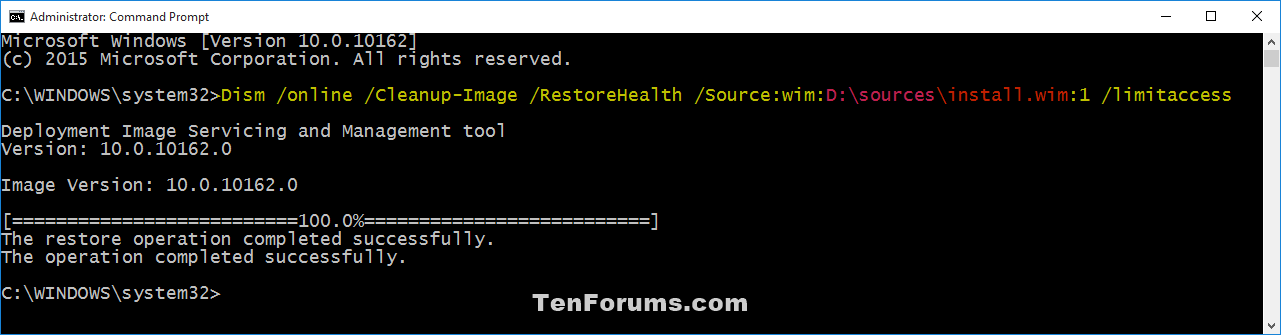
You would use /Source with /RestoreHealth to specify the location of an install.wim file as the source of known good versions of files that can be used for the repair. This can take around 10-15 minutes up to a few hours to finish depending on the level of corruption. It will stay at 20% for a while before continuing.
This can be useful if step 5 above was not able to repair the Windows image (component store).
The install.wim file will be in the Sources folder of a mounted Windows 10 ISO file.
If you have an install.esd file instead of install.wim, then you would need to use step 7 below instead.
If you get a 0xc1420127 or 50 error, see here.
A) Use steps 1-4 in the tutorial below to verify if this Windows 10 ISO file has install.wim and what the index number is for your edition of Windows 10.
B) Type the command below you want to use into the elevated command prompt, press Enter, and go to step 8 below. (see screenshot below)
Dism /Online /Cleanup-Image /RestoreHealth /Source:wim:Full Path to install.wim file:<Index Number>
OR
(To prevent DISM from using Windows Update for online images)
Dism /Online /Cleanup-Image /RestoreHealth /Source:wim:Full Path to install.wim file:<Index Number> /limitaccess
Substitute <Index Number> in the command above with the actual index number (ex: "1") for the edition (ex: "Pro") you want details about from step 6A above.
For example:Dism /Online /Cleanup-Image /RestoreHealth /Source:wim:D:\sources\install.wim:1 /limitaccess
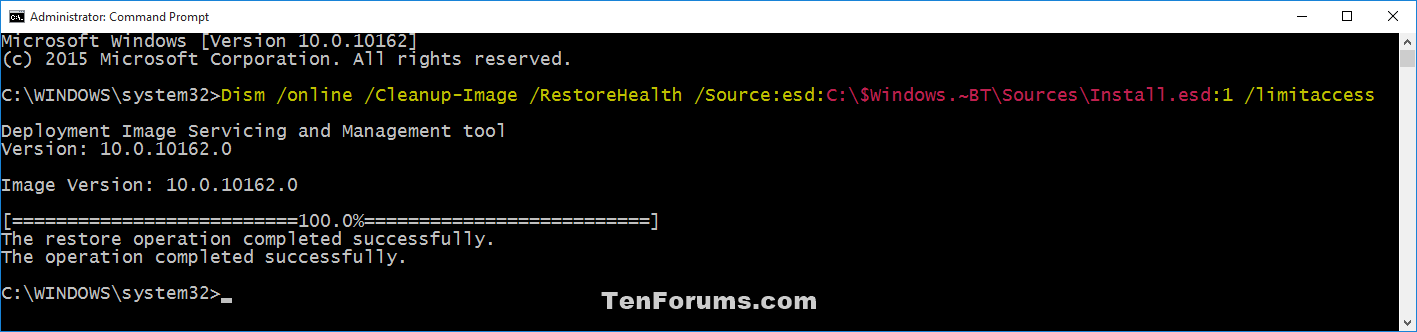
You would use /Source with /RestoreHealth to specify the location of an install.esd file as the source of known good versions of files that can be used for the repair. This can take around 10-15 minutes up to a few hours to finish depending on the level of corruption. It will stay at 20% for a while before continuing.
This can be useful if step 5 above was not able to repair the Windows image (component store).
The install.esd file will be in the Sources folder of a mounted Windows 10 ISO from Media Creation Tool (use ISO from OPTION ONE at link) file.
If you have an install.wim file instead of install.esd, then you would need to use step 6 above instead.
A) Use steps 1-4 in the tutorial below to verify if this Windows 10 ISO file has install.esd and what the index number is for your edition of Windows 10.
B) Type the command below you want to use into the elevated command prompt, press Enter, and go to step 8 below. (see screenshot below)
Dism /Online /Cleanup-Image /RestoreHealth /Source:esd:Full Path to install.esd file:<Index Number>
OR
(To prevent DISM from using Windows Update for online images)
Dism /Online /Cleanup-Image /RestoreHealth /Source:esd:Full Path to install.esd file:<Index Number> /limitaccess
Substitute <Index Number> in the command above with the actual index number (ex: "1") for the edition (ex: "Pro") you want details about from step 7A above.
For example:
Dism /Online /Cleanup-Image /RestoreHealth /Source:esd:C:\$Windows.~BT\Sources\Install.esd:1 /limitaccess
OR
(USB from Media Creation Tool where E is drive letter of USB)
Dism /Online /Cleanup-Image /RestoreHealth /Source:esd:E:\Sources\Install.esd:1 /limitaccess
8 If you did step 5, step 6, or step 7 above, it is recommended to restart the computer to fully apply.
1 Open an elevated PowerShell.
2 Do step3, step 4, step 5 (recommended), step 6, or step 7 below for what DISM command you would like to use.
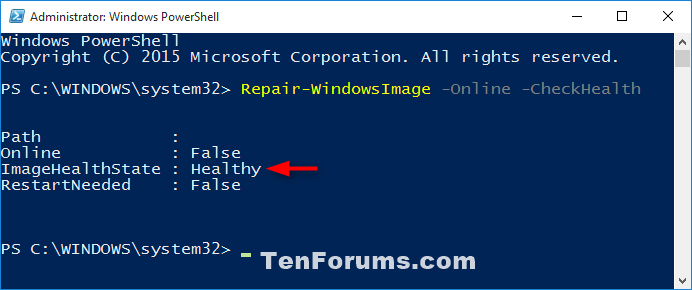
You would use /CheckHealth to only check whether the image has been flagged as corrupted by a failed process and whether the corruption can be repaired. This is just a quick way to see if corruption currently exists, and to inform you if there is corruption. This does not fix anything or create a log. This will finish running almost instantly.
A) Copy and paste theRepair-WindowsImage -Online -CheckHealthcommand into the elevated PowerShell, press Enter, and go to step 8 below. (see screenshot below)
You would use /ScanHealth to scan the image for component store corruption. This option does not fix any corruption. It only checks for component store corruption and records that corruption to the log file. This can take around 5-10 minutes to finish. It will stay at 20% for a while before continuing.
A) Copy and paste theRepair-WindowsImage -Online -ScanHealthcommand into the elevated PowerShell, press Enter, and go to step 8 below. (see screenshot below)
(recommended) You would use /RestoreHealth to scan the image for component store corruption, perform repair operations automatically using Windows Update as the source, and records that corruption to the log file. This can take around 10-15 minutes up to a few hours to finish depending on the level of corruption. It will stay at 20% for a while before continuing.
You will need to have an Internet connection for this command to perform repair operations automatically using Windows Update as the source..
If this command fails, then you can do step 6 or step 7 below instead.
A) Copy and paste theRepair-WindowsImage -Online -RestoreHealthcommand into the elevated PowerShell, press Enter, and go to step 8 below. (see screenshot below)
You would use /Source with /RestoreHealth to specify the location of an install.wim file as the source of known good versions of files that can be used for the repair. This can take around 10-15 minutes up to a few hours to finish depending on the level of corruption. It will stay at 20% for a while before continuing.
This can be useful if step 5 above was not able to repair the Windows image (component store).
The install.wim file will be in the Sources folder of a mounted Windows 10 ISO file.
If you have an install.esd file instead of install.wim, then you would need to use step 7 below instead.
If you get a 0xc1420127 or 50 error, see here.
A) Use steps 1-4 in the tutorial below to verify if this Windows 10 ISO file has install.esd and what the index number is for your edition of Windows 10.
B) Type the command below you want to use into the elevated PowerShell, press Enter, and go to step 8 below. (see screenshot below)
Repair-WindowsImage -Online -RestoreHealth -Source "Full Path to install.wim file:<Index Number>"
OR
(To prevent DISM from using Windows Update for online images)
Repair-WindowsImage -Online -RestoreHealth -Source "Full Path to install.wim file:<Index Number>" -LimitAccess
Substitute <Index Number> in the command above with the actual index number (ex: "1") for the edition (ex: "Pro") you want details about from step 6A above.
For example:Repair-WindowsImage -Online -RestoreHealth -Source "D:\sources\install.wim:1" -LimitAccess
You would use /Source with /RestoreHealth to specify the location of an install.esd file as the source of known good versions of files that can be used for the repair. This can take around 10-15 minutes up to a few hours to finish depending on the level of corruption. It will stay at 20% for a while before continuing.
This can be useful if step 5 above was not able to repair the Windows image (component store).
The install.esd file can be in the Sources folder of a mounted Windows 10 ISO from Media Creation Tool (Use ISO from OPTION ONE at link) file.
If you have an install.wim file instead of install.esd, then you would need to use step 6 above instead.
A) Type the command below you want to use into the elevated PowerShell, press Enter, and go to step 8 below. (see screenshot below)
Repair-WindowsImage -Online -RestoreHealth -Source "Full Path to install.esd file:<Index Number>"
OR
(To prevent DISM from using Windows Update for online images)
Repair-WindowsImage -Online -RestoreHealth -Source "Full Path to install.esd file:<Index Number>" -LimitAccess
Substitute <Index Number> in the command above with the actual index number (ex: "1") for the edition (ex: "Pro") you want details about from step 7A above.
For example:Repair-WindowsImage -Online -RestoreHealth -Source "C:\$Windows.~BT\Sources\Install.esd:1" -LimitAccess
8 If you did step 5, step 6, or step 7 above, it is recommended to restart the computer to fully apply.
That's it,
Shawn
Related Tutorials
- How to Add Repair Windows Image Context Menu in Windows 10
- How to Run SFC Command to Repair System Files in Windows 10
- How to Do a Repair Install of Windows 10 with an In-place Upgrade
- How to Analyze Component Store (WinSxS folder) in Windows 10
- How to Clean Up Component Store (WinSxS folder) in Windows 10
Use DISM to Repair Windows 10 Image
-
New #1
Hi
I have an inquiry :
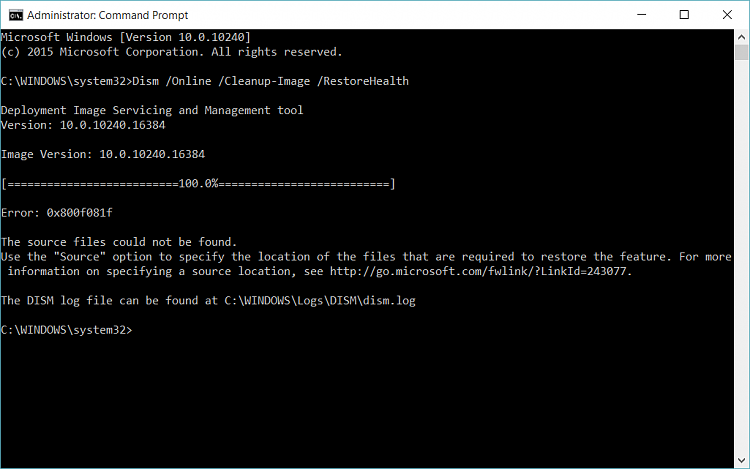
If I wish "To Use DISM /RestoreHealth /Source:wim Command" (step 6) to restore the health of my 10240 installation, can I do this? Is it possible, I mean?
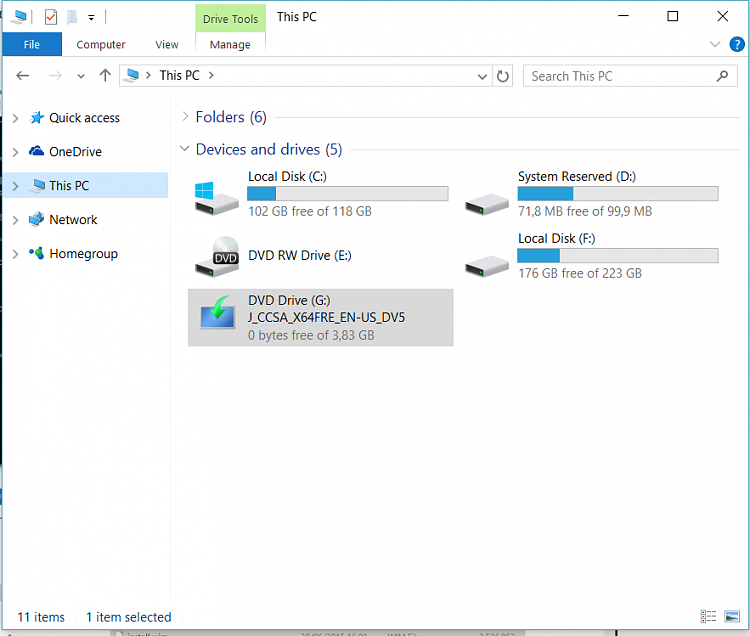
And if I have the official 10162 ISO on my desktop, mounted so found on drive G: , which is the full path I should use?
So, in my case the command is :
Dism /Online /Cleanup-Image /RestoreHealth /Source:wim:G:\sources\install.wim:1 /limitaccess
?
Because when I run it this way it says that it cannot find the Source..
-
New #2
Hello Joanne, :)
You can use the command below from step 5 option one to do so unless DISM is unable to repair the Windows image from the default source.
Dism /Online /Cleanup-Image /RestoreHealth
Since it says it can't find the specified source using step 6, your ISO may have been created with .esd instead of .wim. If so, give step 7 a try to see it works.
-
New #3
Thank you for your reply! :)
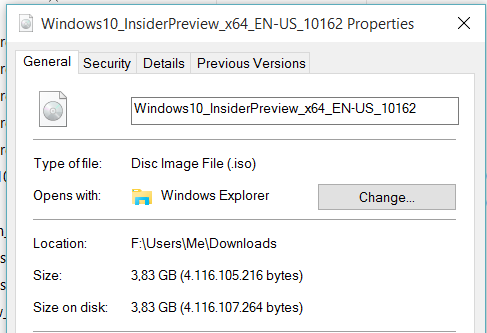
Here is the result. Please advise me what to do next to repair my installation. I have the official 10162 ISO on my other SSD.
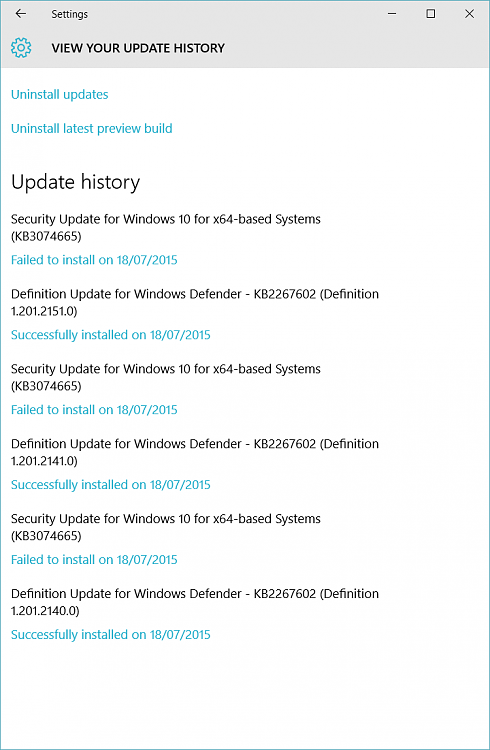
Here is the reason I am trying this. Look how many times today's update has failed installing....
-
New #4
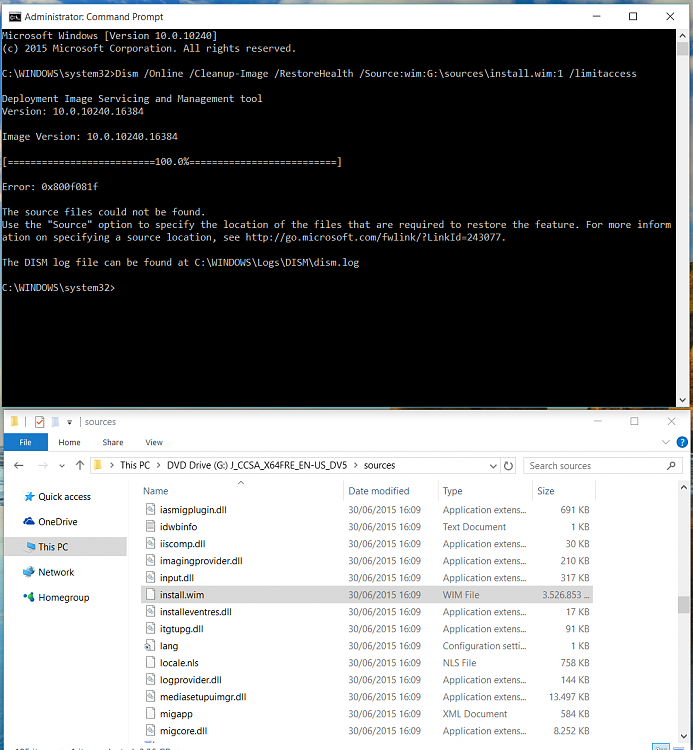
Yep, in that case, use the command below to run the DISM command from the install.wim source on your G: drive. :)
Dism /Online /Cleanup-Image /RestoreHealth /Source:wim:G:\sources\install.wim:1 /limitaccess
-
New #5
I just did it but it cannot find the source files. I mounted the official 10162 ISO so the G:\ drive was created. Then I run the command. But it doesn't work.
-
New #6
In that case, run the commands in the order below one at a time.
Dism.exe /online /Cleanup-Image /StartComponentCleanup
sfc /scannow
Dism /Online /Cleanup-Image /RestoreHealth
sfc /scannow
-
New #7
Okay... I've run the 3 out of the 4 commands and...I have issues as it seems....
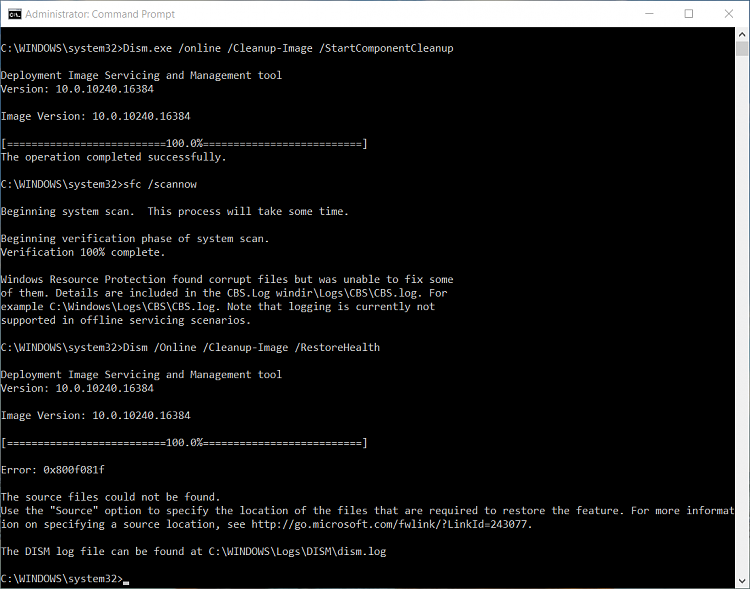
So, what can I do next, please?
Thank you.
PS: how can I upload the CBS log file, in case it's needed?
-
New #8
In that case, you may need to refresh Windows 10 instead.
To upload the CBS.log, you would need to copy it to your desktop first, ZIP it, then upload the ZIP.
-
-
New #9
Thank you for your support, Brink!
Please, allow me to ask you one simple question, before reading that entire tutorial :
- I do not care at all what will happen with my Win 10 TP installation, I do not care wiping everything out of it - because I've not installed anything important- but what I DO care tremendously about is my Win 7 Home Premium installation, it being in a Dual boot system with 10, on this computer. So, I ask : this refreshing or whatever, can it affect my Win 7 in ANY way? Should I unplug my Win 7 SSD before attempting this refreshing?
I would clean install this Win 10 for sure but it is this special occasion now. MS does not offer an official 10240 ISO. So clean-installing would bring me in waiting for 10240 again, etc etc...
So?
Oh! And one last thing... Until a couple of hours ago I was sitting with 10240 untouched, waiting to get updated. But I got bored so I performed a full Disk Cleanup, system files included, AND I have deleted all the files in the SoftwareDistribution/Downloads folder. Will this Refresh still work after all this?

Use DISM to Repair Windows 10 Image
How to Repair Windows 10 Image using DISMPublished by Shawn BrinkCategory: Performance & Maintenance
29 Jul 2022

 Quote
Quote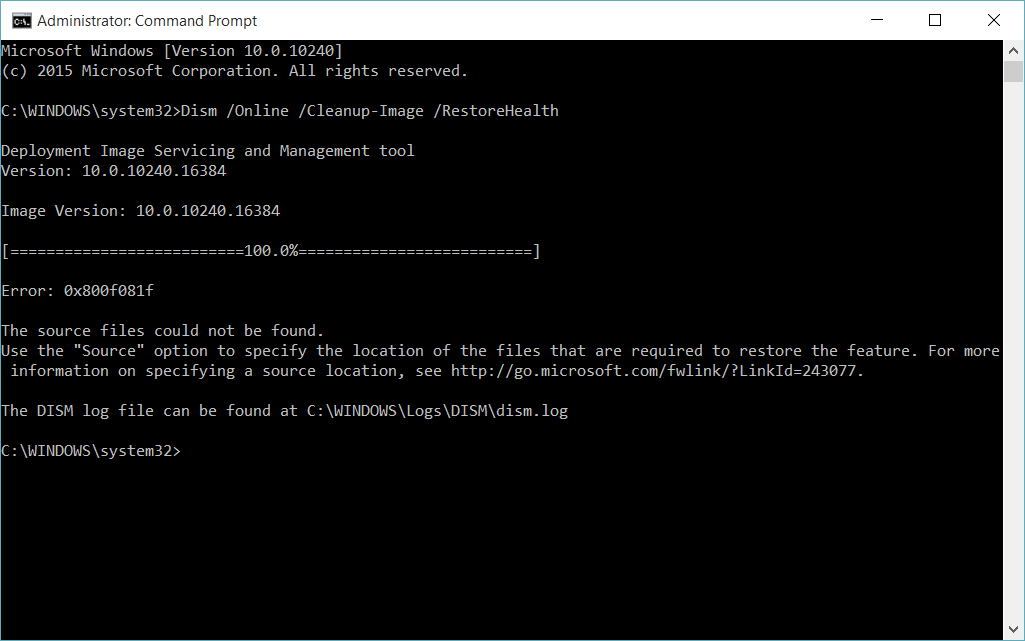


Tutorial Categories

Related Discussions
