How to Enable or Disable the Lock Screen in Windows 10
The lock screen is the screen you see when you lock your PC (or when it locks automatically after you haven't been using it for a while). The lock screen will also show at startup, and when you are signed out and idle for one minute. You will need to dismiss the lock screen to be able to see the sign in screen and sign in to Windows. Users can dismiss the lock screen using touch, the keyboard, or by dragging it up with the mouse.
This tutorial will show you how to enable or disable the lock screen to show before the sign in screen for all users in Windows 10.
You must be signed in as an administrator to be able to enable or disable the lock screen.
If you have secure sign-in enabled for users to require them to press the Ctrl+Alt+Delete keys on the lock screen before signing in, then the lock screen cannot be disabled.
Contents
- Option One: To Enable or Disable Lock Screen using Group Policy
- Option Two: To Enable or Disable Lock Screen using a REG file
- Option Three: To Disable Lock Screen using a Task
- Option Four: To Disable Lock Screen using Security Policy Rule
EXAMPLE: Lock and sign in screen in Windows 10
The Local Group Policy Editor is only available in the Windows 10 Pro, Enterprise, and Education editions.
All editions can use Option Two below to set this same policy.
1 Open the Local Group Policy Editor.
2 Navigate to the location below in the left pane of Local Group Policy Editor. (see screenshot below)
3 In the right pane of Personalization in Local Group Policy Editor, double click/tap on the Do not display the lock screen policy to edit it. (see screenshot above)
4 Do step 5 (enable) or step 6 (disable) below for what you would like to do.
A) Select (dot) Not Configured or Disabled, click/tap on OK, and go to step 7 below. (see screenshot below)
Not Configured is the default setting.
7 When finished, you can close the Local Group Policy Editor if you like.
8 You can press the Win + L keys to lock the computer to verify.
The downloadable .reg files below will modify the DWORD values in the registry keys below.
HKEY_LOCAL_MACHINE\SOFTWARE\Microsoft\Windows\CurrentVersion\Authentication\LogonUI\SessionData
AllowLockScreen DWORD
0 = Disable
1 = Enable
HKEY_LOCAL_MACHINE\SOFTWARE\Policies\Microsoft\Windows\Personalization
NoLockScreen DWORD
0 or delete = enable
1 = disable
1 Do step 2 (enable) or step 3 (disable) below for what you would like to do.
This is the default setting.
A) Click/tap on the Download button below to download the file below, and go to step 4 below.
Enable_Lock_Screen.reg
Download
A) Click/tap on the Download button below to download the file below, and go to step 4 below.
Disable_Lock_Screen.reg
Download
4 Save the .reg file to your desktop.
5 Double click/tap on the downloaded .reg file to merge it.
6 When prompted, click/tap on Run, Yes (UAC), Yes, and OK to approve the merge.
7 If you like, you can now delete the downloaded .reg file.
8 You can press the Win + L keys to lock the computer to verify.
This option will not disable the lock screen at startup. It will disable the lock screen when a user locks the computer, signs out, and resume from sleep.
1 Press the Win + R keys to open Run, type taskschd.msc into Run, and click/tap on OK to open Task Scheduler.
2 Click/tap on Task Scheduler Library in the left pane of Task Scheduler, and click/tap on Create Task in the right Actions pane. (see screenshot below)
3 In the General tab, type a name (ex: "Disable Lock Screen") you want for this task, and type an optional description of the task. (see screenshot below)
4 In the General tab, check the Run with highest privileges box. (see screenshot below)
5 In the General tab, select Windows 10 in the Configure for drop down menu. (see screenshot below)
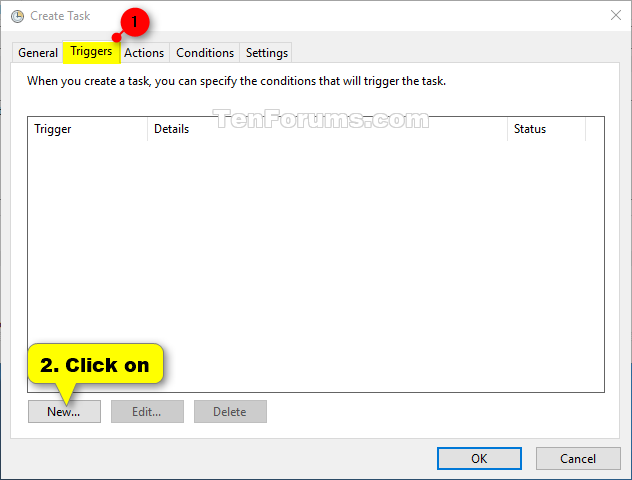
6 Click/tap on the Triggers tab, and click/tap on the New button. (see screenshot below)
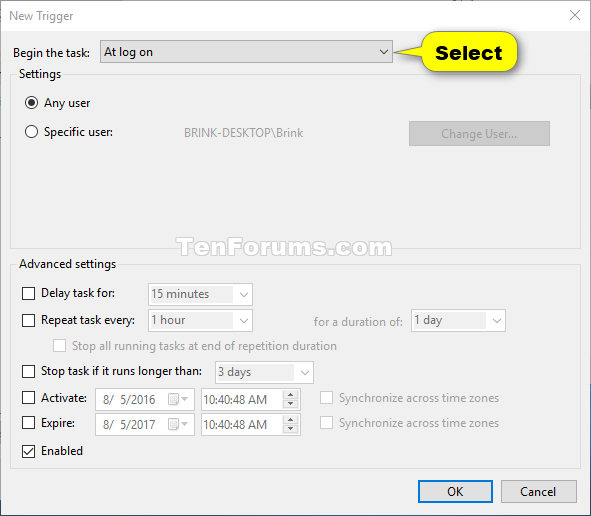
7 Select At log on in the Begin the task drop down menu, and click/tap on OK. (see screenshot below)
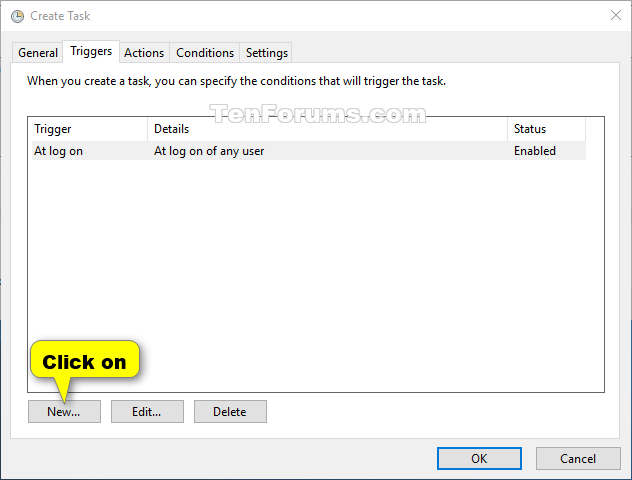
8 Click/tap on the New button in the Triggers tab. (see screenshot below)
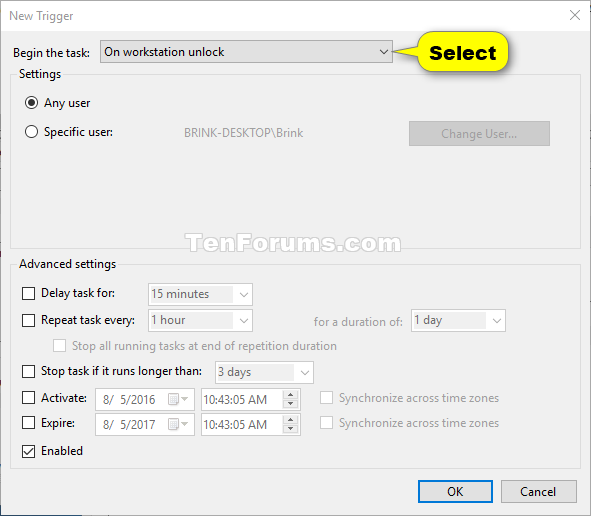
9 Select On workstation unlock in the Begin the task drop down menu, and click/tap on OK. (see screenshot below)
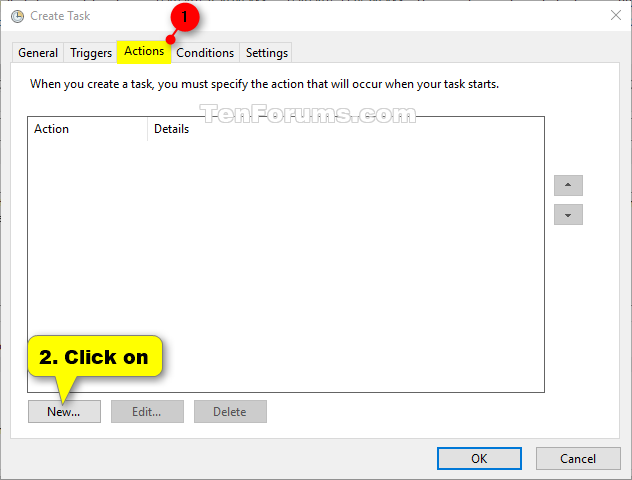
10 Click/tap on the Actions tab, and click/tap on the New button. (see screenshot below)
11 Type reg in the Program/script field. Type the command below into the Add arguments field, and click/tap on OK. (see screenshot below)
By default, the AllowLockScreen DWORD is reset to 1 at log on to always have the lock screen enabled.
This command for the task will keep the AllowLockScreen DWORD set to 0 instead to disable the lock screen.
add HKLM\SOFTWARE\Microsoft\Windows\CurrentVersion\Authentication\LogonUI\SessionData /t REG_DWORD /v AllowLockScreen /d 0 /f
12 You will now see this new action listed. (see screenshot below)
13 Click/tap on the Conditions tab, uncheck the Start the task only if the computer is on AC power box, and click/tap on OK. (see screenshot below)
14 You will now see this new task (ex: "Disable Lock Screen") listed in the Task Scheduler Library. You can now close Task Scheduler if you like. (see screenshot below)
To undo this task and enable the lock screen again, you would just need to delete this new task (ex: "Disable Lock Screen").
15 Sign out and sign in to apply the task. The task will automatically be applied to all other users on the PC the next time they sign in.
This option will not disable the lock screen at startup. It will disable the lock screen when a user locks the computer, signs out, and resume from sleep.
The Local Security Policy is only available in the Windows 10 Pro and Enterprise editions.
1 Open Local Security Policy (secpol.msc).
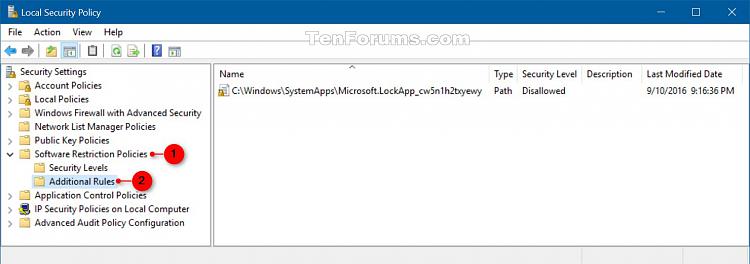
2 Expand open Software Restriction Policies and open Additional Rules in the left pane. (see screenshot below)
If you do not have Additional Rules under Software Restriction Policies, then right click on Software Restriction Policies and click on New Software Restriction Policies.
3 Do step 4 (disable) or step 5 (enable) below for what you want to do.
A) Right click on Additional Rules in the left pane, and click on New Path Rule. (see screenshot below step 2)
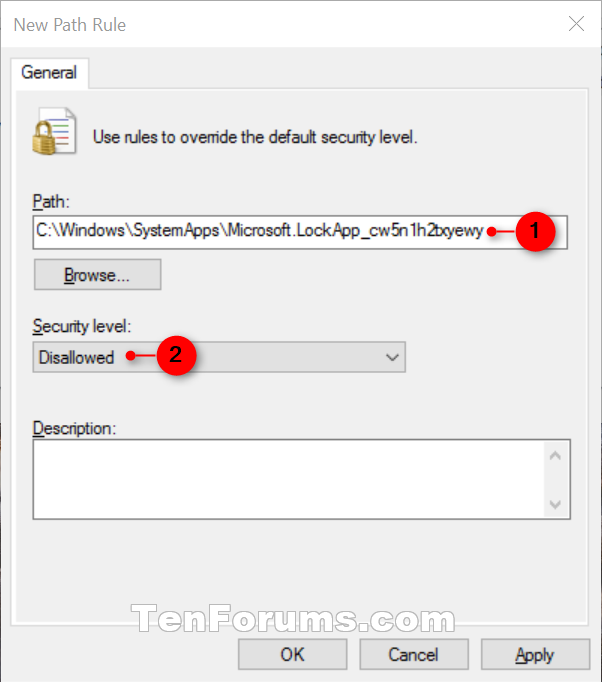
B) Copy and paste C:\Windows\SystemApps\Microsoft.LockApp_cw5n1h2txyewy under Path, set Security level to Disallowed, click/tap on OK, and go to step 6 below. (see screenshot below)
This is the default setting.
A) Right click on the policy rule in the right pane of Additional Rules, and click on Delete. (see screenshot below step 2)
B) Click/tap on Yes to confirm, and go to step 6 below. (see screenshot below)
6 You can now close the Local Security Policy window if you like.
That's it,
Shawn Brink
Related Tutorials
- How to Enable or Disable Lock Screen Slide Show in Windows 10
- How to Enable or Disable Lock Computer in Windows
- How to Change your Lock Screen Background in Windows 10
- How to Enable or Disable Changing Lock Screen Background in Windows 10
- How to Enable or Disable Secure Sign-in with Ctrl+Alt+Delete in Windows 10
- How to Turn On or Off Lock Screen Alarm, Reminder, and VoIP Notifications in Windows 10
- How to Turn On or Off App Notifications on Lock Screen in Windows 10
- How to Hide or Show Content of Notifications on Lock Screen in Windows 10
- How to Enable or Disable Console Mode Sign-in in Windows 10
- How to Sign in to Windows 10
- How to Add 'Console lock display off timeout' to Power Options in Windows 10
- How to Change 'Console lock display off timeout' in Windows 10
- How to Change Lock Screen Clock to 12 hour or 24 hour Format in Windows 10
- How to Choose Apps to Show Detailed and Quick Status on Lock Screen in Windows 10
- How to Enable Search Box on Lock Screen in Windows 10
Enable or Disable Lock Screen in Windows 10
-
New #1
Shawn
The group policy edit has not worked for me for several builds. I think that ever since the Lock Screen went to XAML type the group policy edit is being ignored.
-
New #2
Hey tracit,
Yeah, I had some policies I found that don't do anything right now as well.
This one still works though. At least for me it does in build 10130. :)
-
New #3
-
New #4
I used the Group Policy on my 64-bit desktop Windows 10, and it works fine.But on my 32-bit tablet with Windows 10 Home, the registry key does not work. This is after doing gpupdate.exe /force.
-
-
-
New #7
Hello Satchmo, :)
I'm glad to hear it's working well for you.
I hate to be the one that breaks the bad news to you, but the registry edit is the same thing that group policy sets. I just like having different options for doing the same thing in the tutorials in case one option (ex: group policy) is not an available option in say Windows 10 Home.
-
New #8
I did, and it didn't!
However, what I then did was download the same .reg file as you have here, but from another source, and import that. For some reason that did it.
Nothing changed - I had already created the correct key and DWORD. But it didn't take effect until I imported that .reg file.
Weird!
-
-
New #9
Mark,
Odd. Are the contents of that .reg file the same as this one?
If so, then I suppose that it may just not have successfully fully merged last time.

Enable or Disable Lock Screen in Windows 10
How to Enable or Disable the Lock Screen in Windows 10Published by Shawn BrinkCategory: Customization
11 Sep 2021
Tutorial Categories


Related Discussions






 Quote
Quote