How to Get and Give Remote Assistance with Quick Assist app in Windows 10
The Quick Assist app enables two people to share a computer over a remote connection so that one person can help solve problems on the other person's computer.
The person who needs help requests assistance from a helper (either a friend or Microsoft Support). Both start Quick Assist and the helper sends a security code to the person who needs help. The person who needs help enters the code and gives permission to the helper who is then able to take control of that person’s computer and provide assistance over the remote connection.
When you get assistance, you allow someone you trust to assist you by taking control of your computer.
When you give assistance, you assist another person over a remote connection. You are required to sign in to your Microsoft account to be able to give assistance.
See also:
- Improved Quick Assist experience in Windows 10 and Windows 11
- Solve PC problems over a remote connection | Microsoft Support
- Get help remotely with Quick Assist in Windows 10 | Windows Community
This tutorial will show you how to quickly and easily get assistance and give assistance remotely with the Quick Assist app in Windows 10 and Windows 11.
Contents
- Option One: To Give Assistance with Quick Assist app
- Option Two: To Get Assistance with Quick Assist app
VIDEO by Microsoft: How to use Quick Assist | Simply Windows
1 Open the Quick Assist (Win+Ctrl+Q) app from All apps under Windows Accessories. (see screenshot below)
2 Click/tap on the Assist another person button under Give assistance. (see screenshot below)
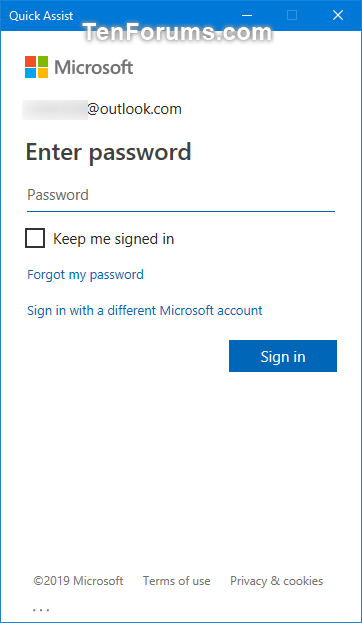
3 If prompted, you will need to sign in to the Quick Assist app with your Microsoft account. (see screenshots below)

4 If you turned on two-step verification for your Microsoft account, you will now need to verify. (see screenshots below)
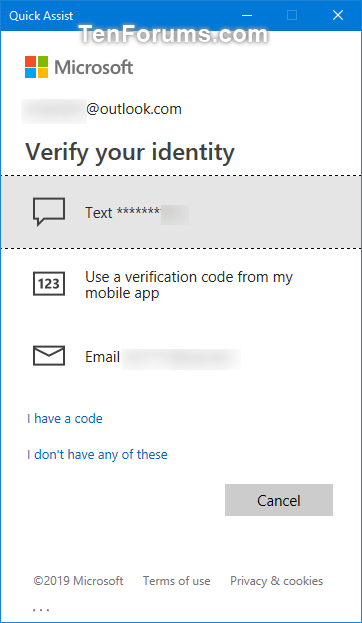
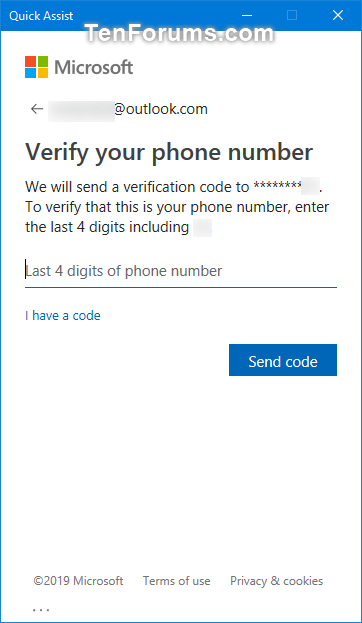
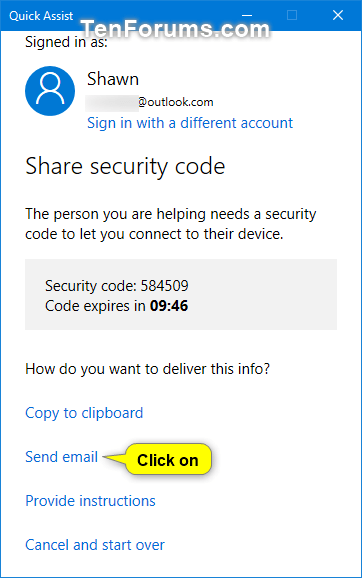
5 Do step 6 (clipboard), step 7 (email), or step 8 (instructions) below for how you want to deliver the security code to the person that needs to get assistance.
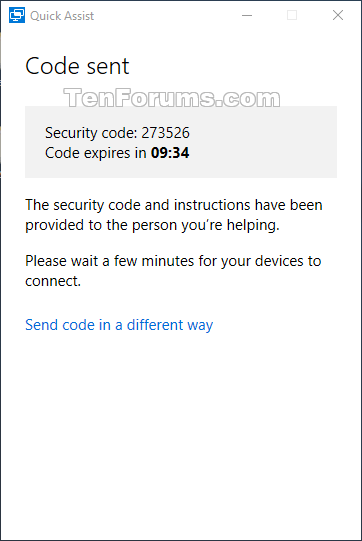
This security code will expire in 10 minutes, so be sure to send it to the person getting assistance and connect before it expires. If the code expires, you will need to start over to generate a new code to use.
A) Click/tap on Copy to clipboard. (see screenshot below)
B) After you have sent the code, click/tap on the I sent the code link, and go to step 9 below. (see screenshots below)

A) Click/tap on Send email. (see screenshot below)
B) Enter the email address of the person getting assistance, click/tap on Send, and go to step 9 below. (see screenshots below)

A) Click/tap on Provide instructions. (see screenshot below)
B) After you have provided the instructions, click/tap on the I provided the instructions link, and go to step 9 below. (see screenshots below)
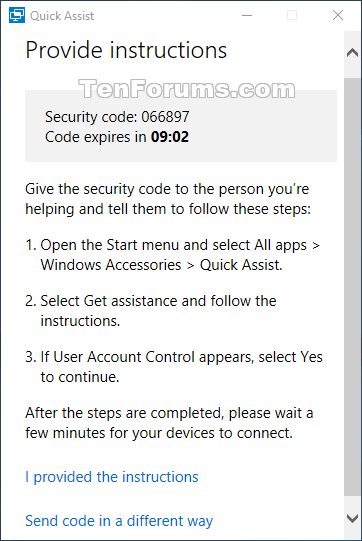
9 The person getting assistance will now need to use Option Two below using the security code you sent them.
10 Select (dot) to Take full control or View screen for the sharing option you want to use, and click/tap on Continue. (see screenshot below)
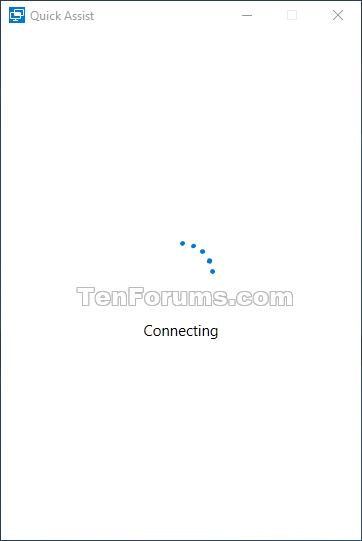
11 When the person getting assistance has allowed (step 4 in OPTION TWO you to connect, Quick Assist will start remotely connecting the two computers. (see screenshot below)
12 You now will be connected to the other PC with screen sharing on for you to provide assistance to the person's computer. (see screenshot below)
13 When you are finished giving assistance, you can click/tap on the End button in the toolbar at the top to end screen sharing, then close the Quick Assist app. (see screenshot below)
14 You can now either Give Feedback to Submit, or Close Quick Assist. (see screenshot below)
1 The person giving assistance will need to use Option One above first to send you the security code to connect with.
2 Open the Quick Assist (Win+Ctrl+Q) app from All apps under Windows Accessories. (see screenshot below)
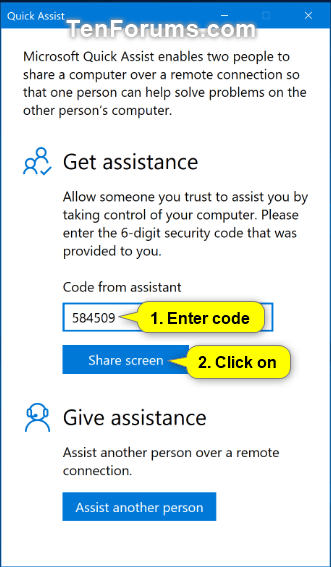
3 Enter the code from assistant under Get assistance, and click/tap on the Share screen button. (see screenshot below)
4 Click/tap on Allow to give permission to the person giving assistance access to your computer. (see screenshot below)
5 Quick Assist will start remotely connecting the two computers. (see screenshot below)
7 You now will be connected to the other PC with screen sharing on for you to get assistance from the other person's computer. (see screenshot below)
8 When you are finished getting assistance, you can close the Quick Assist app, and click/tap on Close to confirm. (see screenshots below)

9 You can now either Give Feedback to Submit, or Close Quick Assist. (see screenshot below)
That's it,
Shawn Brink
Related Tutorials
- How to Enable or Disable Remote Assistance Connections in Windows
- How to use Remote Desktop Connection to connect to and from your Windows 10 PC
Get and Give Remote Assistance with Quick Assist app in Windows 10
-
New #1
Can I change file names and such by doing this. I want to tinker with my desktop in the living room and I'm on the couch but the text is to small on the tv. I have my laptop on my lap and can see it better. So I was wondering if I can edit file names in that mode.
-
New #2
Hello Renee, :)
Yes, you sure could. When you are using Quick Assist, it will be the same as if you were on your desktop PC.
If you have ever done a "Remote Desktop Connection", it will basically be the same but with an easier to use interface (Quick Assist).
-
New #3
Quick Assist
On the tutorial page:
Get and Give Remote Assistance with Quick Assist app in Windows 10 | Tutorials
it says that "The Quick Assist app is no longer available in Windows 10."
Yet I notice that if I type "Quick Assist" into the search menu, I get the app.
Is Quick Assist functional? Does it work well? Are there inexpensive and better options?
-
-
-
New #6
-
-
New #8
Do these options for Remote Assistance and Remote Desktop in System Properties need to be set on both PCs or does Quick Assist override these settings?
Attachment 254753
-
-

Get and Give Remote Assistance with Quick Assist app in Windows 10
How to Get and Give Remote Assistance with Quick Assist app in Windows 10Published by Shawn BrinkCategory: Network & Sharing
13 Dec 2022
Tutorial Categories


Related Discussions










 Quote
Quote
