

How to Turn On or Off BitLocker for Operating System Drive in Windows 10
You can use BitLocker Drive Encryption to help protect your files on an entire drive. BitLocker can help block hackers from accessing the system files they rely on to discover your password, or from accessing your drive by physically removing it from your PC and installing it in a different one. You can still sign in to Windows and use your files as you normally would.
New files are automatically encrypted when you add them to a drive that uses BitLocker. However, if you copy these files to another drive or a different PC, they're automatically decrypted.
BitLocker can encrypt the drive Windows is installed on (the operating system drive) as well as fixed data drives (such as internal hard drives). You can also use BitLocker To Go to help protect all files stored on a removable data drive (such as an external hard drive or USB flash drive).
BitLocker checks the PC during startup for any conditions that could represent a security risk (for example, a change to the BIOS software that starts the operating system when you turn on your PC, or changes to any startup files). If a potential security risk is detected, BitLocker will lock the operating system drive and you'll need a special BitLocker recovery key to unlock it.
You can choose how to unlock the operating system drive when you turn on your PC with a PIN (requires TPM) , password, or startup key on a connected USB flash drive.
This tutorial will show you how to turn on or off BitLocker to encrypt or decrypt operating system drives with or without a TPM in Windows 10.
You must be signed in as an administrator to be able to configure BitLocker for operating system drives.
BitLocker Drive Encryption is only available in Windows 10 Pro, Windows 10 Enterprise, and Windows 10 Education editions.
Microsoft is aware of reports of vulnerabilities in the hardware encryption of certain self-encrypting drives (SEDs). Customers concerned about this issue should consider using the software only encryption provided by BitLocker Drive Encryption. On Windows computers with self-encrypting drives, BitLocker Drive Encryption manages encryption and will use hardware encryption by default. Administrators who want to force software encryption on computers with self-encrypting drives can accomplish this by deploying a Group Policy to override the default behavior. Windows will consult Group Policy to enforce software encryption only at the time of enabling BitLocker.
Guidance for configuring BitLocker to enforce software encryption
Contents
- Option One: To Turn On BitLocker for Operating System Drive in BitLocker Manager
- Option Two: To Turn Off BitLocker for Operating System Drive in BitLocker Manager
- Option Three: To Turn Off BitLocker for Operating System Drive in Command Prompt
- Option Four: To Turn Off BitLocker for a Operating System Drive in PowerShell
EXAMPLE: Enter password or PIN (TPM) at startup to unlock OS drive encrypted by BitLocker

1 If you like, set a default encryption method (XTS-AES or AES-CBC) and cipher strength (128 bit or 256 bit) you want used by BitLocker. BitLocker Drive Encryption uses AES-CBC 128 bit by default for operating system drives.
2 Do step 3 (TPM), step 4 (TPM with options) , or step 5 (Without TPM - with password or USB) below for how you want to unlock the OS drive at startup.
This option requires that your PC has a TPM chip on it.
See also: BitLocker TPM Requirement FAQs | Microsoft DocsA) No need to do anything else. Go to step 6 below.
This option requires that your PC has a TPM chip on it.
See also: BitLocker TPM Requirement FAQs | Microsoft Docs
On a PC with a compatible TPM, four types of authentication methods can be used at startup to provide added protection for encrypted data. When the PC starts, it can use only the TPM for authentication, or it can also require insertion of a USB flash drive containing a startup key, the entry of a 4-digit to 20-digit PIN, or both.
Starting with Windows 10 version 1703, the minimum length for the BitLocker PIN was increased to 6 characters to better align with other Windows features that leverage TPM 2.0, including Windows Hello. To help organizations with the transition, beginning with Windows 10 version 1709 and Windows 10 version 1703 with the October 2017 Fall Cumulative Update installed, the BitLocker PIN length is 6 characters by default, but it can be reduced to 4 characters. If the minimum PIN length is reduced from the default of six characters, then the TPM 2.0 lockout period will be extended.
See also: BitLocker Group Policy settings (Windows 10) | Microsoft DocsA) Open the Local Group Policy Editor.
B) In the left pane of Local Group Policy Editor, navigate to the location below. (see screenshot below)
Computer Configuration > Administrative Templates > Windows Components > BitLocker Drive Encryption > Operating System Drives
C) In the right pane of Operating System Drives in Local Group Policy Editor, double click/tap on the Require additional authentication at startup policy to edit it. (see screenshot above)
D) Select Enabled at the top, and uncheck the Allow BitLocker without a compatible TPM (requires a password or a startup key on a USB flash drive) box under Options. (see screenshot below)
E) Select the setting you want for computers with a TPM, click/tap on OK, and go to step 6 below. (see screenshot below)
If you want to use a PIN to unlock the OS drive at step 10 below, then you may also want to enable enhanced PINs for startup and specify a minimum PIN length.
This option is used when you don't want to use or have a TPM chip on your PC.
Allowing BitLocker without a TPM will require to unlock the operating system drive at startup with either a password or startup key on a USB flash drive.A) Open the Local Group Policy Editor.
B) In the left pane of Local Group Policy Editor, navigate to the location below. (see screenshot below)
Computer Configuration > Administrative Templates > Windows Components > BitLocker Drive Encryption > Operating System Drives
C) In the right pane of Operating System Drives in Local Group Policy Editor, double click/tap on the Require additional authentication at startup policy to edit it. (see screenshot above)
D) Select Enabled at the top, check the Allow BitLocker without a compatible TPM (requires a password or a startup key on a USB flash drive) box under Options, and go to step 6 below. (see screenshot below)
6 Do step 7, step 8, or step 9 below for how you would like to manage BitLocker.
7 Right click or press and hold on the operating system drive (ex: C: ) you want to encrypt, click/tap on Turn on BitLocker, and go to step 10 below. (see screenshot below)
8 Select the operating system drive (ex: C: ) you want to encrypt, click/tap on the "Drive Tools" Manage tab, click/tap on the BitLocker button in the ribbon, click/tap on Turn on BitLocker, and go to step 10 below. (see screenshot below)
9 Open the Control Panel (icons view), and click/tap on the BitLocker Drive Encryption icon.
A) Expand open the operating system drive (ex: C: ) you want to encrypt under Operating system drives, click/tap on Turn on BitLocker, and go to step 10 below. (see screenshot below)
10 Choose how (USB, PIN (requires TPM), password, or automatically) you want to unlock the operating system drive at startup. (see screenshots below)
You will not see this step if you did step 3 above.

Enter a PIN - This option allows you to unlock the operating system drive with a 6-20 digit PIN. This option is only available if your PC has a TPM, and you did step 4 above. If you want to use a PIN to unlock the OS drive, then you may also want to enable enhanced PINs for startup and specify a minimum PIN length.
Let BitLocker automatically unlock my drive = This option is only available if your PC has a TPM, and you did step 3 or step 4 above.
Insert USB flash drive = This option allows you to unlock the operating system drive with a connected USB flash drive with the startup key saved on it.
Enter a password = This option allows you to unlock the operating system drive with a password, but is only available if you did step 5 above.
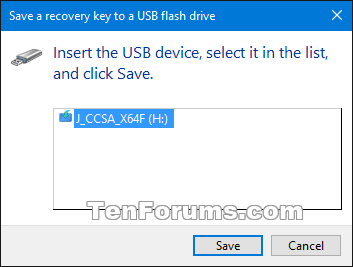
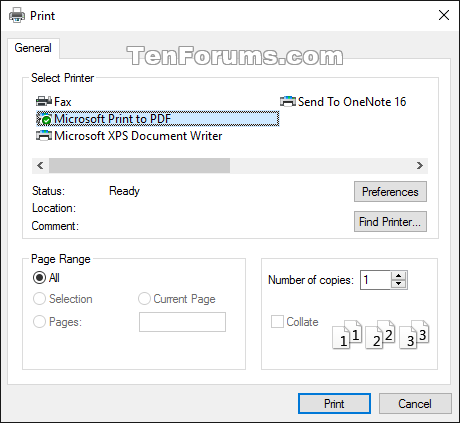
11 Select how (Microsoft account, USB, file, and/or print) you want to back up your BitLocker recovery key for this drive, and click/tap on Next when finished. (see screenshot below)
Microsoft account = This option is only available when you are signed in to Windows 10 with a Microsoft account. It will save the BitLocker recovery key to your OneDrive account online at https://onedrive.live.com/recoverykey.
USB flash drive = This option will save the BitLocker recovery key to a selected USB flash drive.
File = This option will save the BitLocker recovery key .TXT file to a location you select.

Print = This option will print the BitLocker recovery key to the selected printer.
12 Select (dot) how much of your drive to encrypt right now, and click/tap on Next. (see screenshot below)
It is recommended to select Encrypt entire drive.
13 Select (dot) which encryption mode to use, and click/tap on Next. (see screenshot below)
If you did step 1 above to set a default encryption method and cipher strength, then you will not have this setting available since BitLocker will use what you set in step 1 instead.
New encryption mode (XTS-AES 128-bit) = Select this mode if this is a fixed drive or if this drive will only be used on devices running at least Windows 10 (version 1511) or later.
Compatible mode (AES-CBC 128-bit) = Select this mode if this is a removable drive that you're going to use on an older version of Windows (ex: Vista, Windows 7, or Windows 8/8.1).
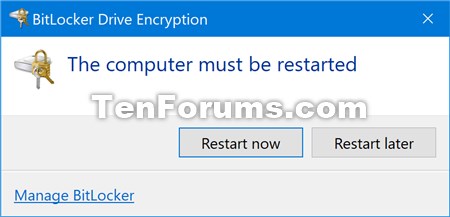
14 Uncheck or check (recommended) the Run BitLocker system check box for what you want, and click/tap on Continue when ready to start encrypting. (see screenshot below)
If you check the box, you will need to click/tap on Restart now after clicking on "Continue".
15 The operating system drive will now start encrypting. (see screenshot below)
This could take a long time to finish depending on the size of the drive and how much data on the drive is being encrypted.
16 When encryption has finished, click/tap on Close. (see screenshot below)
1 If you have not already, unlock the removable data drive encrypted by BitLocker.
2 Do step 3, step 4, or step 5 below for how you would like to manage BitLocker.
3 Right click or press and hold on the encrypted operating system drive (ex: C: ), click/tap on Manage BitLocker, and go to step 6 below. (see screenshot below)
4 Select the encrypted operating system drive (ex: C: ), click/tap on the "Drive Tools" Manage tab, click/tap on the BitLocker button in the ribbon, click/tap on Manage BitLocker, and go to step 6 below. (see screenshot below)
5 Open the Control Panel (icons view), click/tap on the BitLocker Drive Encryption icon, and go to step 6 below.
6 Expand open the encrypted C: BitLocker on drive under Operating system drive, and click/tap on Turn off BitLocker. (see screenshot below)
7 Click/tap on Turn off BitLocker to confirm. (see screenshot below)
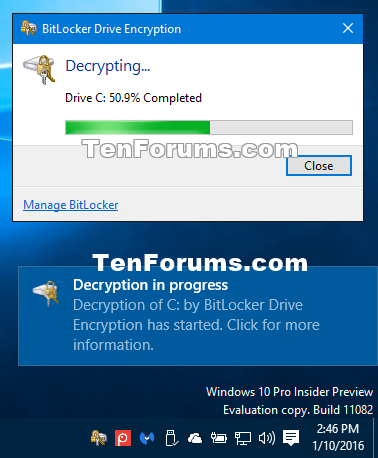
8 The operating system drive will now start decrypting. (see screenshot below)
9 When decryption has finished, click/tap on Close. (see screenshot below)
1 Open an elevated command prompt.
2 Type the command below in the elevated command prompt, and press Enter. (see screenshot below)
manage-bde -off <drive letter>:
Substitute <drive letter> in the command above with the actual drive letter of the encrypted drive you want to decrypt.
For example:manage-bde -off C:
You can check the status of BitLocker for the drive at anytime.
1 Open an elevated Powershell.
2 Type the command below in the elevated PowerShell, and press Enter. (see screenshot below)
Disable-BitLocker -MountPoint "<drive letter>:"
Substitute <drive letter> in the command above with the actual drive letter of the encrypted drive you want to decrypt.
For example:Disable-BitLocker -MountPoint "F:"
You can check the status of BitLocker for the drive at anytime.
That's it,
Shawn
Related Tutorials
- How to Turn On or Off Device Encryption in Windows 10
- How to Unlock an OS Drive Encrypted by BitLocker in Windows 10
- How to Use BitLocker Repair Tool to Recover Encrypted Drive in Windows
- How to Enable or Disable Enhanced PINs for BitLocker Startup in Windows 10
- How to Specify Minimum PIN Length for BitLocker Startup in Windows 10
- How to Change BitLocker Startup PIN in Windows 10
- How to Create a BitLocker Drive Encryption Shortcut in Windows 10
- How to Turn On or Off BitLocker for Removable Data Drives in Windows 10
- How to Turn On or Off BitLocker for Fixed Data Drives in Windows 10
- How to Set Default BitLocker Encryption Method and Cipher Strength in Windows 10
- How to Check Status of BitLocker Drive Encryption for Drive in Windows 10
- How to Add or Remove Change BitLocker Password Context Menu in Windows 10
- How to Add or Remove Change BitLocker PIN Context Menu in Windows 10
- How to Add or Remove 'Manage BitLocker' Context Menu from Drives in Windows
- How to Add or Remove Resume BitLocker Protection Context Menu in Windows 10
- How to Add 'Suspend BitLocker protection' to Context Menu of Drives in Windows
- How to Add or Remove 'Turn off BitLocker' Context Menu from Drives in Windows
- How to Add or Remove 'Turn on BitLocker' Context Menu from Drives in Windows 10
- How to Suspend or Resume BitLocker Protection for Drive in Windows 10
- How to Back up BitLocker Recovery Key for Drive in Windows 10
- How to Copy Startup Key of OS Drive Encrypted by BitLocker in Windows
- How to Encrypt Files and Folders with Encrypting File System (EFS) in Windows 10
- How to Enable or Disable Standard Users from Changing BitLocker PIN or Password in Windows 10
- How to Change BitLocker Password in Windows 10
- How to Create BitLocker Encrypted Container File with a VHD or VHDX File in Windows
Turn On or Off BitLocker for Operating System Drive in Windows 10
-
New #1
What is the reason for option 1 step 14? I ran the bitlocker system check with no issues in build 10586 and it definitely should work...
If you have set a pin to unlock (and allowed alphanumeric pins in Group policy) it is recommended. Reason is not all BIOS let you use full keyboard so you might define a PIN you can't enter at boot time.
BitLocker Drive Encryption in Windows 7: Frequently Asked Questions NoteTo use enhanced PINs, your computer's BIOS must support using the full keyboard in the pre-boot environment. Users can run the optional system check during the BitLocker setup process to ensure the PIN can be entered correctly in the pre-boot environment. You should verify that the computers in your organization are compatible before making the use of enhanced PINs an organizational requirement.
-
New #2
Hello lx07, :)
I recommended step 14 in OPTION ONE because of what's in the red warning box under that step.
Too many people, including myself, had the computer no longer be able to boot into Windows if selected to do the check, and I ended up having to reinstall Windows because it couldn't unlock the OS drive even with the recovery key. The odd thing is that it's not suppose to be encrypted yet, but is still locked out.
When not using the check, BitLocker proceeded and worked fine.
I'm not sure if it's an UEFI issue or what yet causing that, so I added that as a precaution to help others avoid the same.
-
New #3
Can't do a clean install of Win10 as Drive 0 Partition 4 locked
Following advice on another thread I attempted a clean install of Windows 10 as my HDD had become fragmented with numerous spurious partitions that were eating up space unnecessarily. The process went well until Windows created the four partitions and I tried to install Windows on Drive 0 Partition 4, when Windows gave a message:
"Windows can't be installed on Drive 0 Partition 4. Bitlocker Drive Encryption is enabled on the selected partition. Suspend Bitlocker in the Control Panel then restart installation."
I had no idea that the HDD was locked with Bitlocker and the Clean Install tutorial on the forum gave no warning that this could be a problem. As Windows and the Recovery partitions have been deleted this is not an option.
How can I solve this and get Windows reinstalled short of replacing the HDD?
-
New #4
-
New #5
Hello Exspextations, :)
You should be able to delete all partitions on the disk at boot during Windows Setup to do a clean install of Windows 10 on the disk even if it was encrypted with BitLocker.
When you delete or format a disk, it removes BitLocker protection.
-
New #6
Umm. If that is the case, not sure what happened when I did this then, but I have managed to get round the problem as follows:
After setting my Bios to legacy boot I was able to boot from the USB recovery disk. However when I ran the install I still had the Bitlocker problem after deleting all the partitions. As I had nothing to loose, after deleting all the partitions created on the previous attempt to install Windows I clicked the 'new' button which created a 500 MB Drive 0 Partition 1: System Reserved partition and a Drive 0 Partion 2, which when selected allowed me to proceed and successfully install Windows. However, this was not the 4 partition configuration that the Windows installation is supposed to have so I decided to do a fresh clean install after deleting the two partitions to obtain the required configuration. This produced the same 2 partition configuration rather than the 450 recovery partition, 100 MB EFI system partition and 16 MB MSR partition with the rest as the C: drive. Not sure why my installation is different or why it is different from that expected, but at least it works.
One final question: Bitlocker is not shown in the control panel of Window 10 an doesn't appear to be a function of WIndows 10 Home - so not sure why my disk was encrypted in the first place, but should I encrypt the C:\ drive after the clean install?
-
New #7
When you used the "new" route on the unallocated disk, it would have formatted the disk to remove BitLocker. Afterwards, you would have been able to do a clean install as usual.
Windows 10 Home doesn't include being able to encrypt a drive with BitLocker, so I'm not sure what encrypted the drive. You don't have to worry about encrypting it again afterwards since using BitLocker is not an option. If you wanted to encrypt, you could use 3rd party software to do so though.
-
New #8
Hi Shawn,
1. Is this also possible in an environment with corporate dropbox?
Can I implement this with a first client encrypting the full disk with the shared dropbox folder without losing access to the dropbox data on other clients?
2.Is this also possible for file servers?
Love to hear what you have to say.
Kind regards,
Martijn
-
-
New #9
Hello Martijn, and welcome to Ten Forums. :)
I'm not sure how it would be behave for that, but it may be best to keep shares on non encrypted locations to avoid any possible access restrictions.

Turn On or Off BitLocker for Operating System Drive in Windows 10
How to Turn On or Off BitLocker for Operating System Drive in Windows 10Published by Shawn BrinkCategory: Security System
17 Feb 2020


 Quote
QuoteTutorial Categories

Related Discussions
