

How to Enable or Disable Driver Signature Enforcement and Test Mode in Windows 10
64-bit versions of Windows 10 include a driver signature enforcement feature that requires all drivers be signed by Microsoft with a digital signature before being allowed to install and load into the Windows kernel. This is a security feature to help prevent malware from getting into the Windows kernel.
If needed, you can disable driver signature enforcement to install and load unsigned drivers you trust or testing.
See also:
- Driver Signing | Microsoft Docs
- Digital Signatures | Microsoft Docs
- Driver Signing Policy | Microsoft Docs
- Enable Loading of Test Signed Drivers | Microsoft Docs
This tutorial will show you how to enable or disable driver signature enforcement and Test Mode in Windows 10.
You must be signed in as an administrator to enable or disable driver signature enforcement and Test Mode.
It is required to suspend BitLocker or turn off BitLocker for the OS drive to be able to disable driver signature enforcement and/or enable Test Mode.
It is required to disable Secure Boot to be able to disable driver signature enforcement and/or enable Test Mode.
Contents
- Option One: Temporarily Disable Driver Signature Enforcement in Startup Settings at Boot
- Option Two: Enable or Disable Driver Signature Enforcement in Command Prompt
- Option Three: Enable or Disable Test Mode in Command Prompt
This option will only temporarily disable disable driver signature enforcement in Windows 10 allowing you to install unsigned drivers until you restart the computer next.
The next time you restart the computer, driver signature enforcement will automatically be enabled.
If driver signature enforcement is enabled while you still have unsigned drivers installed, those drivers will stop functioning.
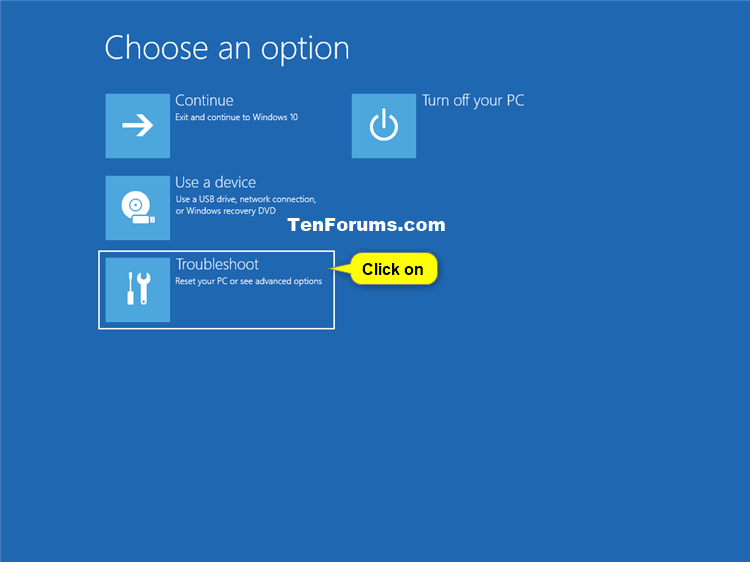
1 Boot to Advanced Startup Options.
2 Click/tap on Troubleshoot on the Choose an option screen at boot. (see screenshot below)
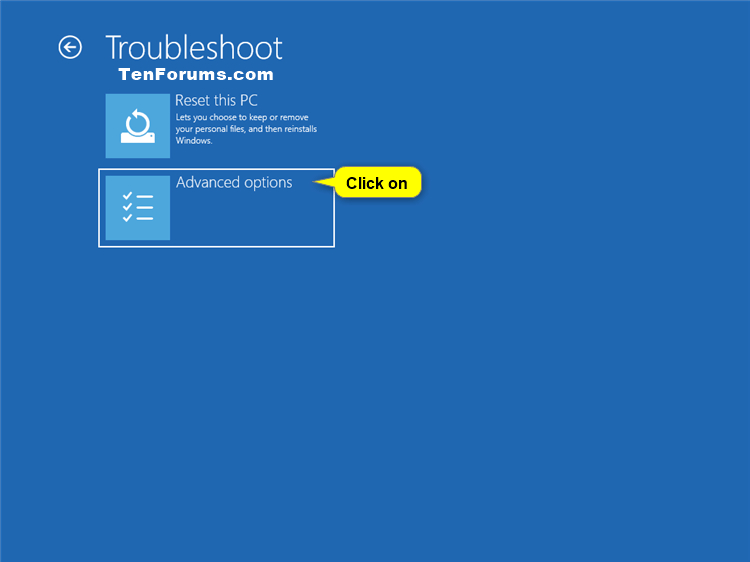
3 Click/tap on Advanced options in Troubleshoot options. (see screenshot below)
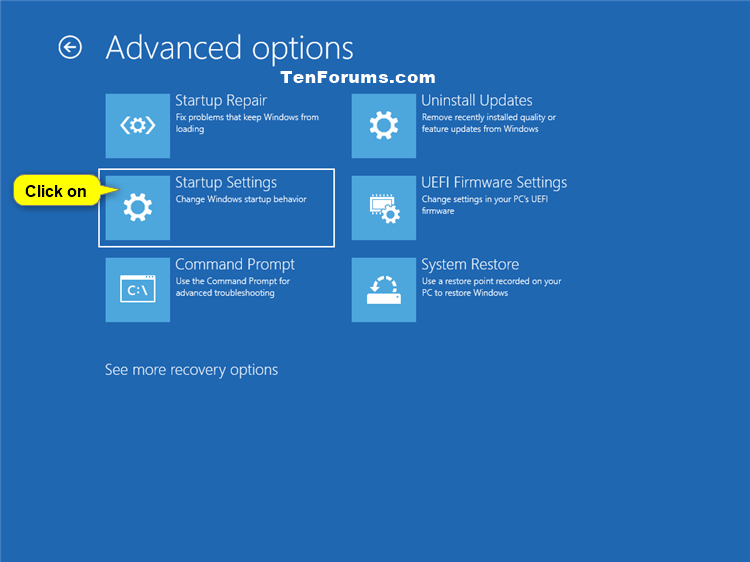
4 Click/tap on Startup Settings in Advanced options. (see screenshot below)
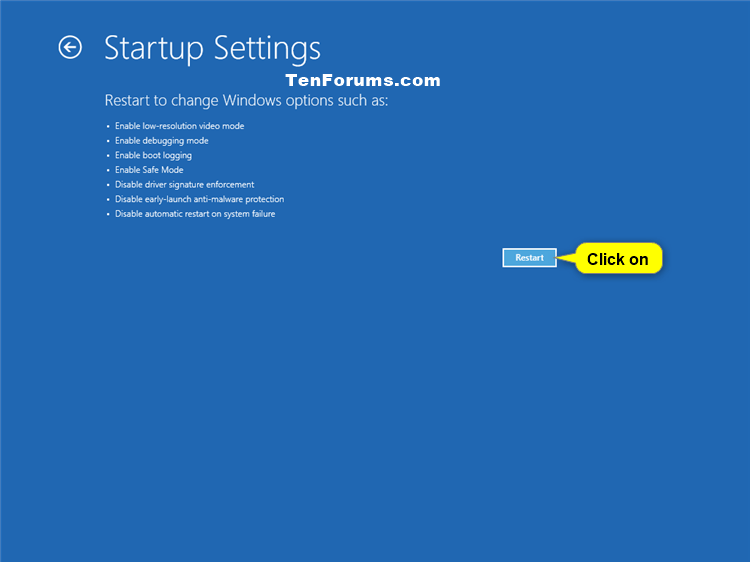
5 Click/tap on the Restart button in Startup Settings. (see screenshot below)
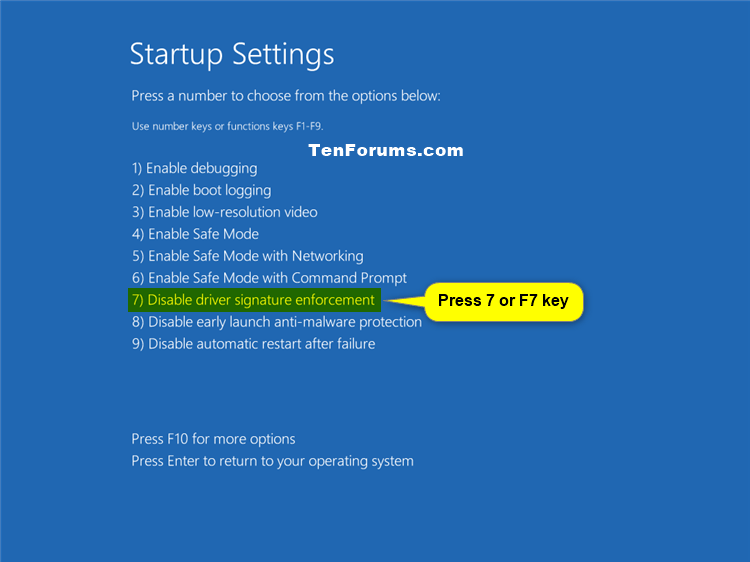
6 When the computer restarts into Startup Settings, press the 7 or F7 key to Disable driver signature enforcement. (see screenshot below)
7 The computer will now automatically restart with driver signature enforcement disabled until you restart the computer next to automatically enable driver signature enforcement.
This setting is independent of Option Three
It is required to disable Secure Boot if you get the error message below while trying to enable Test Mode.
An error has occurred setting the element data..
The value is protected by Secure Boot policy and cannot be modified or deleted.
This option allows you to completely disable driver signature enforcement in Windows 10 allowing you to install unsigned drivers until you enable driver signature enforcement.
If you enable driver signature enforcement while you still have unsigned drivers installed, those drivers will stop functioning.
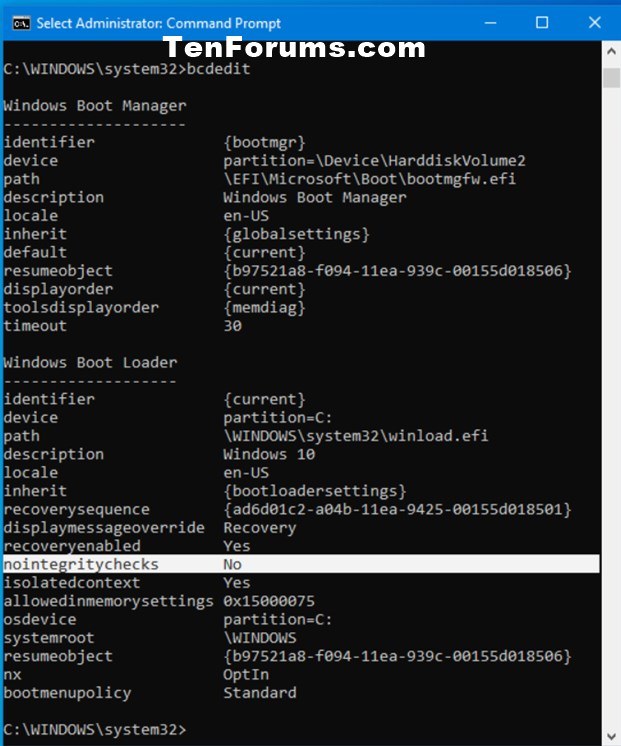
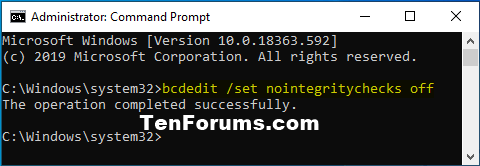
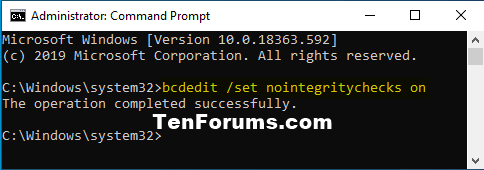
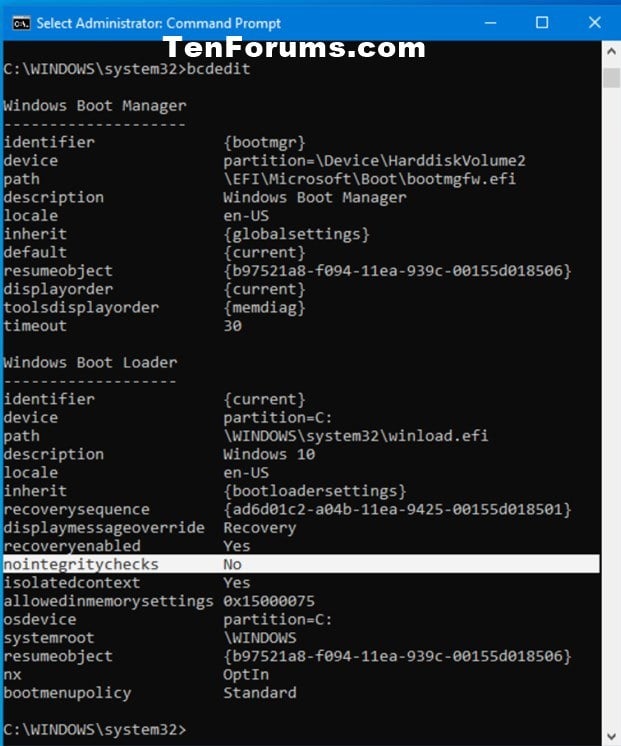
1 Open an elevated command prompt.
2 Copy and paste the command you want to use below into the elevated command prompt, and press Enter. (see screenshots below)
(enable driver signature enforcement - DEFAULT)
bcdedit /set nointegritychecks off
OR
(Disable driver signature enforcement)
bcdedit /set nointegritychecks on
3 Restart the computer to apply.
This setting is independent of Option Two.
This option allows you to enable Test Mode to disable driver signature enforcement on test-signed code and drivers until you disable Test Mode.
If you disable Test Mode while you still have unsigned drivers installed, those drivers will stop functioning.
It is required to disable Secure Boot if you get the error message below while trying to enable Test Mode.
An error has occurred setting the element data.

The value is protected by Secure Boot policy and cannot be modified or deleted.
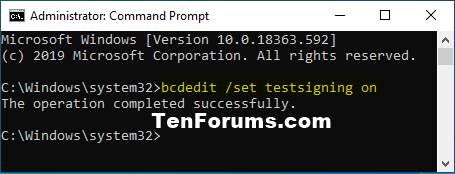
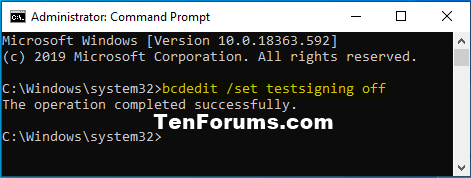
1 Open an elevated command prompt.
2 Copy and paste the command you want to use below into the elevated command prompt, and press Enter. (see screenshots below)
(enable Test Mode)
bcdedit /set testsigning on
OR
(Disable Test Mode - DEFAULT)
bcdedit /set testsigning off
3 Restart the computer to apply.
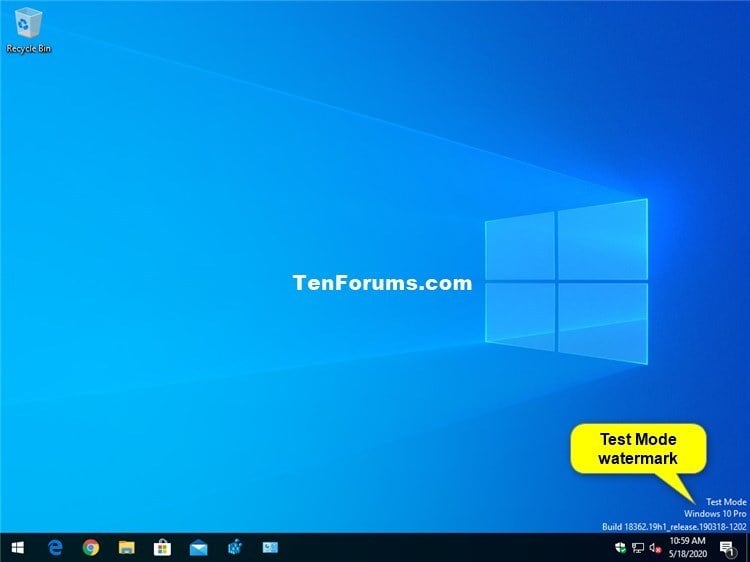
4 If you enabled Test Mode, you will see a Test Mode watermark in the lower right corner of your main display to indicate so. (see screenshot below)
That's it,
Shawn
Related Tutorials
- How to Verify if System Files and Drivers are Digitally Signed in Windows
- How to Enable and Disable Driver Verifier in Windows 10
- How to Turn On or Off Developer Mode in Windows 10
How to Enable or Disable Driver Signature Enforcement in Windows 10
-
New #1
Greets,
Thanks for the nice tutorial!
A Few Queries Please :
( Provided : All the things are well with the driver except it is unsigned! )
It seems the only problem with unsigned drivers occurs during booting / startup. Isn't it ?
Not all the drivers load during the boot, right ? So, is it possible that the driver is not signed, is not loaded during the startup / boot & comes into play a little further without any difficulty ? Plug & Play or something else, Any possibility ?
Thanks. ...
-
New #2
Hello @Vineet Garg,
The driver not being signed is one reason why it may not load during startup.
It also depends on the device and the driver for if it's needed at startup or not, and any possible issues (ex: corrupted) with the driver.
-
New #3
Greets,
Thanks for the quick response, the things are clearer now!
But sorry I did not put the query well. So, one more chance!
Condition : The driver is all good every way but its not signed, the driver is not needed to load at startup / boot & Driver Signature Enforcement is Enabled.
Now,
I am trying to install it. So, what will happen exactly ? how the enforcement will come into play ? Will it stop the installation itself ? Will the device work at all ?
Thanks. ...
-
-
-
-
New #7
Installing unsigned microsoft xbox 360 receiver driver
Hi, brink! First, I would like to thank you for your content.
Recently I was researching about the xbox 360 receivers and why there are reports about the new version of windows 10, 2004, breaking their functionality. I have one dongle myself and wanted to play some games. I have been waiting for the problem to fix itselft through a new update for quite a while now, but nothing has changed. The old usual fix (manual installation of the driver through device manager) stopped working a couple weeks back.
So I found a video on youtube saying that apparently my dongle is from a third party and that is why they stopped working. This was news to me since I thought it was original (I have it for many years now). Anyway, the youtube video taught me how to disable the driver digital signature enforcement through test mode and how to install the driver and revert back out of test mode. The driver installed was downloaded from the microsoft website and the video showed how to edit the file xusb21.inf on notepad to simply change the ID of the product to 0291. So I know that there is nothing malicious about this driver. However, this process removes the digital signing of the driver.
You mentioned if I enable the driver signature enforcement, the installed unsigned driver would stop functioning. So, after installing in test mode and reverting back (comand: bcdedit.exe /set testsigning off), I was worried about security and started to wonder if the enforcement was really at work, since the driver was functioning well. I tried using the command bcdedit.exe to look the options "nointegritychecks" and "testsigning" to see if they were classified as "no" and they were. I tried the commands: "bcdedit.exe /set nointegritychecks off" and
"bcdedit.exe -set loadoptions DENABLE_INTEGRITY_CHECKS" which were completed succesfully.
But when I tried to execute the file xusb21.inf again, nothing happened. Didnt get a warning like before when I tried to install it without entering test mode. To see if it was actually doing something I tried through prompt with the command: "pnputil -a c:\[...]\xusb21.inf" and to my surprise the driver was "installed" succesfully. And I wasnt in test mode. So, I tried unnistalling the driver through device manager and after restarting my computer I tried to install the driver again. Them I got the error message and I had to do all the process again to install the driver.
My guess is that the enforcement is indeed working after the unsigned driver instalation and the driver works after reverting back from test mode. And the reason the xusb21.inf file "installs" without a warning is because this specific driver is already installed. I wonder if I tried to install another unsigned driver the enforcement would work. What are your thoughts about this?
Is there another way to check if the enforcement is indeed active?
Thanks in advance!
-
New #8
Hello h9090, and welcome to Ten Forums.
It should normally prevent you from installing any unsigned driver that's not already installed while not in Test Mode.
You can run thebcdeditcommand in an elevated command prompt to check if the nointegritychecks entry shows Yes (on - disabled) or No (off - enabled). If there isn't a nointegritychecks entry, then it's the same as enabled.
-
-
New #9
Thanks for the fast response!
It seems to be as I imagined, then.
Thanks for welcoming me into the forum.

How to Enable or Disable Driver Signature Enforcement in Windows 10
How to Enable or Disable Driver Signature Enforcement and Test Mode in Windows 10Published by Shawn BrinkCategory: Hardware & Drivers
03 Nov 2020

 Quote
Quote
Tutorial Categories

Related Discussions
