

Information
Windows XP Mode is a free pre-installed virtual machine running on Virtual PC in Windows 7. See the tutorial on our sister site Seven Forums: Windows XP Mode - Install and Setup - Windows 7 Help Forums
In this tutorial, I will show how to use Windows XP Mode virtual hard disk to create a virtual machine in Windows 10 using Hyper-V-
An archiving application which can open EXE archives is required. In this tutorial, I will use 7-Zip. Free download: 7-Zip
Notice that setting up Windows XP Mode virtual machine in Hyper-V, it will not be activated. If you have a valid XP product key, you can use it to activate the virtual machine.
Without activation, you can use Windows XP Mode virtual machine for 30 days.
Windows XP Mode is only available in US English.
Part One: Download Windows XP Mode Part Two: Extract the VHD Part Three: Add browser offline installer Part Four: Setup a Hyper-V VM Part Five: First Boot (OOBE)
1.1) Download Windows XP Mode package from Microsoft:
Download
1.2) Be sure to select the full version, highlighted in screenshot. The N version comes without Windows Media Features:
2.1) Right click the downloaded WindowsXPMode_en-us.exe file, select Properties, unblock the file (tutorial):
2.2) Open the Windows XP Mode EXE archive in 7-Zip:
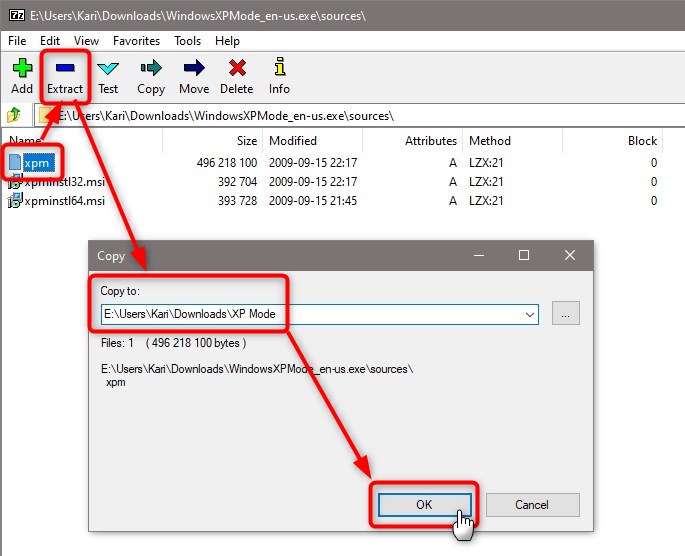
2.3) In 7-Zip, browse to Sources folder of the archive, select file xpm, click Extract, select where you want to extract the file, click OK:
2.4) Browse to folder where you extracted the file xpm. Open it in 7-Zip:
2.5) In 7-Zip, select file VirtualXPVHD, click Extract, select where you want to extract the file, click OK:
2.6) The extracted VirtualXPVHD file is the Windows XP virtual hard disk. When extracted, it has no extension. We need to add the .vhd extension to it to make Windows to recognize it as a virtual hard disk file.
In File Explorer, browse to folder where you extracted the VHD. Select View tab in Explorer, select File name extensions, right click the VHD file, select Rename, add .vhd to end of file name:
3.1) The default browser in XP Mode is Internet Explorer version 6. It is so outdated, that you might not be able to use it to download a more recent IE version, or any third party browser. It is recommended that you add an offline installer for a browser to XP VHD file before using it on a virtual machine, and install it when VM is booted first time.
3.2) Having difficulties to find out offline installer for old enough 32 bit version for Chrome and Firefox, I use Opera. Download the oldest possible Opera offline installer:
Download
3.3) At the moment of writing this, version 15.0.1147.130 is oldest listed on Opera archive, it works well in XP:
3.4) Unblock the downloaded installer, right click it and select Copy.
3.5) Right click the extracted VirtualXPVHD.vhd file, select Mount to open VHD in File Explorer. In my case now, the VHD was mounted as drive J:. Browse to folder Documents and Settings\All Users in mounted VHD, paste the downloaded browser offline installer:
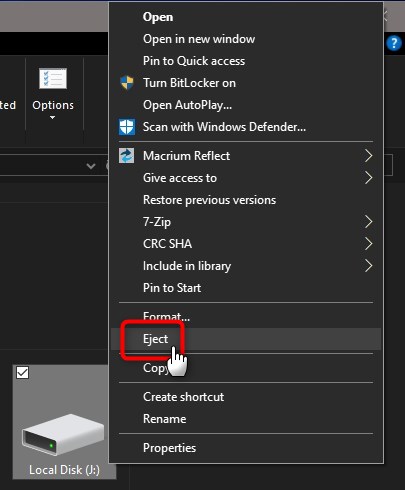
3.6) A mounted VHD cannot be used on a virtual machine. Right click the VHD drive in File Explorer (This PC), and select Eject to dismount it:
4.1) Create a new Generation 1 virtual machine in Hyper-V as told in Part Five in Hyper-V tutorial: Hyper-V virtualization - Setup and Use in Windows 10
4.2) Some tips for Windows XP VM:
- XP works with 512 MB virtual RAM, but I recommend using 2 GB, no Dynamic Memory
- Windows XP VM only supports two virtual processors, there's no need to add more
- Using a Legacy Network Adapter as told in Hyper-V tutorial is important, network connection in Windows XP VM simply does not work using the default virtual network adapter
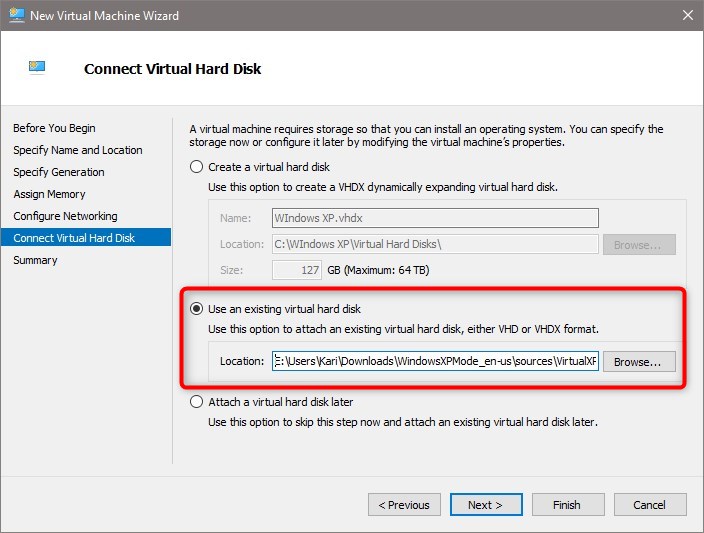
4.3) When creating the VM in New Virtual Machine Wizard, instead of creating a new VHD, use your extracted and prepared WindowsXPVHD.vhd file as existing VHD in Connect Virtual Hard Disk page:
5.1) First boot of your new Windows XP Mode VM goes through OOBE. First thing is, you must accept the license agreement.
5.2) The XP VM is in US English, default location USA, default input method US English keyboard, and default formats US (numbers, time and so on). If you are OK with these, click Next in Regional and Language options.
In my case, I wanted formats be UK English, location Finland, and input method to be my familiar Finnish keyboard layout. To change them, I click Customize:
5.3) In Regional Options tab, I can change formats and location:
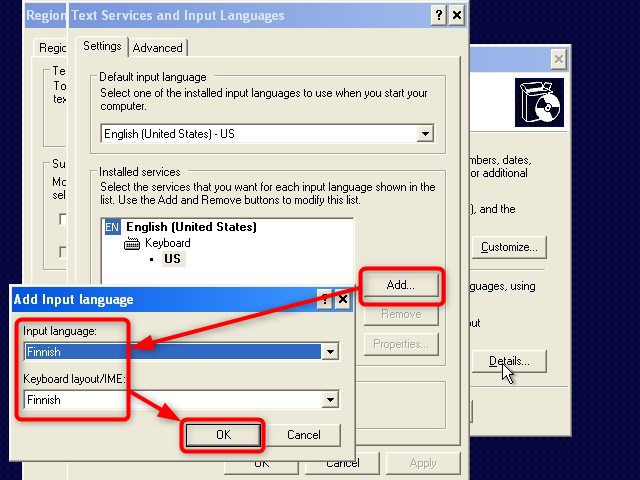
5.4) Switching to Languages tab, I click Details to change input method:
5.4) I can now add Finnish keyboard:
... and make it default:
5.5) The XP Mode VM will be setup using the built-in administrator account (username Administrator). It is important to set up a password for it. This is done on the same OOBE page where you name the computer:
5.6) In next page, you can change the time zone:
5.7) OOBE continues. If you are shown some Found new hardware prompts, ignore them for now and click Cancel. Select if you want updates to be automatic or not:
5.8) Run the browser offline installer you added to VHD in step 3.5:
5.9) Browser installed, Opera in this example case:
That's it. You have now a working Windows XP virtual machine.
Kari
Related Tutorials
- How to Setup and Use Hyper-V in Windows 10 for OS Virtualization
- How to Create Shortcut of Hyper-V Virtual Machine in Windows 8 and 10
- How to Import Existing Windows XP Mode Virtual Machine from Windows 7 to Windows 10
Hyper-V - Add Windows XP Mode Virtual Machine in Windows 10
-
New #1
Excellent Kari. The VHD also works in VirtualBox although until you install guest additions you have no mouse support and have to do everything using the keyboard.
-
New #2
Hello,
Is it possible to use WinRAR, which I already have installed in the computer, in the same way as you use 7-Zip in this tutorial or is it essential for success that 7-Zip is used?
Thanks in advance
-
New #3
it's convenient to use 7-Zip as installing it adds the right-click context menu that makes it easy to open the .exe as an archive. Providing you can open the .exe in WinRar it should do just as good a job at extracting the files. You may need to interpret some of the 'browse to here' instructions in terms that make sense in WinRar, but the end result will be the same.
-
-
New #5
Hello again, I managed to install the Windows XP in a Hyper V environment in Windows 10. So far everything was fine. But then, when I wanted to start to use it, problems heaped up. I can't connect to the net no matter how I change the settings for the important SWITCH and I can't change the screen resolution to something I can work with on my wide screen computer. This is perhaps the worst of the problems.
Happy for any suggestions.

-
-
New #7
-
New #8
I just started using it a few days ago. I migrated all of my VMs over to it. It’s a lot like HyperV but the extensions that can be loaded into each VM really are nice. Mouse works seamlessly, screen resolutions have more choices. Then network adapter choices are so much better. You can also share folders either permanently or just for the session. I’m still learning but I think the extension also support drag and drop file transfer. Be sure you get V6, that the latest. That said I really like the Macrium iVBoot and that only works with HyperV. I’ve got HyperV on one PC and VBox on another. VBox has a command line conversion utility to help you import VHDX disks. Very handy.
Enjoy.
-
-
Hyper-V - Add Windows XP Mode Virtual Machine in Windows 10
How to Create Hyper-V virtual machine using free Windows XP Mode in Windows 10Published by Kari "Kalsarikänni" FinnCategory: Virtualization
18 Aug 2019


 Quote
Quote

Tutorial Categories

Related Discussions
