

How to Share Files and Folders Over a Network in Windows 10 and Windows 11
File sharing over a network in Windows 10 allows you to share files and folders on your computer with other users over a private or public network in your workgroup or domain.
You can set the permissions of a shared file or folder to allow groups or users to have a read only, change (modify), or full control access rights.
Starting with Windows 10 version 1803, some features of file sharing over a network have changed, including the removal of HomeGroup. However, even though HomeGroup has been removed, you can still share printers and files by using features that are built into Windows 10.
See also: Can't access shared folders from File Explorer in Windows 10 | Microsoft Docs
This tutorial will show you how to setup and share files and folders over a network in Windows 10 and Windows 11.
You will only be able to share files and folders that are on NTFS and ReFS volumes.
When you share a folder, all files in the folder will be shared.
If version 22H2 can not access network shares on 20H2, you'll need to turn on "Enable insecure guest logons", as described here.
Apparently it's required on 22H2, but not on 20H2.
Contents
- Option One: Set Up File Sharing on a Windows PC
- Option Two: Share File or Folder using "Give access to" Context Menu
- Option Three: Stop Sharing File or Folder using "Give access to" Context Menu
- Option Four: Share File or Folder using Share tab in File Explorer
- Option Five: Stop Sharing File or Folder using Share tab in File Explorer
- Option Six: Share Folder using Sharing Properties
- Option Seven: Share Folder or Drive using Advanced Sharing
- Option Eight: Stop Sharing Folder or Drive using Advanced Sharing
- Option Nine: Share Folder or Drive using Shared Folder Wizard
- Option Ten: Stop Sharing Folder or Drive using Shared Folders MMC Snap-in
EXAMPLE: File sharing over a network in Windows 10
This option needs to be done on each Windows PC you want to be able to share files and folders between before doing any of the other options below.
1 Make sure each computer you want to share between are all connected to the same network. For example, all connected to the same router via Ethernet and/or wireless.
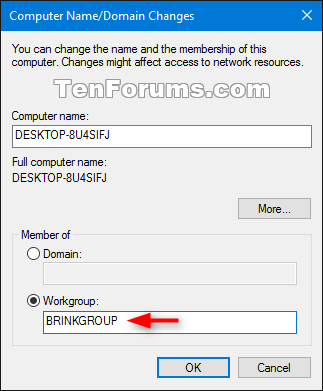
2 Make sure each computer on the network has a different computer name.
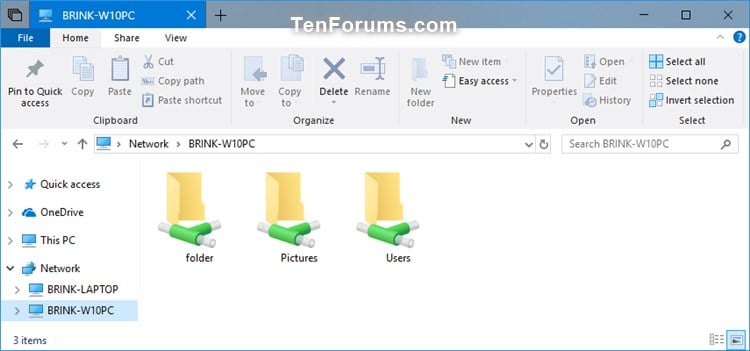
3 Make sure each computer you want to share between are on the same workgroup. (see screenshot below)
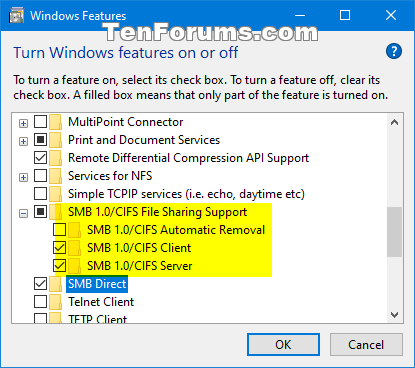
4 Enable SMB Direct on each computer you want to share between. If you have an older USB network drive or connecting to a previous version of Windows (ex: "Windows 7") than Windows 10, then you will need to enable SMB1. (see screenshot below)
SMB Direct will not be available in the Windows 10 Home edition. You will need to enable SMB1 instead.
If you enable SMB1, be sure to uncheck Automatic Removal.It is recommended you do not enable SMB1 unless absolutely necessary for security reasons.
If you enable SMB1, it will also enable and have the Computer Browser service to run which could potentially cause 10 minutes + delay in discovering a PC newly connected to the network.
See also:
- SMB insecure guest auth now off by default in Windows 11 Insider Pro editions
- Guest access in SMB2 and SMB3 disabled by default in Windows
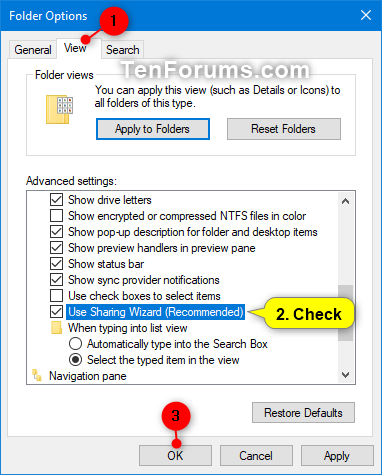
5 Make sure Use Sharing Wizard is checked in Folder Options > View tab on each computer you want to share between. (see screenshot below)
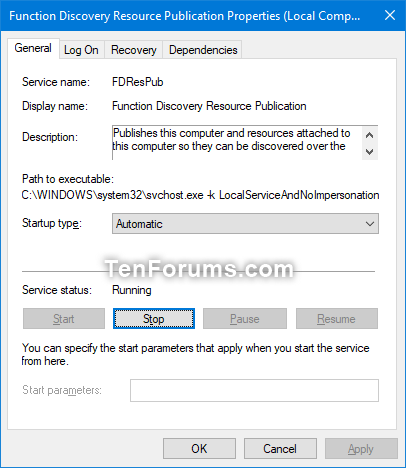
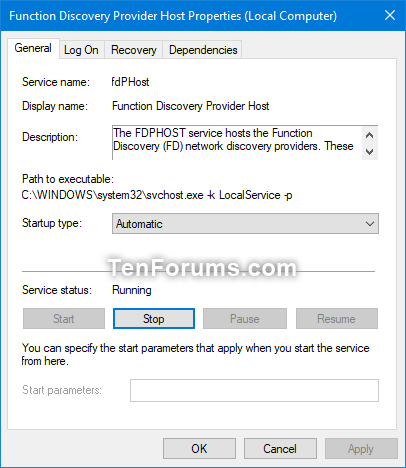
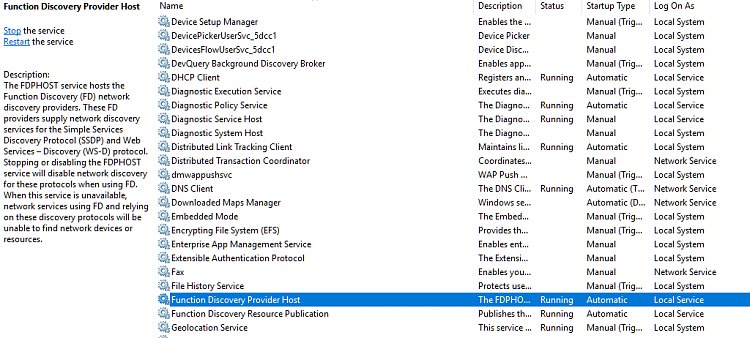
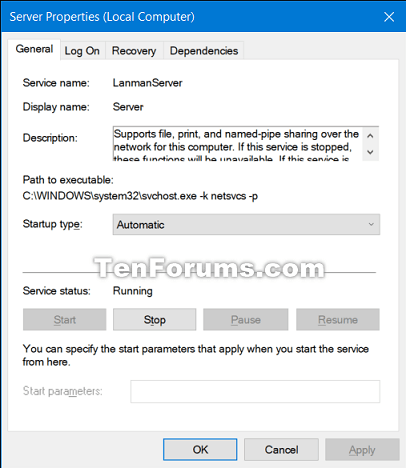
6 Make sure the Function Discovery Resource Publication, Function Discovery Provider Host, and Server services are started (running) and their startup type is set to automatic on each computer you want to share between. (see screenshots below)
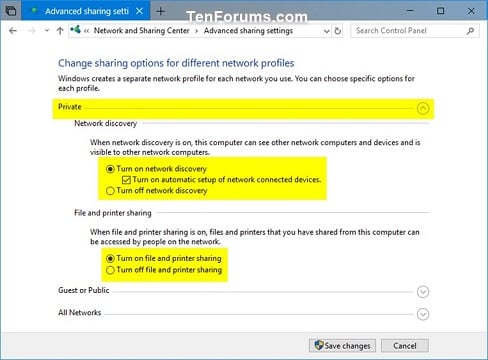
7 Set the network location on each computer you want to share between to private (recommended) or public.
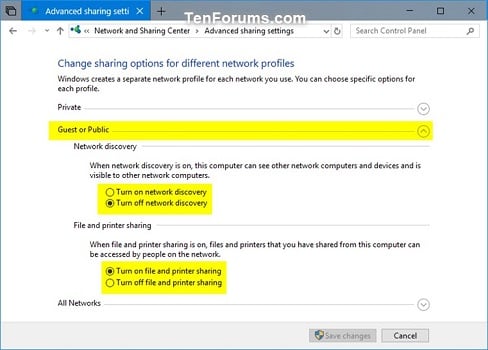
8 Turn on network discovery for your private or public network on each computer you want to share between.
9 Turn on File and Printer Sharing for your private or public network on each computer you want to share between.
10 Turn on Public folder sharing on each computer you want to share between if you want to share items in the C:\Users\Public folder on a computer.
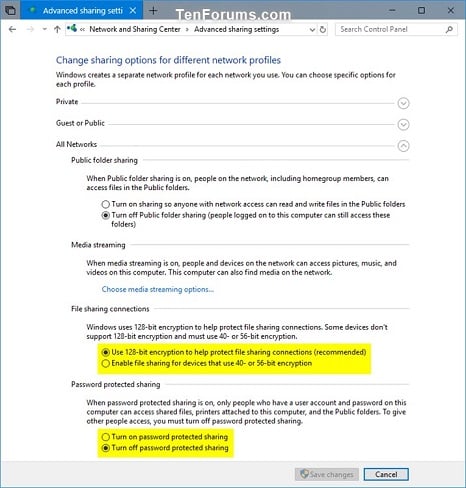
11 Turn on or off password protected sharing for what you want on each computer you want to share between.
12 Select the file sharing connections encryption level you want to use on each computer you want to share between.
When password protected sharing is turned on, only people who have a user account and password on your computer can access shared files, printers attached to your computer, and the Public folders.
If you want to give access to shared files to other people without requiring them having an account and password on your computer, then turn off password protected sharing.
13 Verify the services below are enabled, set to Automatic, and running on each computer:
- Function Discovery Provider Host
- Function Discovery Resource Publication
- SSDP Discovery
- UPnP Device Host
14 You can now use any of the options below to share files and folders with another computer on the same network.
Contents
- Option Two: Share File or Folder using "Give access to" Context Menu
- Option Three: Stop Sharing File or Folder using "Give access to" Context Menu
- Option Four: Share File or Folder using Share tab in File Explorer
- Option Five: Stop Sharing File or Folder using Share tab in File Explorer
- Option Six: Share Folder using Sharing Properties
- Option Seven: Share Folder or Drive using Advanced Sharing
- Option Eight: Stop Sharing Folder or Drive using Advanced Sharing
- Option Nine: Stop Sharing Folder or Drive using Shared Folders MMC Snap-in
You must do Option One first if sharing with another computer on the same network.
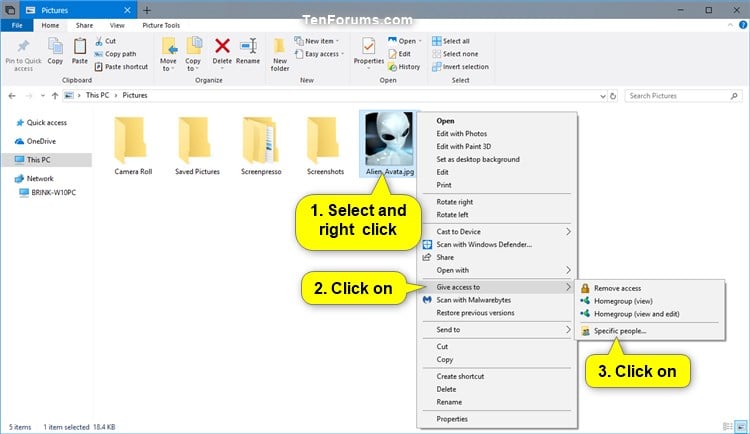
1 Open File Explorer (Win+E).
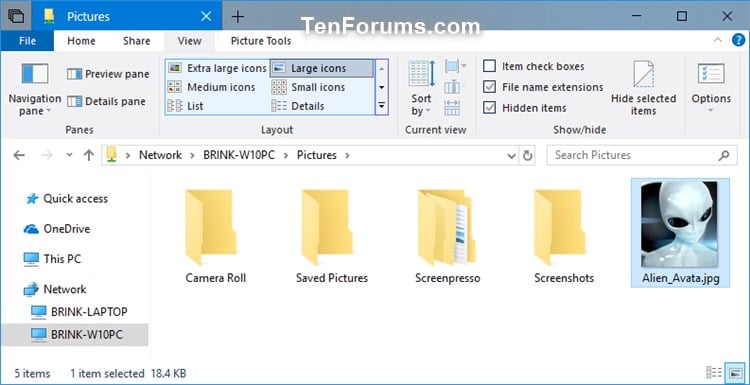
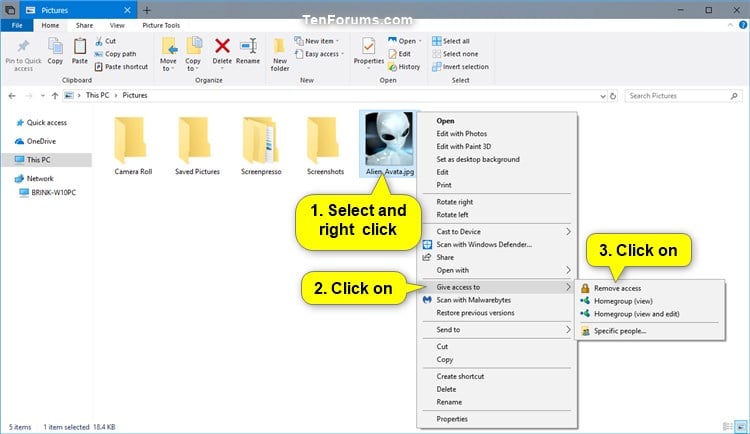
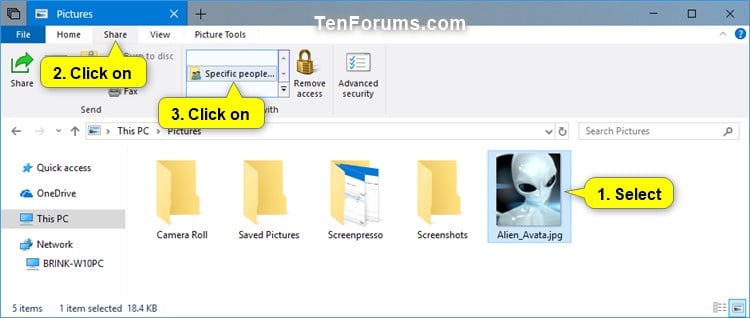
2 Navigate to and select one or more file, folder, and/or library you want to share, right click or press and hold on the selected item(s), click/tap on Give access to, and click/tap on Specific people. (see screenshot below)
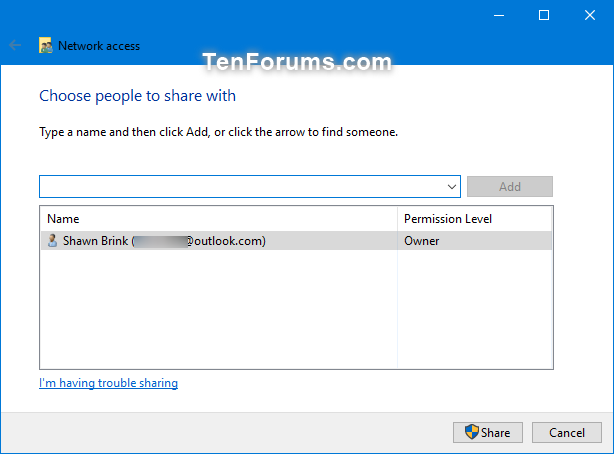
3 You will now see the people that you are currently sharing this with and their permission level. (see screenshot below)
The owner will be listed by default.
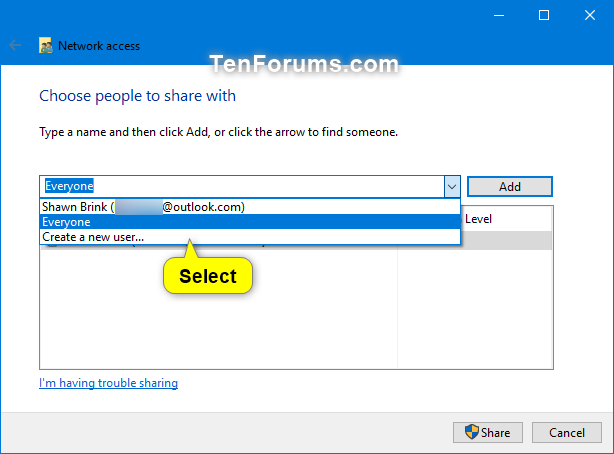
4 Select a name of a user account on your PC or everyone you want to share with. (see screenshot below)
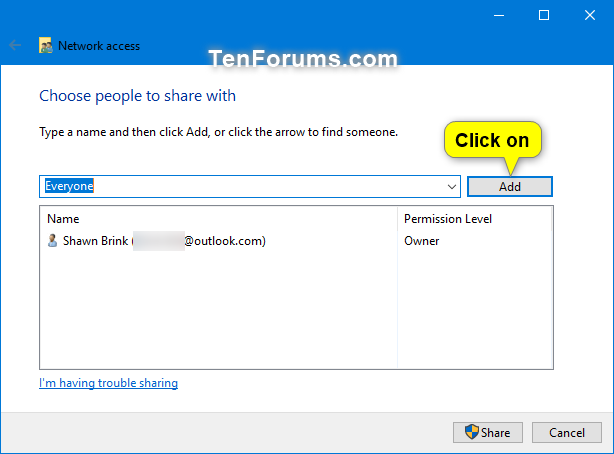
5 Click/tap on Add. (see screenshot below)
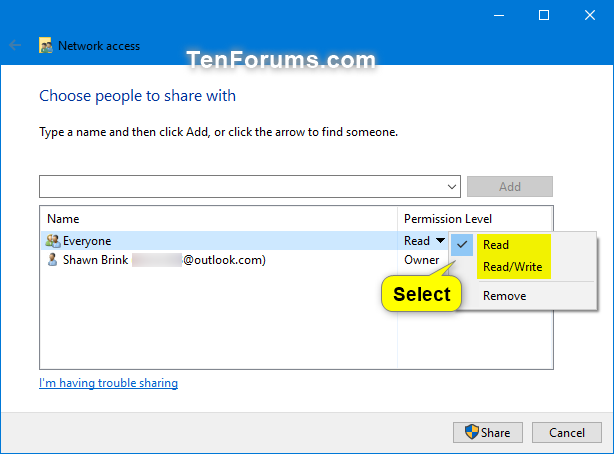
6 Select (check) the permission level you want for this user or everyone. (see screenshot below)
If you want to stop sharing with a specific user, select the user's name, and click/tap on Remove in their permission level.
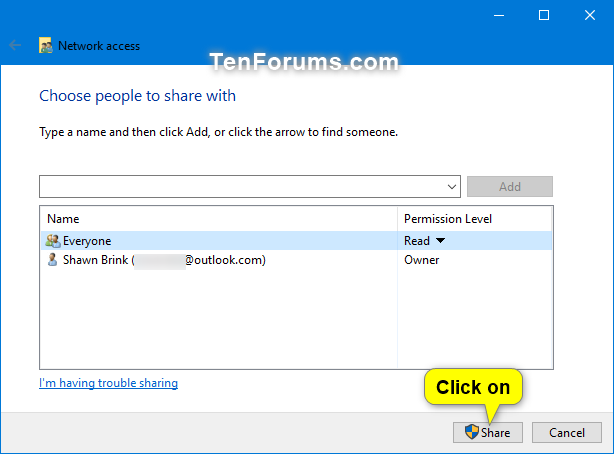
7 When finished adding people to share with, click/tap on the Share button at the bottom. (see screenshot below)
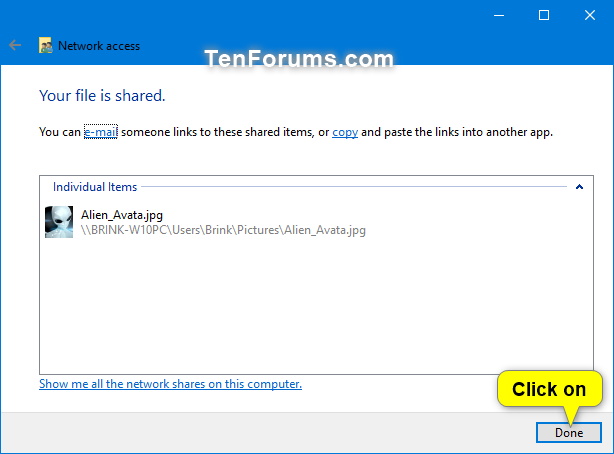
8 Click/tap on Done. (see screenshot below)
This option will have no effect on people you choose to share with in advanced sharing from Option Eight.
You must do Option One first if sharing with another computer on the same network.
1 Open File Explorer (Win+E).
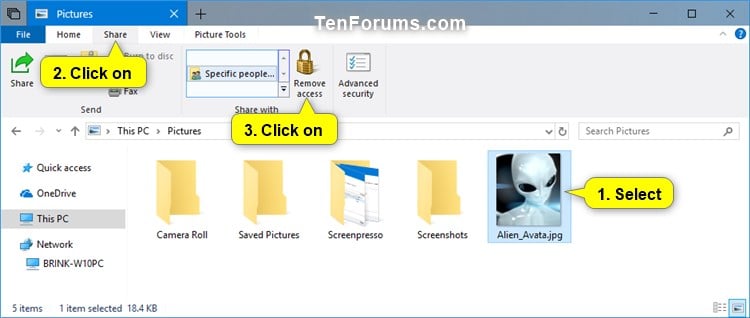
2 Navigate to and select one or more file, folder, and/or library you want to stop sharing with everyone, right click or press and hold on the selected item(s), click/tap on Give access to, and click/tap on Remove access. (see screenshot below)
You must do Option One first if sharing with another computer on the same network.
1 Open File Explorer (Win+E).
2 Navigate to and select one or more file, folder, and/or library you want to share, click/tap on the Share tab, and click/tap on Specific people in the "Share with" section of the ribbon. (see screenshot below)
3. You will now see the people that you are currently sharing this with and their permission level. (see screenshot below)
The owner will be listed by default.
4 Select a name of a user account on your PC or everyone you want to share with. (see screenshot below)
5 Click/tap on Add. (see screenshot below)
6 Select (check) the permission level you want for this user or everyone. (see screenshot below)
If you want to stop sharing with a specific user, select the user's name, and click/tap on Remove in their permission level.
7 When finished adding people to share with, click/tap on the Share button at the bottom. (see screenshot below)
8 Click/tap on Done. (see screenshot below)
This option will have no effect on people you choose to share with in advanced sharing from Option Eight.
You must do Option One first if sharing with another computer on the same network.
1 Open File Explorer (Win+E).
2 Navigate to and select one or more file, folder, and/or library you want to stop sharing with everyone, click/tap on the Share tab, and click/tap on Remove access in the "Share with" section of the ribbon. (see screenshot below)
You must do Option One first if sharing with another computer on the same network.
1 Open File Explorer (Win+E).
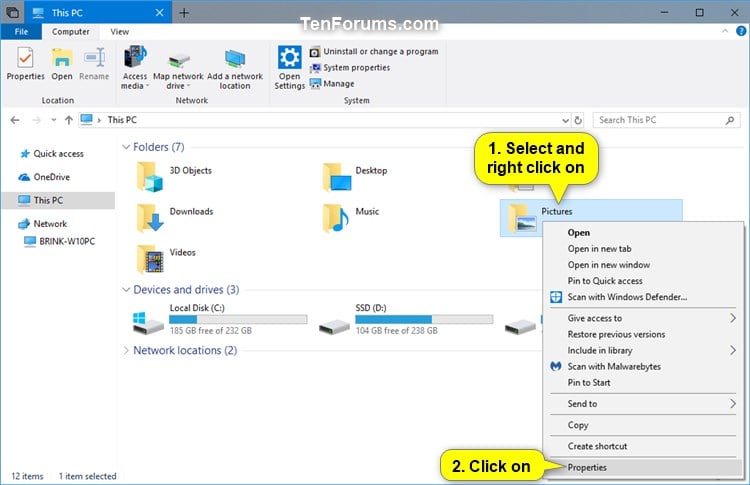
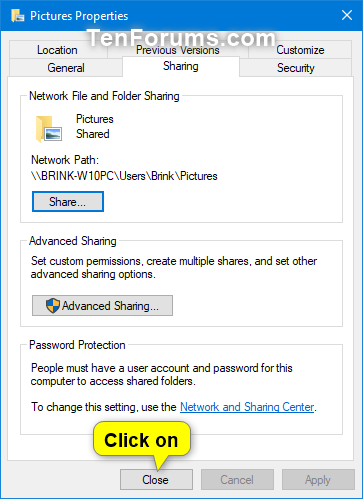
2 Navigate to and right click or press and hold on the folder you want to share, and click/tap on Properties. (see screenshot below)
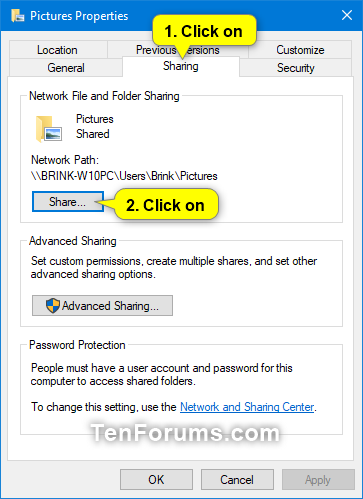
3 Click/tap on the Sharing tab, and click/tap on the Share button. (see screenshot below)
4 You will now see the people that you are currently sharing this with and their permission level. (see screenshot below)
The owner will be listed by default.
5 Select a name of a user account on your PC or everyone you want to share with. (see screenshot below)
6 Click/tap on Add. (see screenshot below)
7 Select (check) the permission level you want for this user or everyone. (see screenshot below)
If you want to stop sharing with a specific user, select the user's name, and click/tap on Remove in their permission level.
8 When finished adding people to share with, click/tap on the Share button at the bottom. (see screenshot below)
9 Click/tap on Done. (see screenshot below)
10 Click/tap on Close. (see screenshot below)
You must be signed in as an administrator to be able to do this option.
You must do Option One first if sharing with another computer on the same network.
1 Open File Explorer (Win+E).
2 Navigate to and right click or press and hold on the folder or drive you want to share, and click/tap on Properties. (see screenshot below)
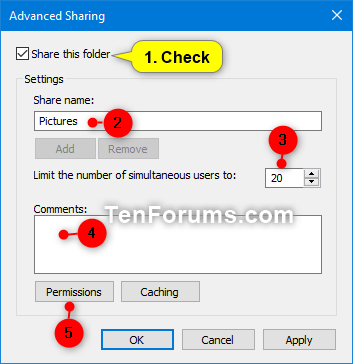
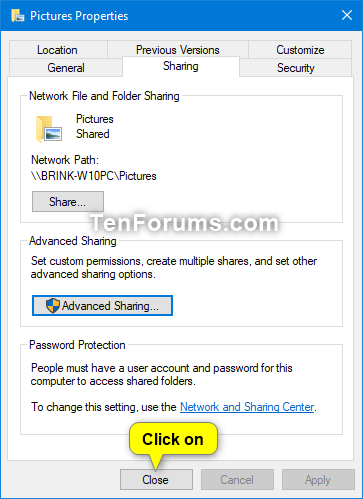
3 Click/tap on the Sharing tab, and click/tap on the Advanced Sharing button. (see screenshot below)
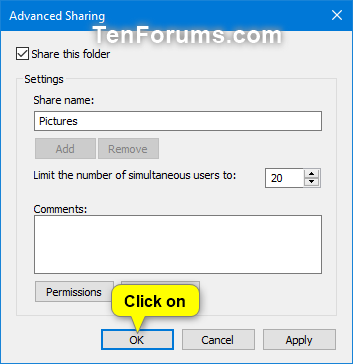
4 Perform the following actions: (see screenshot below)
A) Check Share this folder.
B) If you want a different share name, then you can change it.
C) Limit the number of simultaneous users to the number you want. The default is 20.
D) Add any comments you want for this share.
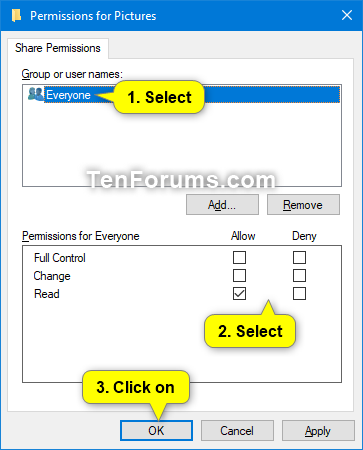
E) Click/tap on the Permissions button.
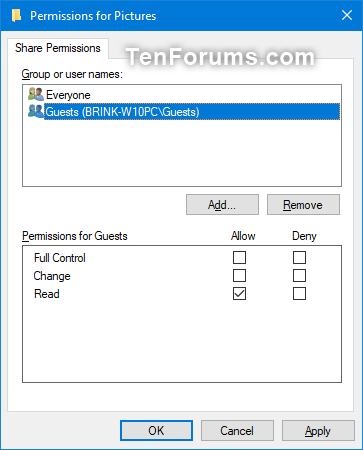
5 Select a group or user, select (check or uncheck) the permissions (allow or deny) you want for this group or user, and click/tap on OK when finished. (see screenshots below)
Everyone is allowed to read this share by default.
Note
If you want to stop sharing with a group or user, select the user or group, and click/tap on the Remove button.
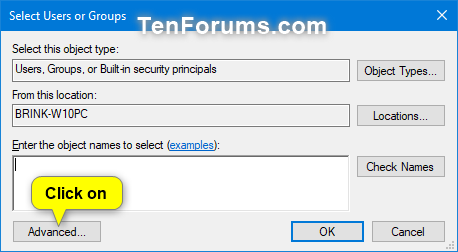
If you want to add a user or group to share this folder or drive with, click/tap on the Add button, and perform the following steps:
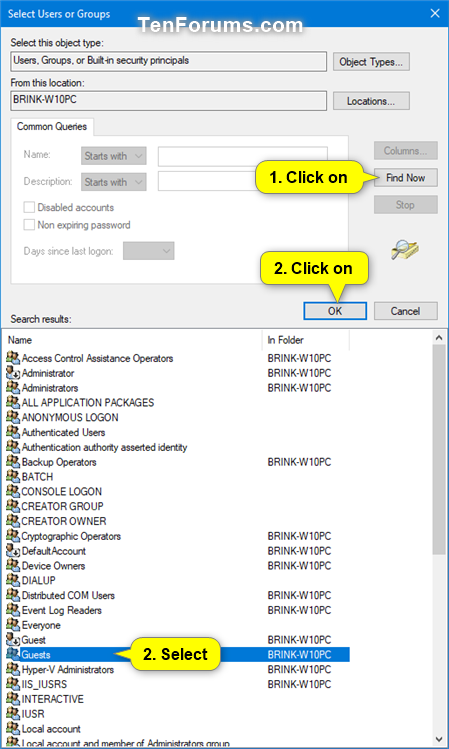
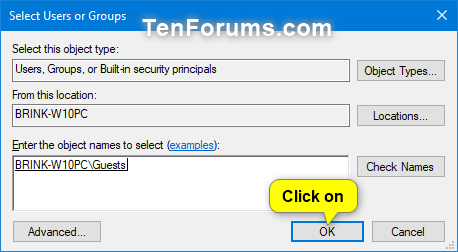
A) Click/tap on the Advanced button. (see screenshot below)
B) Click/tap on the Find Now button, select a user or group you want to share with, and click/tap on OK. (see screenshot below)
C) Click/tap on OK. (see screenshot below)
6 Click/tap on OK. (see screenshot below)
7 Click/tap on Close. (see screenshot below)
You must be signed in as an administrator to be able to do this option.
This option only affects what you shared in Advanced Sharing from Option Seven, and will have no effect on people you choose to share with from Option Two, Option Four, and Option Six.
You must do Option One first if sharing with another computer on the same network.
1 Open File Explorer (Win+E).
2 Navigate to and right click or press and hold on the folder or drive you want to stop sharing with everyone, and click/tap on Properties. (see screenshot below)
3 Click/tap on the Sharing tab, and click/tap on the Advanced Sharing button. (see screenshot below)
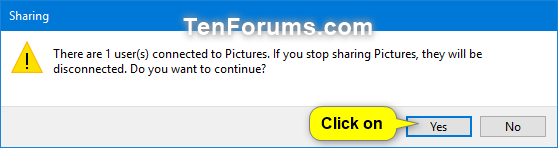
4 Uncheck Share this folder, and click/tap on OK. (see screenshot below)
5 If prompted, click/tap on Yes to confirm. (see screenshot below)
6 Click/tap on Close. (see screenshot below)
You must be signed in as an administrator to be able to do this option.
This option is not available in the Home editions of Windows 10/11.
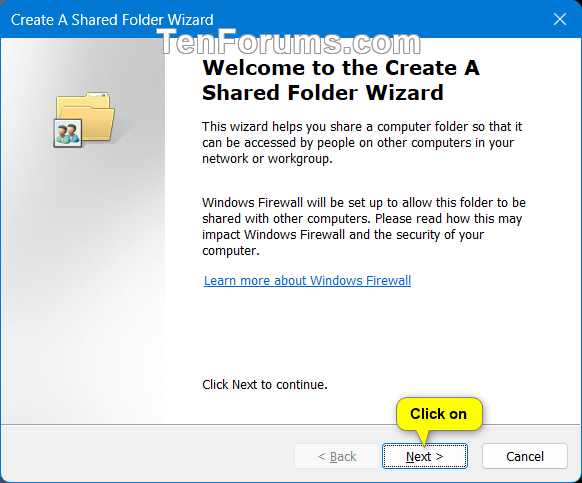
1 Press the Win+R keys to open Run, type either compmgmt.msc (Computer Management) or fsmgmt.msc (Shared Folders) into Run, and click/tap on OK.
2 Right click on Shares in the left pane, and click/tap on New Share. (see screenshot below)
3 Click/tap on Next. (see screenshot below)
4 Perform the following actions to select a folder or drive to share: (see screenshots below)
- Click/tap on Browse.
- Navigate to and select the folder or drive you want to share.
- Click/tap on OK.
- Click/tap on Next
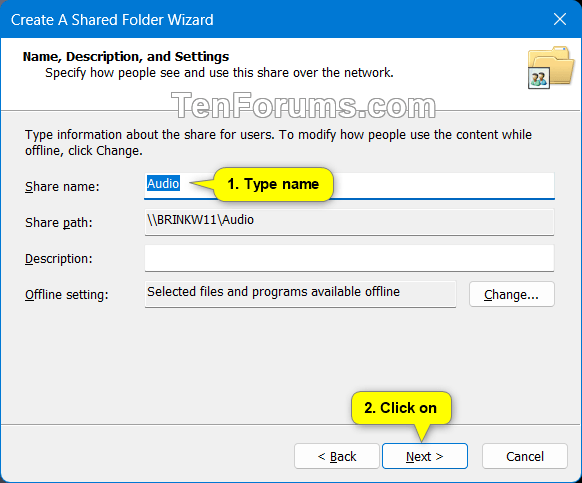
5 Type a Share name you want, and click/tap on Next. (see screenshot below)
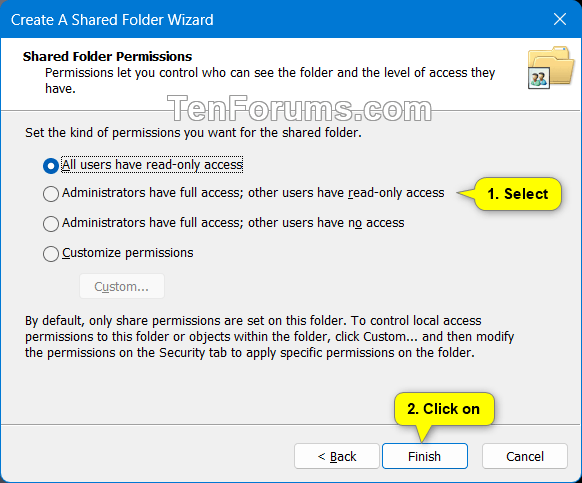
6 Perform one of the following actions to set share permissions: (see screenshots below)
- Select (dot) one of the top 3 permissions, and click/tap on Finish.
- Select (dot) Customize permissions, and click/tap on the Custom button.
- Select a group or user, select (check or uncheck) the permissions (allow or deny) you want for this group or user.
- Click/tap on OK when finished.
- Click/tap on Finish.
If you want to stop sharing with a group or user, select the user or group, and click/tap on the Remove button.
If you want to add a user or group to share this folder or drive with, click/tap on the Add button, and perform the following steps:
A) Click/tap on the Advanced button. (see screenshot below)
B) Click/tap on the Find Now button, select a user or group you want to share with, and click/tap on OK. (see screenshot below)
C) Click/tap on OK. (see screenshot below)
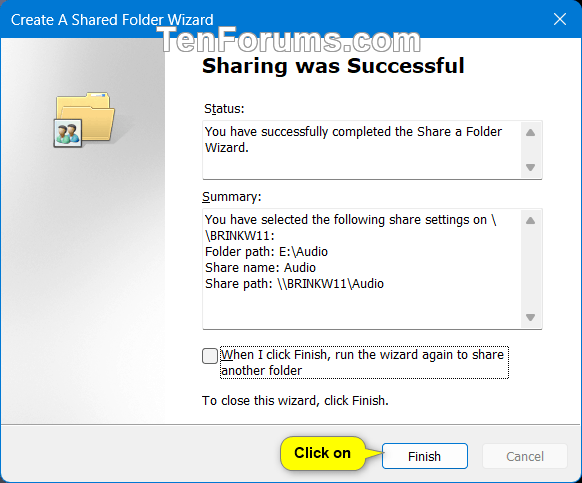
7 Click/tap on Finish. (see screenshot below)
8 When finished, you can now close Computer Management or Shared Folders if you like.
You must be signed in as an administrator to be able to do this option.
This option is not available in the Home editions of Windows 10/11.
This option will have no effect on people you choose to share with from Option Two, Option Four, and Option Six.
This option is the same as doing Option Eight, and affects what you shared in Advanced Sharing from Option Seven.
You must do Option One first if sharing with another computer on the same network.
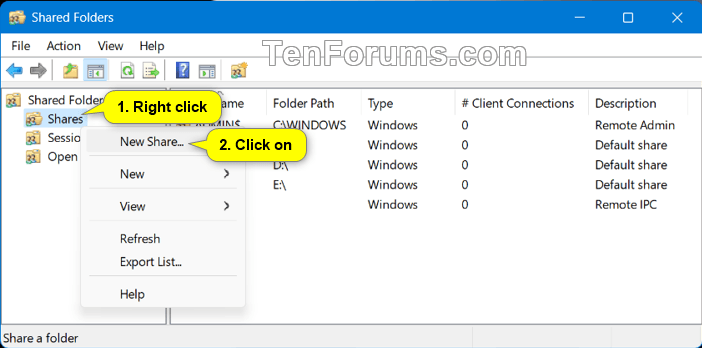
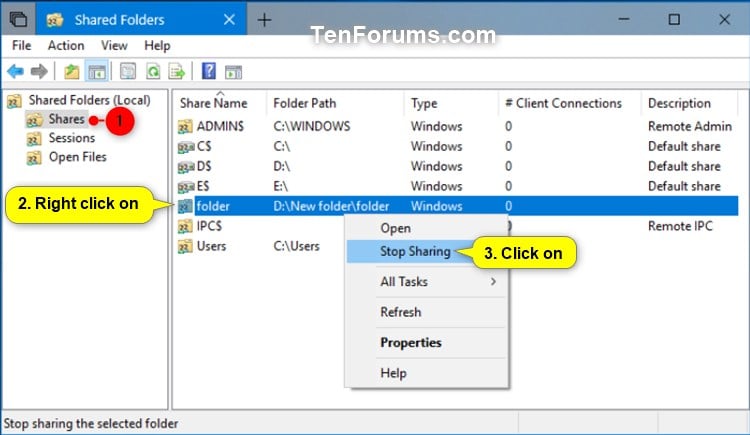
1 Press the Win+R keys to open Run, type either compmgmt.msc (Computer Management) or fsmgmt.msc (Shared Folders) into Run, and click/tap on OK.
2 Expand open Shared Folders in the left pane, click/tap on Shares, right click on the share name (folder or drive) without $ at the end of the name you want to stop sharing, and click/tap on Stop Sharing. (see screenshots below)
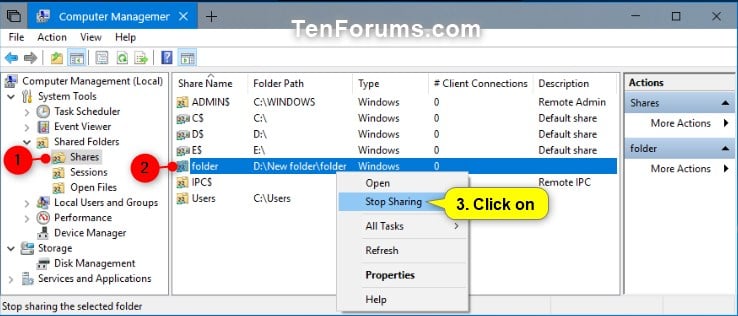
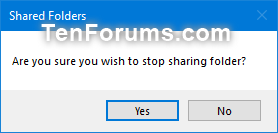
3 Click/tap on Yes to confirm. (see screenshot below)
4 When finished, you can now close Computer Management or Shared Folders if you like.
That's it,
Shawn Brink
Related Tutorials
- How to View All Network Shares on a Windows PC
- How to Backup and Restore Network Shares and Permissions in Windows
- How to Share Your OneDrive Files and Folders
- How to Share Files using an App in Windows 10
- How to Turn On or Off Nearby Sharing in Windows 10
- How to Share a Printer in Windows 10
- How to Turn On or Off File and Printer Sharing in Windows 10
- How to Turn On or Off Password Protected Sharing in Windows 10
- How to Turn On or Off Public Folder Sharing in Windows 10
- How to Change File Sharing Encryption Level in Windows 10
- How to Turn On or Off Network Discovery in Windows 10
- How to Set Network Location to be Public, Private, or Domain in Windows 10
- How to Add or Remove 'Give access to' Context Menu in Windows 10
- How to Create a Shared Folders Shortcut in Windows 10
- How to Enable or Disable SMB1 File Sharing Protocol in Windows
- How to Enable or Disable Offline Files in Windows
- How to Add or Remove Sharing tab in Folder Properties in Windows
Share Files and Folders Over a Network in Windows 10
-
New #1
Hi Brink great tutorial as usual.
I could not help but notice in step 1 you say to enable " Function Discovery Resource Publication "
In most of the posts I have read on Ten Forums they also suggest to enable " Function Discovery Provider Host "
Are you suggesting that Function Discovery Provider Host is not necessary.
-
-
New #3
@Brink, I have no problem sharing all my windows 10 computers, files, folders. But I can no longer share my windows 7 computers with my windows 10 computers. I can view the win 7 computers on win 10 computers, but every time I try to open folders or files that I have given permission, I am blocked saying I don’t have permission. This has been since the latest iteration of win 10 that took out HomeGroup. Can you tell me, or point to directive that will give me info on what I need to do?
-
New #4
Hello Mike,
I assume that you have already double checked everything in Option One on the W7 computers.
You might also test having SMB1 enabled on the W7 computers to see if you will have access afterwards.
 Enable or Disable SMB1 File Sharing Protocol in Windows | Windows 10 Tutorials
Have you already tested with password protected sharing turned off on a W7 computer to see if it may allows access afterwards?
-
New #5
@Brink Hello, I have registered just because of this tutorial and to ask questions. I just don't understand how to make it work.
I have a combination of 4 Home PCs and Laptops(LAN+WiFi) and I want to have 1 folder on each of them that's shared among the 4 so that we can easily share files. Previous using HomeGroup it was ridiculously simple but now that it's gone I'm at a loss as to how to make it work.
So I go to the folder and press Share and I can only give Read/Write to Everyone, which I don't want to do I just want to give access to the other 3 PCs so how do I do that? I have tried to go to Advanced Sharing, then Permissions, Add and Locations but that only shows me my own PC in the list and none of the rest.
-
New #6
Hello UnsharedMan, and welcome to Ten Forums.
The problem is file sharing will only share a folder on one PC with the others.
For what you want, it may be better to use a NAS to share files from with all or specific PCs on the network.
Another option would be to use OneDrive. You could share files/folders from OneDrive online to the PCs.
Share OneDrive Files and Folders | Windows 10 Tutorials
-
New #7
Thanks.
Perhaps I should clarify. A NAS would mean 1 place to store and share all files to all computers, that's not what I'm trying to do.
I want to Share a folder on my PC with other PCs on my network but the only option I can see is giving Read/Write permission to Everyone when what I want to do is share a folder Read/Write access that's in Desktop-A/Shark with Desktop-B/Octopus and not any other computer I connect to the network. How can I add permission to an account from a different PC on the network?
(Shark and Octopus being made up user accounts on respective PCs)
-
-
-
New #9
Share Files and Folders Over a Network in Windows 10
How to Share Files and Folders Over a Network in Windows 10Published by Shawn BrinkCategory: Network & Sharing
13 Jan 2023


 Quote
QuoteTutorial Categories

Related Discussions
