

How to Enable or Disable Collect Activity History in Windows 10
Starting with Windows 10 build 17040, Microsoft added settings that let you to view and manage your activity history, which Cortana uses to let you pick up where you left off.
Your collected activity history allows you to jump back into what you were doing with apps, docs, or other activities, either on your PC or your phone. To resume your activities, Windows needs to collect your PC activity.
If you like, you can enable or disable letting Windows collect User Activities.
If enabled, Store my activity history on this device will be turned on for all users, but users will still be able to turn this setting on or off for their account.
If disabled, Store my activity history on this device will be turned off for all users, and users will not be able to turn this setting on or off for their account.
This tutorial will show you how to enable or disable Activity history settings to let Windows collect User Activities for all users in Windows 10.
You must be signed in as an administrator to enable or disable online tips and help for the Settings app
Timeline requires the Windows Search service to be enabled, running, and set to Automatic (Delayed Start).
Starting in July 2021, if you have your activity history synced across your devices through your Microsoft account (MSA), you'll no longer have the option to upload new activity in Timeline. You'll still be able to use Timeline and see your activity history (information about recent apps, websites and files) on your local device. AAD-connected accounts won't be impacted.
Contents
- Option One: Enable or Disable Collect Activity History in Local Group Policy Editor
- Option Two: Enable or Disable Collect Activity History using a REG file
EXAMPLE: "Store my activity history on this device" disabled in Settings
The Local Group Policy Editor is only available in the Windows 10 Pro, Enterprise, and Education editions.
All editions can use Option TWO below.
1 Open the Local Group Policy Editor.
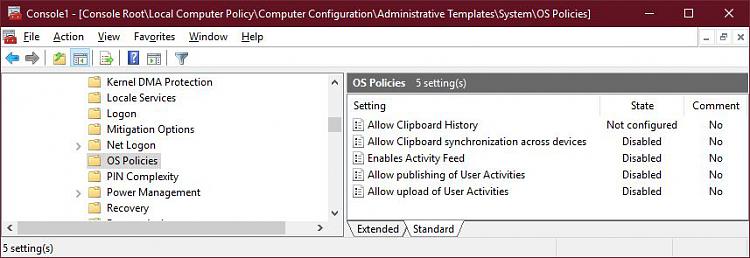
2 In the left pane of Local Group Policy Editor, navigate to the location below. (see screenshot below)
Computer Configuration\Administrative Templates\System\OS Policies
3 In the right pane of OS Policies in Local Group Policy Editor, double click/tap on the Allow publishing of User Activities policy to edit it. (see screenshot above)
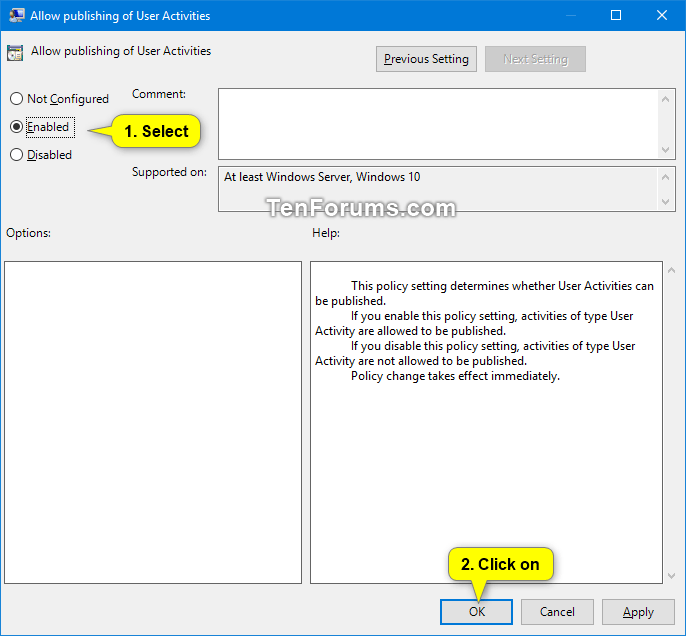
4 Do step 5 (enable) or step 6 (disable) below for what you would like to do.
A) Select (dot) Not Configured or Enabled (recommended), click/tap on OK, and go to step 7 below. (see screenshot below)
Not Configured is the default setting.
7 When finished, you can close the Local Group Policy Editor if you like.
The downloadable .reg files below will add and modify the DWORD value in the registry key below.
HKEY_LOCAL_MACHINE\SOFTWARE\Policies\Microsoft\Windows\System
PublishUserActivities DWORD
0 = Disable
1 = Enable
1 Do step 2 (enable) or step 3 (disable) below for what you would like to do.
This is the default setting.
A) Click/tap on the Download button below to download the file below, and go to step 4 below.
Enable_Activity_history.reg
Download
A) Click/tap on the Download button below to download the file below, and go to step 4 below.
Disable_Activity_history.reg
Download
4 Save the .reg file to your desktop.
5 Double click/tap on the downloaded .reg file to merge it.
6 When prompted, click/tap on Run, Yes (UAC), Yes, and OK to approve the merge.
7 Sign out and sign in to apply.
8 You can now delete the downloaded .reg file if you like.
That's it,
Shawn
Related Tutorials
- How to Enable or Disable Sync Activities from PC to Cloud in Windows 10
- How to Turn On or Off Collect Activity History in Windows 10
- How to Clear Your Activity History from Cloud in Windows 10
- How to Clear Activities from Timeline in Windows 10
- How to Open and Use Timeline in Windows 10
- How to Enable or Disable Timeline in Windows 10
- How to Turn On or Off Timeline Suggestions in Windows 10
- How to Add Task View Context Menu in Windows 10
- How to Create Task View Shortcut in Windows 10
Enable or Disable Collect Activity History in Windows 10
-
New #1
These policy settings seem to be changing with Windows 10 versions, at least on my systems with local accounts only. The version 1803 has three OS policy settings:

The version 1809 has five OS policy settings:
If these policies are not configured, are the local activities still uploaded to Microsoft for local accounts? Seems to me, that there are probably other ways for MS to identify the systems. For example machine/hardware ID created at the time of OS installation, that can be used for this purpose.
The "Privacy dashboard" link in the "Settings\Privacy" tab is the same link for systems with no Microsoft accounts. The link either results in "Can't reach this page..." error, or redirects to creating an MS account, depending on the browser and its settings.
-
New #2
Hello @Cr00zng,
Yeah, the policies have been changing lately with each build and version release.
If the policies are not configured, then each user will be able to change them via Settings instead. The policies just allow you to force a setting you want for all users without them being able to change it.
Turn On or Off Collect Activity History in Windows 10 | Tutorials
-
New #3
Thanks Brink...
As you've stated, this policy is only for local and/or cloud accounts, or actual end users in another word. The policy just prevents them to synchronize data across devices, that they may have.
On the other hand, this has no impact on what MS collects from these end users. They just won't have access to the MS collected activities.
I am not trying to start any argument about data collection, just want to verify the impact of this policy...
-
New #4
No worries. What you stated is correct.
You could try this below for what Microsoft collects to help.
 Change Diagnostic and Usage Data Settings in Windows 10 | Tutorials
-
New #5
Thanks Brink, especially the "No worries" part...
One more question...
If this tutorial user account control is not configured, then the end users can enable activity history and replicate it across their devices that they may have, probably via MS cloud. Would the user setting override the "Change Diagnostic and Usage Data Settings" on a per individual account basis?
On the surface, the answer seems to be no, but I am not certain what the end result of contradicting group policy would be.
-
New #6
Activity History and Diagnostic and Usage Data are two separate unrelated settings.
If you leave the group policy for Activity History in this tutorial set to "Not Configured", then users will be able to turn on collecting activity history on that specific PC.
-
New #7
Hi, in this page there are 2 options: (1903)
store my activity history on this device &...
send my activity history to microsoft
one of them are shown in registry, the other one has a registry key to change as well? thanks in advance
-
-
-
New #9

Enable or Disable Collect Activity History in Windows 10
How to Enable or Disable Collect Activity History in Windows 10Published by Shawn BrinkCategory: User Accounts
25 May 2021


 Quote
QuoteTutorial Categories

Related Discussions
