

How to Undo a System Restore in Windows 10
System protection (if turned on) is a feature that allows you to perform a system restore that takes your PC back to an earlier point in time, called a system restore point. This can be handy if your PC isn't working well and you recently installed an app, driver, or update.
Each restore point contains the necessary information needed to restore the system to the chosen state. Restore points are automatically generated when you install a new app, driver, or Windows update, and generated when you create a restore point manually. Restoring wont affect your personal files in your %UserProfile% folder, but it will remove apps, drivers, and updates installed after the restore point was created.
If a system restore didn't have the expected results you wanted, you can undo the restore point to return your system to how it was before doing the system restore.
See also:
- System Restore | Microsoft Docs
- Monitored File Name Extensions | Microsoft Docs (Files with these extensions are monitored by System Restore.)
- Restoring the System | Microsoft Docs ("To restore a system, System Restore undoes file changes made to monitored files, recapturing the file state at the time of the selected restore point.")
This tutorial will show you how to undo a system restore to return your system to how it was before doing the system restore in Windows 10.
A system restore cannot be undone until after is has completed.
If you did a system restore while in safe mode, it cannot be undone.
If you did a system restore from the Advanced Start Options menu at boot, it cannot be undone.
Contents
- Option One: To Undo a System Restore at Boot
- Option Two: To Undo a System Restore in Windows 10
1 Boot to advanced startup options.
If you boot to advanced startup options from within Windows 10, you must be signed in as an administrator to undo a system restore.
If you boot to advanced startup options from your Windows 10 installation media, you do not need to be an administrator to undo a system restore.
2 Click/tap on Troubleshoot. (see screenshot below)
3 Click/tap on Advanced options. (see screenshot below)
4 Click/tap on System Restore. (see screenshot below)
5 If you booted to advanced startup options from your Windows 10 installation media, click/tap on your listed Windows 10 OS, and go to step 7 below. (see screenshot below)
6 If you booted to advanced startup options from within Windows 10, click/tap on an administrator account you want to provide credentials for. (see screenshot below)
A) Enter the password for this administrator account, and click/tap on Continue. (see screenshot below)
7 Click/tap on Next. (see screenshot below)
8 Select the restore point that has Undo for its "Type", and click/tap on Next. (see screenshot below)
If you like, you can click/tap on the Scan for affected programs button to see what will be affected by undoing this restore point.
9 Click/tap on Finish. (see screenshot below)
10 When ready to start, click/tap on Yes. (see screenshot below)
11 When system restore has completed successfully, click/tap on Restart. (see screenshot below)
This may take a while to finish.
12 When you sign in to Windows 10 next, click/tap on Close. (see screenshot below)
You must be signed in as an administrator to do this option.
1 Do step 2, step 3, or step 4 below for how you would like to open System Restore.
2 Open the Control Panel (icons view), click/tap on the System icon, and go to step 5 below.
3 Open the Control Panel (icons view), click/tap on the Recovery icon, click/tap on the Open System Restore link, and go to step 7 below. (see screenshot below)
4 Open the Control Panel (icons view), click/tap on the Recovery icon, click/tap on the Configure System Restore link, and go to step 6 below. (see screenshot below)
5 Click/tap on the System protection link on the left side. (see screenshot below)
Starting with Windows 10 build 20161, you will need to click/tap on About on the left side, and click/tap on the System protection link instead.
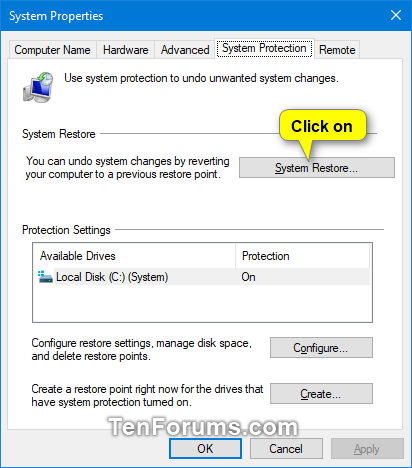
6 Click/tap on the System Restore button. (see screenshot below)
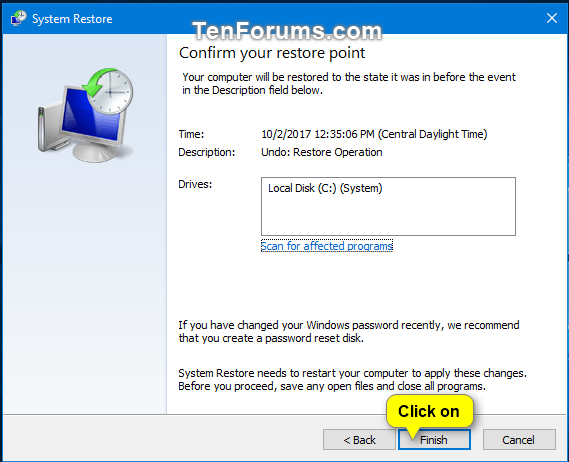
7 Select (dot) Undo System Restore, and click/tap on Next. (see screenshot below)
If you like, you can click/tap on the Scan for affected programs link to see what will be affected by undoing this restore point.
8 Click/tap on Finish. (see screenshot below)
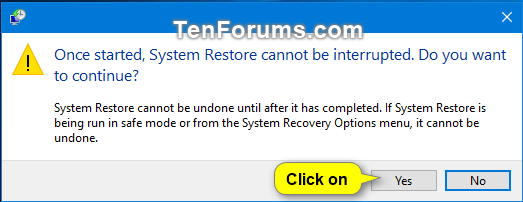
9 When ready to start, click/tap on Yes. (see screenshot below)
This may take a while to finish.
10 When you sign in to Windows 10 next, click/tap on Close. (see screenshot below)
That's it,
Shawn
Related Tutorials
- How to Enable or Disable System Restore in Windows 7, Windows 8, and Windows 10
- How to Enable or Disable System Restore Configuration in Windows 7, Windows 8, and Windows 10
- How to Turn On or Off System Protection for Drives in Windows 10
- How to Do a System Restore of Windows 10
- How to Create a System Restore Point in Windows 10
- How to See List of All Available System Restore Points in Windows
- How to Add a Create Restore Point Context Menu in Windows 10
- How to Make a 'Create System Restore Point' Shortcut in Windows 10
- How to Change System Protection Maximum Storage Size for Drive in Windows 10
- How to Delete System Restore Points in Windows 10
- How to Create System Protection shortcut in Windows 10
- How to Automatically Create System Restore Point at Startup in Windows 10
- How to Automatically Create System Restore Point on Schedule in Windows 10
- How to Change System Restore Point Creation Frequency in Windows 10
- How to Add System Protection Context Menu in Windows 10
Undo a System Restore in Windows 10

Undo a System Restore in Windows 10
How to Undo a System Restore in Windows 10Published by Shawn BrinkCategory: Performance & Maintenance
05 Mar 2021


Tutorial Categories

Related Discussions
