

How to Specify a Default Active Power Plan in Windows 10
A power plan is a collection of hardware and system settings that manages how your computer uses power. Power plans can help you save energy, maximize system performance, or achieve a balance between the two. You can create custom power plans that are optimized for specific computers.
By default, all users (standard and administrator) can make changes to any power plan settings. Changes made to a power plan will affect all users that have chosen the same power plan as their default active power scheme.
See also: Quickly switching your Power Plan on Windows 10 | Microsoft
This tutorial will show you how to specify a default active power plan for all users that cannot be changed in Windows 10.
You must be signed in as an administrator to specify a default active power plan.
Contents
- Option One: To Select a Default Active Power Plan in Local Group Policy Editor
- Option Two: To Specify a Default Active Power Plan in Local Group Policy Editor
- Option Three: To Specify a Default Active Power Plan using a REG file
- Option Four: To Specify a Default Active Power Plan in Registry Editor
EXAMPLE: Power Options grayed out when specified a power plan

Local Group Policy Editor is only available in the Windows 10 Pro, Enterprise, and Education editions.
All editions can use Option Three or Option Four below.
1 Open the Local Group Policy Editor.
2 Navigate to the folder below in the left pane of the Local Group Policy Editor. (see screenshot below)
Computer Configuration\Administrative Templates\System\Power Management
3 In the right pane of Power Management, double click/tap on the Select an active power plan policy to edit it. (see screenshot above)
4 Do step 5 (default) or step 6 (select) below for what you would like to do.
A) Select (dot) Not Configured or Disabled, click/tap on OK, and go to step 7 below. (see screenshot below)
Not Configured is the default setting.
A) Select (dot) Enabled. (see screenshot below)
B) Select Automatic (aka: Balanced), High Performance, or Power Saver in the "Active Power Plan" drop menu for which power plan you want to specify.
C) Click/tap on OK, and go to step 7 below.
7 When finished, you can close the Local Group Policy Editor if you like.
Local Group Policy Editor is only available in the Windows 10 Pro, Enterprise, and Education editions.
All editions can use Option Three or Option Four below.
1 Open a command prompt.
2 Typepowercfg /listinto the command prompt, and press Enter. Make note of the GUID number (ex: "a5af2826-04c0-4305-8603-3e867c70e501") for the power plan (ex: "My Custom Plan") you want to specify. (see screenshot below)
3 Open the Local Group Policy Editor.
4 Navigate to the folder below in the left pane of the Local Group Policy Editor. (see screenshot below)
Computer Configuration\Administrative Templates\System\Power Management
5 In the right pane of Power Management, double click/tap on the Specify a custom active power plan policy to edit it. (see screenshot above)
6 Do step 7 (default) or step 8 (specify) below for what you would like to do.
A) Select (dot) Not Configured or Disabled, click/tap on OK, and go to step 9 below. (see screenshot below)
Not Configured is the default setting.
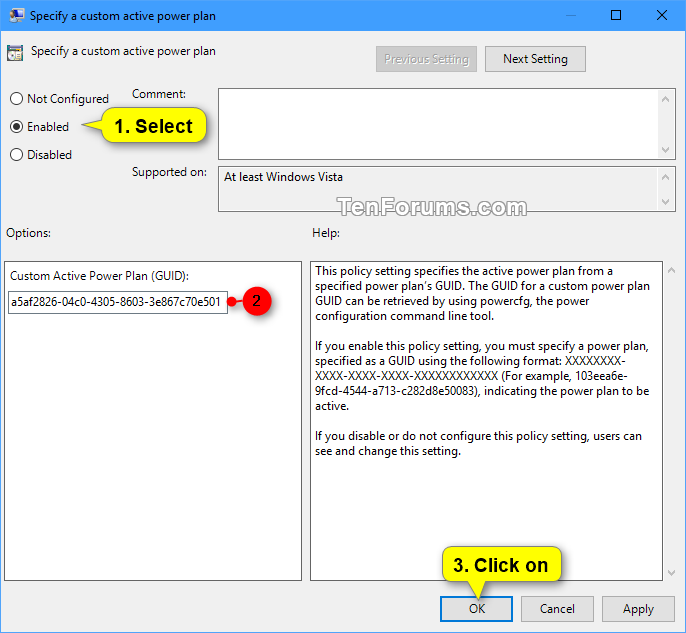
A) Select (dot) Enabled. (see screenshot below)
B) Enter the GUID number (ex: "a5af2826-04c0-4305-8603-3e867c70e501") from step 2 above into the "Custom Active Power Plan (GUID)" field.
C) Click/tap on OK, and go to step 9 below.
9 When finished, you can close the Local Group Policy Editor if you like.
The downloadable .reg files below will add and modify the string value in the registry key below.
HKEY_LOCAL_MACHINE\SOFTWARE\Policies\Microsoft\Power\PowerSettings
NoLockScreen String Value (REG_SZ)
<delete> = Default, no specified active power plan
381b4222-f694-41f0-9685-ff5bb260df2e = Automatic (aka: Balanced)
8c5e7fda-e8bf-4a96-9a85-a6e23a8c635c = High Performance
a1841308-3541-4fab-bc81-f71556f20b4a = Power Saver
e9a42b02-d5df-448d-aa00-03f14749eb61 = Ultimate Performance (starting with Windows 10 build 17083)
1 Do step 2 (Default), step 3 (Automatic), step 4 (High Performance), step 5 (Power Saver), or step 5 (Ultimate Performance) below for what you would like to do.
This is the default setting.
A) Click/tap on the Download button below to download the file below, and go to step 7 below.
Default_no_specified_power_plan.reg
Download
A) Click/tap on the Download button below to download the file below, and go to step 7 below.
Specify_Automatic_power_plan.reg
Download
A) Click/tap on the Download button below to download the file below, and go to step 7 below.
Specify_High_Performance_power_plan.reg
Download
A) Click/tap on the Download button below to download the file below, and go to step 7 below.
Specify_Power_Saver_power_plan.reg
Download
The "Ultimate Performance" power plan is only available starting with Windows 10 build 17083.
A) Click/tap on the Download button below to download the file below, and go to step 7 below.
Specify_Ultimate_Performance_power_plan.reg
Download
7 Save the .reg file to your desktop.
8 Double click/tap on the downloaded .reg file to merge it.
9 When prompted, click/tap on Run, Yes (UAC), Yes, and OK to approve the merge.
10 Restart the computer to apply.
11 If you like, you can now delete the downloaded .reg file.
1 Open a command prompt.
2 Typepowercfg /listinto the command prompt, and press Enter. Make note of the GUID number (ex: "a5af2826-04c0-4305-8603-3e867c70e501") for the power plan (ex: "My Custom Plan") you want to specify. (see screenshot below)
3 Press the Winp + R keys to open Run, type regedit into Run, and click/tap on OK to open Registry Editor.
4 Navigate to the key below in the left pane of Registry Editor. (see screenshot below)
HKEY_LOCAL_MACHINE\SOFTWARE\Policies\Microsoft\Power\PowerSettings
If you do not have the Power key, then right click on the Microsoft key, click/tap on New, click/tap on Key, type Power for the name, and press Enter.
If you do not have the PowerSettings key, then right click on the Power key, click/tap on New, click/tap on Key, type PowerSettings for the name, and press Enter.
5 Do step 6 (specify) or step 7 (default) below for what you would like to do.
A) In the right pane of the PowerSettings key, double click/tap on the ActivePowerScheme string value (REG_SZ). (see screenshot below step 4)
If you do not have the ActivePowerScheme string value, then right click on an empty area in the right pane of the PowerSettings key, click/tap on New, click/tap on String Value, type ActivePowerScheme for the name, and press Enter.
B) Enter the GUID number (ex: "a5af2826-04c0-4305-8603-3e867c70e501") from step 2 above. (see screenshot below)
C) Click/tap on OK, and go to step 8 below.
This is the default setting.
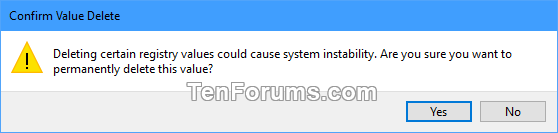
A) In the right pane of the PowerSettings key, right click on the ActivePowerScheme string value (REG_SZ), and click/tap on Delete. (see screenshot below step 4)
B) Click/tap on Yes to confirm, and go to step 8 below. (see screenshot below)
8 When finished, close Registry Editor.
9 Restart the computer to apply.
That's it,
Shawn
Related Tutorials
- How to Add or Remove Power Options Context Menu in Windows 10
- How to See Your Current Active Power Plan Scheme in Windows 10
- How to Choose a Power Plan in Windows 10
- How to Add or Remove 'Choose Power Plan' context menu in Windows 10
- How to Change Power Plan Settings in Windows 10
- How to Change Power Mode Level in Windows 10
- How to Create a Custom Power Plan in Windows 10
- How to Rename a Power Plan in Windows 10
- How to Export and Import a Power Plan in Windows 10
- How to Delete a Power Plan in Windows 10
- How to Reset and Restore Power Plans to Default Settings in Windows 10
- How to Restore Missing Default Power Plans in Windows 10
Specify Default Active Power Plan in Windows 10
-
New #1
This tutorial is fantastic. Thanks for taking the time to create it.
My question is:
"This tutorial will show you how to specify a default active power plan for all users that cannot be changed in Windows 10."
Is there a way to set this key, choose a default, but still allow the user to change it?
I have done some Googling, but have not come up with an answer.
Thanks.
John
-
-
New #3
I appreciate the response. Thanks for the follow-up. I am no either. If I do happen to find anything, I will post back.
Specify Default Active Power Plan in Windows 10
How to Specify a Default Active Power Plan in Windows 10Published by Shawn BrinkCategory: Performance & Maintenance
17 Apr 2021


 Quote
Quote
Tutorial Categories

Related Discussions
