

How to Change Permissions of File, Folder, Drive, or Registry Key for Users and Groups in Windows 10
On NTFS and ReFS volumes, you can set security permissions on files and folders. These permissions grant or deny access to the files and folders.
Every container (ex: folder) and object (ex: file) on the PC has a set of access control information attached to it. Known as a security descriptor, this information controls the type of access allowed to users and groups. The security descriptor is automatically created along with the container or object that is created.
When you are a member of a group (ex: "Administrators") that is associated with an object, you have some ability to manage the permissions on that object. For those objects you own, you have full control.
Permissions are defined within an object's security descriptor. Permissions are associated with, or assigned to, specific users and groups. For example, for the file Temp.dat, the built-in Administrators group might be assigned Read, Write, and Delete permissions, while the Backup Operators group might be assigned Read and Write permissions only.
Each assignment of permissions to a user or group is represented in the system as an access control entry (ACE). The entire set of permission entries in a security descriptor is known as a permission set or access control list (ACL). Thus, for a file named Temp.dat, the permission set includes two permission entries, one for the built-in Administrators group and one for the Backup Operators group.
There are two types of permissions: explicit permissions and inherited permissions.
- Explicit permissions are those that are set by default on non-child objects when the object is created, or by user action on non-child, parent, or child objects.
- Inherited permissions are those that are propagated to an object from a parent object. Inherited permissions ease the task of managing permissions and ensure consistency of permissions among all objects within a given container.
- Inherited Deny permissions do not prevent access to an object if the object has an explicit Allow permission entry.
- Explicit permissions take precedence over inherited permissions, even inherited Deny permissions.
By default, objects within a container inherit the permissions from that container when the objects are created. For example, when you create a folder called MyFolder, all subfolders and files created within MyFolder automatically inherit the permissions from that folder. Therefore, MyFolder has explicit permissions, while all subfolders and files within it have inherited permissions.
This tutorial will show you how to change permissions of a file, folder, drive, or registry key to allow or deny access for users and groups in Windows 10 and Windows 11.
Contents
- Option One: To Add User or Group and Set Permissions for File, Folder, Drive, or Registry Key in Security Settings
- Option Two:To Add User or Group and Set Permissions for File, Folder, Drive, or Registry Key in Advanced Security Settings
- Option Three: To Remove User or Group from Permissions for File, Folder, Drive, or Registry Key in Security Settings
- Option Four: To Remove User or Group from Permissions for File, Folder, Drive, or Registry Key in Advanced Security Settings
- Option Five: To Change Permissions for User or Group of File, Folder, Drive, or Registry Key in Security Settings
- Option Six: To Change Permissions for User or Group of File, Folder, Drive, or Registry Key in Advanced Security Settings
- Option Seven: To Change Permissions for User or Group of File, Folder, or Drive in Command Prompt
1 Perform one of the following actions for what you want to do:
A) Right click or press and hold on a registry key, and click/tap on Permissions.
OR
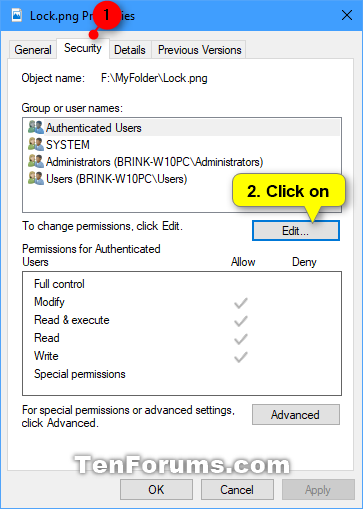
B) Right click or press and hold on a file, folder, or drive, and click/tap on Properties. Click/tap on the Security tab, and click/tap on the Edit button. (see screenshot below)
If you see this below instead, then it means you will need to take ownership of this file, folder, drive, or registry key first, and try again.
2 Click/tap on the Add button. (see screenshot below)
3 Click/tap on the Advanced button. (see screenshot below)
4 Click/tap on the Find Now button, select the name of the user or group (ex: "Brink2") you want to add, and click/tap on OK. (see screenshot below)
If you like, you can press and hold the Ctrl key to select more than one user and/or group to add.
5 Click/tap on OK. (see screenshot below)
6 Select the added user or group, check the Allow or Deny boxes for the permissions you want to assign to this user or group for this file, folder, drive, or registry key, and click/tap on Apply. When finished, click/tap on OK. (see screenshot below)
7 Click/tap on OK. (see screenshot below)
1 Perform one of the following actions for what you want to do:
A) Right click or press and hold on a registry key, and click/tap on Permissions.
OR
B) Right click or press and hold on a file, folder, or drive, and click/tap on Properties.
2 Click/tap on the Security tab, and click/tap on the Advanced button. (see screenshot below)
3 Click/tap on the Add button. (see screenshot below)
If you see this below instead, then it means you will need to take ownership of this file, folder, drive, or registry key first, and try again.
4 Click/tap on the Select a principal link. (see screenshot below)
5 Click/tap on the Advanced button. (see screenshot below)
6 Click/tap on the Find Now button, select the name of the user or group (ex: "Brink2") you want to add, and click/tap on OK. (see screenshot below)
If you like, you can press and hold the Ctrl key to select more than one user and/or group to add.
7 Click/tap on OK. (see screenshot below)
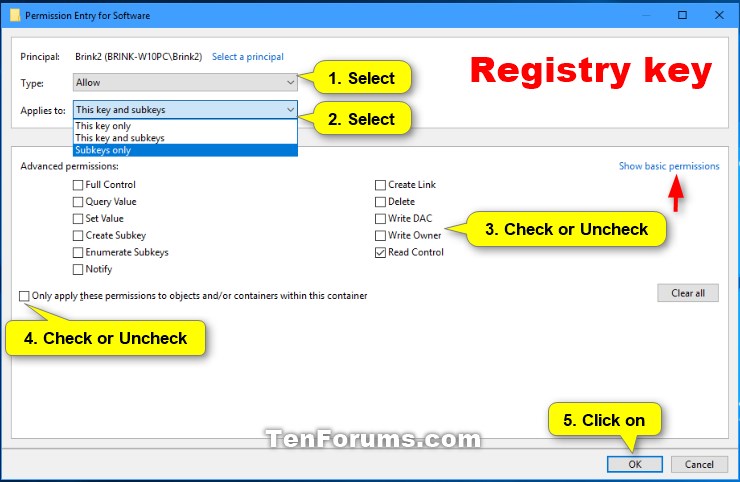
8 Select Allow or Deny in the Type drop menu for the type of permissions you want to change. (see screenshots below step 10)
9 If this is for a folder, drive, or registry key, then select what you want in the Applies to drop menu for how the permissions will be applied. (see screenshots below step 10)
10 Check or uncheck the Basic permissions or Advanced permissions you want to assign to this user or group for this file, folder, drive, or registry key, and click/tap on OK. (see screenshots below)


11 When finished, click/tap on OK. (see screenshot below)
12 Click/tap on OK. (see screenshot below)
1 Perform one of the following actions for what you want to do:
A) Right click or press and hold on a registry key, and click/tap on Permissions.
OR
B) Right click or press and hold on a file, folder, or drive, and click/tap on Properties. Click/tap on the Security tab, and click/tap on the Edit button. (see screenshot below)
If you see this below instead, then it means you will need to take ownership of this file, folder, drive, or registry key first, and try again.
2 Select the user or group (ex: "Brink2") you want to remove, and click/tap on the Remove button. (see screenshot below)
If this is an inherited user or group, then you will get the error message below.
In this case, you would need to go to the parent ("Inherited from" source) of this file, folder, drive, or registry key, and remove this user or group from the parent's security settings instead.
3 When finished, click/tap on OK. (see screenshot below)
4 Click/tap on OK. (see screenshot below)
1 Perform one of the following actions for what you want to do:
A) Right click or press and hold on a registry key, and click/tap on Permissions.
OR
B) Right click or press and hold on a file, folder, or drive, and click/tap on Properties.
2 Click/tap on the Security tab, and click/tap on the Advanced button. (see screenshot below)
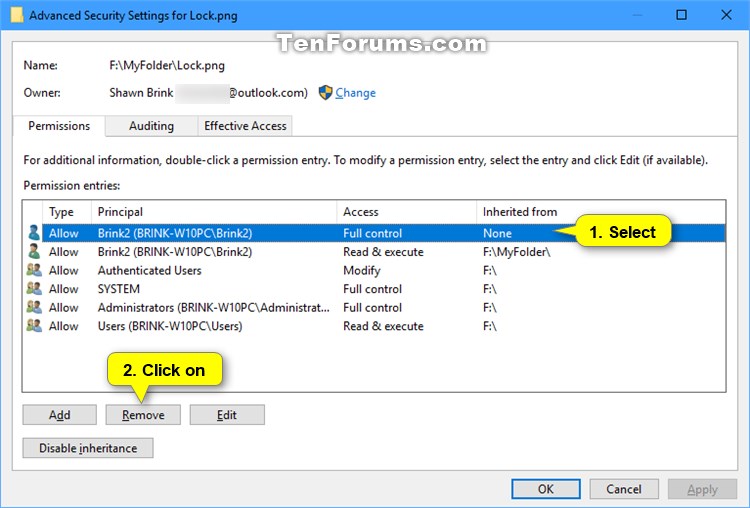
3 Select the user or group (ex: "Brink2") you want to remove, and click/tap on the Remove button. (see screenshot below)
If this is an inherited user or group, then you will get the error message below.
In this case, you would need to go to the parent ("Inherited from" source) of this file, folder, drive, or registry key, and remove this user or group from the parent's advanced security settings instead.
If you see this below instead, then it means you will need to take ownership of this file, folder, drive, or registry key first, and try again.
4 When finished, click/tap on OK. (see screenshot below)
5 Click/tap on OK. (see screenshot below)
1 Perform one of the following actions for what you want to do:
A) Right click or press and hold on a registry key, and click/tap on Permissions.
OR
B) Right click or press and hold on a file, folder, or drive, and click/tap on Properties. Click/tap on the Security tab, and click/tap on the Edit button. (see screenshot below)
If you see this below instead, then it means you will need to take ownership of this file, folder, drive, or registry key first, and try again.
2 Select a user or group (ex: "Brink2") you want to change permissions for, check the Allow or Deny boxes for the permissions you want to assign to this user or group for this file, folder, drive, or registry key, and click/tap on Apply. When finished, click/tap on OK. (see screenshot below)
3 Click/tap on OK. (see screenshot below)
1 Perform one of the following actions for what you want to do:
A) Right click or press and hold on a registry key, and click/tap on Permissions.
OR
B) Right click or press and hold on a file, folder, or drive, and click/tap on Properties.
2 Click/tap on the Security tab, and click/tap on the Advanced button. (see screenshot below)
3 Select a user or group (ex: "Brink2") you want to change permissions for, and click/tap on the Edit button. (see screenshot below)
If this is an inherited user or group, then you will see a View button instead of an Edit button.
In this case, you would need to go to the parent ("Inherited from" source) of this file, folder, drive, or registry key, and change permissions of this user or group from the parent's advanced security settings instead.
If you see this below instead, then it means you will need to take ownership of this file, folder, drive, or registry key first, and try again.
4 Select Allow or Deny in the Type drop menu for the type of permissions you want to change. (see screenshots below step 6)
5 If this is for a folder, drive, or registry key, then select what you want in the Applies to drop menu for how the permissions will be applied. (see screenshots below step 6)
6 Check or uncheck the Basic permissions or Advanced permissions you want to assign to this user or group for this file, folder, drive, or registry key, and click/tap on OK. (see screenshots below)
7 When finished, click/tap on OK. (see screenshot below)
8 Click/tap on OK. (see screenshot below)
For more options on the icacls command, see: Icacls - Microsoft Docs
1 Open a command prompt or elevated command prompt depending on your permission level for this file, folder, or drive.
2 Type the command below you want to use into the command prompt, and press Enter. (see screenshot below step 3)
(Apply to this file only)
icacls "full path of file" /grant "user or group":(permissions)
OR
(Apply to this folder only)
icacls "full path of folder" /grant "user or group":(permissions)
OR
(Apply to this folder, subfolder and files)
icacls "full path of folder" /grant "user or group":(permissions) /t /c
OR
(Apply to this drive only)
icacls "drive letter:" /grant "user or group":(permissions)
OR
(Apply to this drive, subfolder and files)
icacls "drive letter:" /grant "user or group":(permissions) /t /c
Substitute full path of file in the command above with the actual full path of the file with extension (ex: "F:\MyFolder\Lock.png") you want to change permissions for.
Substitute full path of folder in the commands above with the actual full path of the folder (ex: "F:\MyFolder") you want to change permissions for.
Substitute drive letter in the commands above with the actual drive letter (ex: "F") you want to change permissions for.
Substitute user or group in the commands above with the name of the user or group (ex: "Brink2") you want to change permissions for.
Substitute permissions in the commands above with one or more basic and/or advanced permissions you want to assign to the user or group from the table below with each permission separated by a comma in.
For example:icacls "F:\MyFolder" /grant "Brink2":(RX,W) /t /c
Basic Permissions Description N no access F full access M modify access RX read and execute access R read-only access W write-only access D delete access Advanced Permissions Description DE delete RC read control WDAC write DAC WO write owner S synchronize AS access system security MA maximum allowed GR generic read GW generic write GE generic execute GA generic all RD read data/list directory WD write data/add file AD append data/add subdirectory REA read extended attributes WEA write extended attributes X execute/traverse DC delete child RA read attributes WA write attributes
3 When finished, you can close the command prompt if you like.
That's it,
Shawn Brink
Related Tutorials
- Enable or Disable Inherited Permissions for Files and Folders in Windows
- How to Add Inherited Permissions Context Menu in Windows
- How to Add Reset Permissions to Context Menu in Windows
- How to Add View Owner to Context Menu in Windows
- How to Add Take Ownership to Context Menu in Windows 10
- How to Change Owner of File, Folder, Drive, or Registry Key in Windows 10
- How to Add Advanced security to context menu in Windows 8 and Windows 10
- How to Add or Remove Users from Groups in Windows 10
- How to Remove Security tab from Drives, Files, and Folders Properties in Windows 10
- How to Add List Permissions Context Menu in Windows
- How to Backup and Restore Permissions of Files, Folders, or Drives in Windows 10
- How to Add Change Owner to Context Menu in Windows 10
Change Permissions of Objects for Users and Groups in Windows 10
-
New #1
There is one aspect of permissions I have not found an explanation for. There is a difference in behaviour for different categories of folder once permissions have been granted - some permissions have permanent effect whilst others need to be repeated at every access.Case 1 - I use my Admin status to give myself access permissions to another user's folders such as C:\Users\Winger\Documents. This new permission has permanent effect.I cannot find the property that determines the difference in behaviour. Do you know anything about this?
Case 2 - I use my Admin status to give myself access permissions to, for example, C:\Program files or C:\Tools** and all their subfolders. This new permission has to be re-granted for each individual access.
** C:\Tools [owned by the Administrators group] is where I keep all my batch files, vbs files, vba add-ins, ... so the need for re-granting permissions every time is exactly what I want to protect the contents from unauthorised or accidental changes. It's just that I do not understand why it works.
Denis
-
New #2
Hello Denis, :)
I haven't found it yet either other than having to manually change permissions afterwards.
-
-
New #4
I suppose you could use the context menu in the tutorial below to make it easy to reset the permissions for items back to default.
 Add Reset Permissions to Context Menu in Windows User Accounts Tutorials
-
New #5
How long should this take? I did another clean install do fix the issues I was having then hooked up my old hard drives. I would get the 'you currently don't have permission' message so I used one of the methods above on one Users folder and the Take Ownership option on another. 36 hours later they're still cranking away changing the ownership or setting security information. Is there a faster way?
-
-
New #7
-
New #8
I have been looking for an explicit statement [mainly in MS online articles] that Modify permission includes Delete permission but I cannot find one.
If you know of one, please would you be kind enough to post a link to it in all folders on drive marked as "read only"; del requires admin rights
All the best,
Denis
-

Change Permissions of Objects for Users and Groups in Windows 10
Change Permissions of File, Folder, Drive, or Registry Key for Users and Groups in Windows 10Published by Shawn BrinkCategory: User Accounts
04 May 2022


 Quote
Quote
Tutorial Categories

Related Discussions
