
New
#710
Use DISM to Repair Windows 10 Image
-
-
New #711
Can you get them to do the text at the bottom of this image:EDIT.... and unfortunately this laptop is at a family members home so I cannot physically touch it until Feb 8 so I cannot pull the registry information to confirm the exact windows version.

-
New #712
-
New #713
In my experience, that auto repair rarely works, but I guess sometimes it does. I am not sure what it attempts to do.
I rarely use bootrec. With UEFI you can fix just with bcdboot commands. For Legacy BIOS, I use bootsect and bcdboot.
With diskpart, you can totally delete and replace the System partition and then use bootsect and bcdboot to rebuild it. The only issue on a Legacy BIOS/MBR disk setup is that the winre.wim is usually also on the System partition, so you have to move it before deleting the partition.
But your System partition is probably fine, if you are getting the Windows flag logo and swirling dots. There seems to be some devices that freeze at that point after some updates.
You can boot using any Windows 10 install on USB, but if you need to reference the install.wim or install.esd file for DISM repairs (which seems very tricky to get to work) you would need the same Windows 10 version and Edition. Also, would need the same 32-bit or 64-bit as what you want to fix.
- - - Updated - - -
Sorry, I edited my earlier directions, as I always forget that you need a Scratch folder for temp files for DISM to work.
Should have been:
- - - Updated - - -Code:md C:\Scratch DISM /Image:C:\ /Cleanup-Image /RestoreHealth /ScratchDir:C:\Scratch sfc /scannow /OFFBOOTDIR=C:\ /OFFWINDIR=C:\Windows
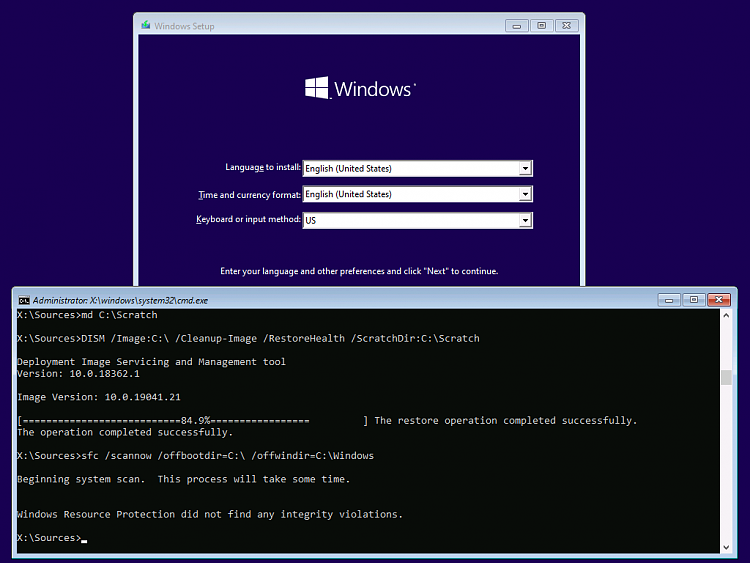
Last edited by DonCuthbert; 29 Jan 2020 at 19:10.
-
New #714
QUESTION: do you think that maybe the first step would be to select "Uninstall Updates" in the advanced options menu?
O.K. I'll make sure I check file locations and then set up scratch directory as recommended. Seems odd that windows DISM command wouldn't do this automatically if it is required to function correctly.
QUESTION: In the event that I find out the installed windows is earlier than 1909, does ANYONE know if there is a Microsoft web page available to download older images/installation programs
-
New #715
No, not on any a Microsoft page, but they do still keep the ISOs on their servers. You can generate links to download older ISOs direct from Microsoft with this Heidoc tool.
Microsoft Windows and Office ISO Download Tool
-
New #716
These are some options for Windows iso downloads:
Download Windows 10 ISO File
Windows Download - #1 Windows ISO Download Source
Microsoft Windows and Office ISO Download Tool
TechBench by WZT (v4.1.1)
Download Universal Windows Downloader - MajorGeeks
Download Microsoft Windows and Office ISO Download Tool - MajorGeeks
-
New #717
It is possible that all of the problem booting is the effect of the last Windows Update on that particular model of PC or with that specific mix of software, antivirus, etc. So uninstalling the most recent update, using the boot menu Advanced option could get you back running. Still the DISM and sfc commands are useful to ensure that the OS is not in a corrupted state at any time.
The version you boot with is not that important, because DISM and sfc are working within the installed OS, comparing the integrity of its Windows binaries to known intact copies, that are preserved within Windows for this purpose. It is only when you need files from an external source, such as another PC, or install.wim from install media, that you need the same Edition and version of the files.
DISM, when run within Windows, uses the existing temp folder. When you boot from install media, drive X: is a RAM disk, with limited storage capacity. The Windows Preinstallation Environment has to run equally well on systems with minimal RAM, so it does not have room left for a big temp folder. Many commands work fine, but the /RestoreHealth and some other options require more temp file storage, which is where the /ScratchDir option comes in.
That heidoc.net utility, for downloading ISO files directly from Microsoft, works well to get official older versions of Windows or Office.
-
New #718
Interim Update...
1. The pc was booted from the USB stick. In the first menu of options, I selected "turn off your pc". My thought here was that this menu selection would put the OS in a state where it is turning on from a "restart" rather than "shutdown" and then pushing the power button. The assumption was that the computer was somehow accessing stored data for a "fast startup".
2. after allowing the computer to completely shut down, a normal boot sequence was performed (no USB stick). This time the computer powered up, displayed a screen saying that windows did not boot properly and gave an option to either shut down or advanced options to troubleshoot.
3. took a chance and decided to try and let the OS perform another startup repair. Recall that the last time this was tried was from a USB stick containing version 1909. Since this startup repair would rely on the installed version of windows 10 (assumed to be 1909 but may be 1903), I thought this approach might let windows fix itself.
4. Windows gave the same error as before stating that it could not be repaired.
EDIT::
4.1 then rebooted and tried to uninstall the latest quality update (windows had selections to remove both quality updates and feature updates).
4.2 removing the quality update failed. windows indicated it could not complete the action.
end EDIT
5. So now that I have the installed OS at least booting into the repair screen, I plan on taking the next step and execute DISM as suggested.
However, I am going to boot the computer WITHOUT the USB stick and use the installed OS access to troubleshooting and subsequently the command prompt.
Even though I will not be booting from the usb stick, I believe that the DISM command should be the same as you have previously noted:
Code:md C:\Scratch DISM /Image:C:\ /Cleanup-Image /RestoreHealth /ScratchDir:C:\Scratch sfc /scannow /OFFBOOTDIR=C:\ OFFWINDIR=C:\Windows
Last edited by dualopsys; 26 Jan 2020 at 16:07.
-
-
New #719
- In Windows 8 and 10, a restart is more thorough than powering off and on, because by default Windows has Fast Startup enabled. That uses a hiberboot.sys file to speed boot times when the computer is powered off normally. You can disable Fast Startup (and all other hibernation) using powercfg /H OFF (but Windows has to be running).
- Using the Windows Repair Command Prompt is similar to booting from a USB Windows install media, except for the Windows version (if you use the Repair your computer link from page 2 of setup). In both cases you have to login using a user account. The main advantage that I see with using SHIFT-F10 instead, is that you do not need to login and you have full rights to do whatever is required. I don't know for sure whether the User account login actually has less file rights, but I can always do whatever I need by booting from an install USB and using SHIFT-F10 for a Command Prompt. In the most recent Fast Ring Insider builds, Windows no longer requires a user account login to get Command Prompt.
- Whichever way you use to get the Command Prompt, you can try the chkdsk, DISM and sfc commands. The command syntax is the same. If they show no errors, then you can try commands to fix or replace the System partition, since your Windows volume has checked out as intact.
- The steps to fix the System partition vary between an MBR disk/Legacy BIOS mode and GPT disk/UEFI mode. UEFI is easier, because you don't have to worry about deleting the winre.wim file that an MBR layout normally keeps on the System partition. With UEFI, there are only about 30MB of System files and it is easy to delete and replace if necessary. All the required files come from your C: drive Windows, using the bcdboot command.
- With either Legacy or UEFI you can first just try a simple command: bcdboot C:\Windows and see if that fixes anything (assumes that Windows is on C: in this mode, so check first).

 Quote
Quote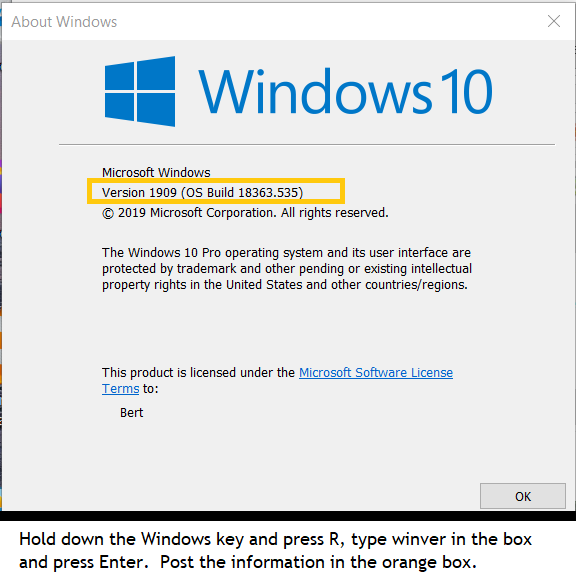

Tutorial Categories

Related Discussions
