

How to Delete a User Account in Windows 10
You need a user account to use Windows, and if you share a single PC with other people, each person should have their own account. Each person can customize their account with their own settings and preferences, like a desktop background or screen saver. User accounts also help control which files and apps each person can use and what changes they can make to the PC.
If you have a user account on your PC that is not being used, you can permanently remove it by deleting it.
This tutorial will show you different ways on how to delete a user account to remove it from your Windows 10 PC.
You must be signed in as an administrator to be able to delete a user account.
You will not be able to delete a user account that is currently signed in. You will need to sign out the user first.
Be sure to always have at least one enabled administrator account on the PC to avoid not being able to perform actions that require administrator rights.
For a Windows 11 version of this tutorial, see:
Delete User Account in Windows 11
Contents
- Option One: How to Remove a User Account in Settings
- Option Two: How to Delete a User Account in Control Panel
- Option Three: How to Delete a User Account in Local Users and Groups
- Option Four: How to Remove a User Account in Netplwiz
- Option Five: How to Delete a User Account in Command Prompt
- Option Six: How to Delete a User Account in PowerShell
1 Open Settings, and click/tap on the Accounts icon.
2 Click/tap on Family & other users on the left side, click/tap on an account (ex: "Brink2") you want to delete on the right side, and click/tap on Remove. (see screenshot below)
3 Click/tap on Delete account and data to confirm. (see screenshot below)
4 When finished, you can close Settings if you like.
1 Open the Control Panel (icons view), and click/tap on the User Accounts icon.
2 Click/tap on the Manage another account link. (see screenshot below)
3 If prompted by UAC, click/tap on Yes.
4 Click/tap on a user (ex: Example) you want to delete. (see screenshot below)
5 Click/tap on the Delete the account link. (see screenshot below)
6 Click/tap on Delete Files or Keep Files for what you want to do with the user account's personal files. (see screenshot below)
7 Click/tap on Delete Account to confirm. (see screenshots below)
8 When finished, you can close the Control Panel if you like.
1 Open Local Users and Groups, and click/tap on the Users folder in the left pane to open it. (see screenshot below)
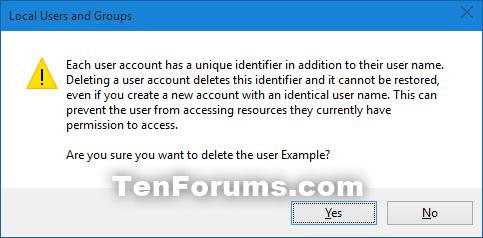
2 Click/tap on a user (ex: Example) you want to delete in the middle pane to select it, click/tap on More Actions under the same user's name (ex: Example) in the right "Actions" pane, and click/tap on Delete. (see screenshot below)
3 Click/tap on Yes to confirm. (see screenshot below)
4 When finished, you can close the Local Users and Groups if you like.
1 Type netplwiz in the search box (Win+S) in your Start menu or on your taskbar, and press Enter.
2 If prompted by UAC, click/tap on Yes.
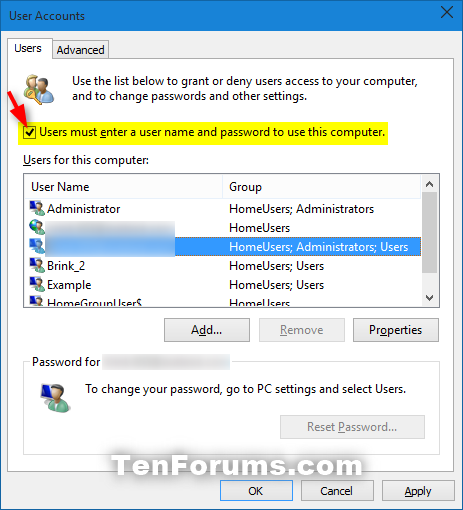
3 Check the Users must enter a user name and password to use this computer box. (see screenshot below)
4 Click/tap on a user (ex: Example) you want to delete, and click/tap on Remove. (see screenshot below)
5 Click/tap on Yes to confirm. (see screenshot below)
6 If you set Windows to automatically sign in to a user account at startup, then you will need to set this again when finished.
7 When finished, you can close Netplwiz if you like.
1 Open an elevated command prompt.
2 Copy and paste thenet userscommand into the elevated command prompt, and press Enter to see a list of all user account names on the PC. Make note of the account name you want to delete. (see screenshot below)
3 Do step 4 or step 5 below depending on if the user is joined to a domain or not.
A) Type the command below into the elevated command prompt, press Enter, and go to step 6 below. (see screenshot below)
net user "UserName" /delete
Substitute UserName in the command above with the actual user name from step 2 you want to delete.
For example:net user "Example" /delete
A) Type the command below into the elevated command prompt, press Enter, and go to step 6 below.
net user "UserName" /delete /domain
Substitute UserName in the command above with the actual domain user name from step 2 you want to delete.
For example:net user "Example" /delete /domain
6 When finished, you can close the elevated command prompt if you like.
For more Remove-LocalUser command options and details, see: Add-Remove-LocalUser - Microsoft Docs
1 Open an elevated PowerShell.
2 Copy and paste theGet-LocalUsercommand into the elevated PowerShell, and press Enter to see a list of all user account names on the PC. Make note of the account name you want to delete. (see screenshot below)
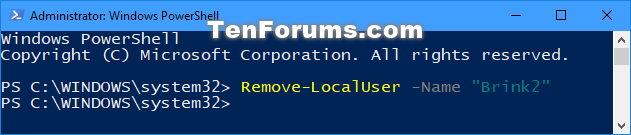
3 Type the command below into the elevated PowerShell, and press Enter. (see screenshot below)
Remove-LocalUser -Name "UserName"
Substitute UserName in the command above with the actual user name from step 2 you want to delete.
For example:Remove-LocalUser -Name "Brink2"
4 When finished, you can close the elevated PowerShell if you like.
That's it,
Shawn
Related Tutorials
- How to Add and Remove Accounts used by other apps in Windows 10
- How to Add a Local Account or Microsoft Account in Windows 10
- How to Add a Guest Account in Windows 10
- How to Enable or Disable Built-in Elevated Administrator Account in Windows 10
- How to View Full Details of All User Accounts in Windows 10
- How to Check if User is a Local Account or Microsoft Account in Windows 10
- How to Enable or Disable User Accounts in Windows 10
- How to Delete User Profile of an Account in Windows 10
- How to Add or Remove Users from Groups in Windows 10
Delete User Account in Windows 10
-
New #1
All this information is ok!
But doesn't work if the computer, when booted, goes right to the account you are try to delete!
Tully
-
New #2
Hello Tully, :)
Are you able to sign out and switch users (if available) to delete the account afterwards?
-
New #3
Is it possible to delete or change the name of the Administrators account
-
-
New #5
-
New #6
meebers,
Yeah, that's just a dummy account provided by the OEM to setup Windows with. You could create a new account for yourself, sign out, sign in to the new account, then delete the old one. :)
https://www.tenforums.com/tutorials/5...dows-10-a.html
-
-
-
-
New #9
Has any of this changed for Creators Update? I may need to delete a user account on a PC with the update. Unfortunately I am not in front of a PC running V1703 to check but I don't think the option to remove was in the family and other users settings, only to block. It's my wife's account (part of our family group) which may have some slight corruption so we may just delete her user account and then re-create it. Just trying to think of the easiest and quickest way to do this without upsetting windows!
I've never dabbled in this before but am I better off deleting user profile in order to achieve my goal? My wife's store app has issues and I think maybe easiest thing is start again for her seeing as there is nothing critical on her current user account.
cheers,
WayneLast edited by Scottyboy99; 27 Apr 2017 at 06:24.

Delete User Account in Windows 10
How to Delete a User Account in Windows 10Published by Shawn BrinkCategory: User Accounts
29 Jul 2022


 Quote
Quote and try to configure it. Tx...
Tutorial Categories

Related Discussions
