

How to Change Presentation Mode to Project Display in Windows 10
Display Switch is used to change the presentation mode of the main display of your Windows 10 PC to project on either the PC screen only, duplicate on second display, extend across all displays, or second screen only.
See also:
- Set up dual monitors on Windows 10 | Microsoft Support
- How to use multiple monitors in Windows 10 | Microsoft Support
This tutorial will show you how to project the main display to PC screen only, duplicate, extend, or second screen only for all users in Windows 10.
Projection Mode Description PC screen only Only the current main display is enabled. All other connected displays will be disabled. (When you're connected to a wireless projector, this option changes to Disconnect.) Duplicate The main display will be mirrored on the second display. Extend (default) The main display is extended across the all connected display screens and allows you to have a desktop that spans them. Second screen only The current main display will be disabled. All other connected displays will remain enabled with the second screen used as your new main display.
Contents
- Option One: To Change Presentation Mode to Project Display in Project flyout
- Option Two: To Change Presentation Mode to Project Display using Command
- Option Three: To Change Presentation Mode to Project Multiple Displays in Settings
1 Do step 2 (Project) or step 3 (Action Center) below for how you would like to open the Project flyout.
2 Press the Win+P keys, or swipe in from the right edge of the touch screen, and go to step 4 below.
3 Open the Action Center, click/tap on the Project button, and go to step 4 below. (see screenshot below)
4 Click/tap on the PC screen only, duplicate, extend, or second screen only presentation mode you want. (see screenshot below)
You can also press the Down Arrow key until you select a projection mode you want, and press Enter to apply.
For example: If you have a blank black screen and can't see the menu, you can do this below to restore the default Extend setting.
Press the Win + P keys, press the Down Arrow key twice, and press Enter.
1 Copy and paste the command below that you want to use into a command prompt or the Run (Win+R) dialog, and press Enter.
(PC screen only)
%windir%\System32\DisplaySwitch.exe /internal
OR
(Duplicate)
%windir%\System32\DisplaySwitch.exe /clone
OR
(Extend)
%windir%\System32\DisplaySwitch.exe /extend
OR
(Second screen only)
%windir%\System32\DisplaySwitch.exe /external
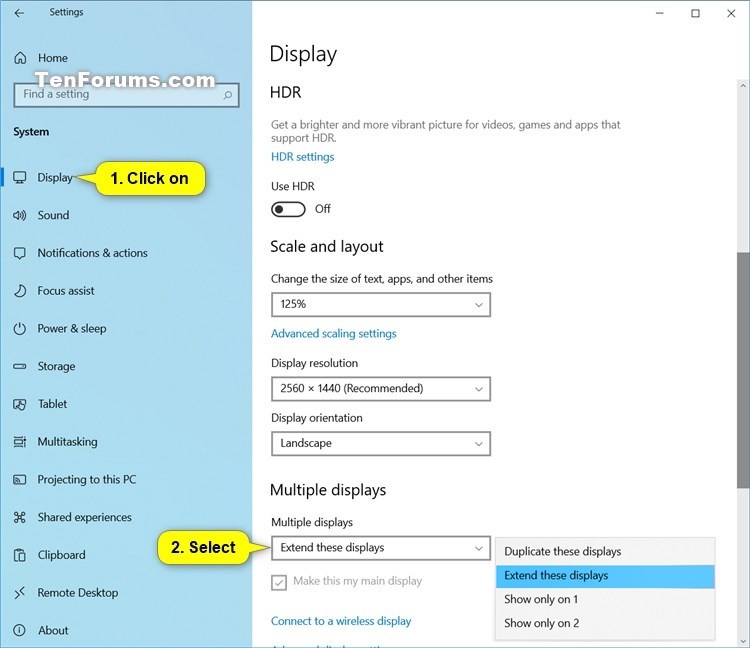
1 Open Settings, and click/tap on the System icon.
2 Click/tap on Display on the left side. (see screenshot below step 3)
3 Select Duplicate these displays, Extend these displays (default), or a Show only on <display number> for what you want in the Multiple displays drop menu on the right side. (see screenshot below)
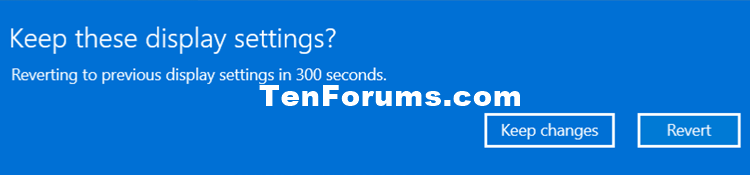
4 Click/tap on Keep changes to apply, or click/tap on Revert to undo this change. (see screenshot below)
You will only have 300 seconds to click/tap on a button before it automatically reverts back to previous display settings.
5 You can now close Settings if you like.
That's it,
Shawn
Related Tutorials
- How to Create a Display Switch shortcut in Windows 10
- How to Set a Display as Main Display in Windows 10
- How to Connect to a Wireless Display with Miracast in Windows 10
- How to Change Settings and Layout for Multiple Displays in Windows 10
- How to Hide or Show Notifications when Duplicating Screen in Windows 10
- How to Clear and Reset External Display Cache in Windows 10
- How to Add a Project Display context menu in Windows 10
- How to Remove Display from Desktop in Windows 10
Display Switch - Change Presentation Mode to Project in Windows 10
-
-
-
-
-
New #5
Device name HPLAPTOPProcessor Intel(R) Core(TM) i7-7500U CPU @ 2.70GHz 2.90 GHzInstalled RAM 8.00 GBDevice ID 01C2869A-EACD-48CF-ACA6-4CFED37BDFF3Product ID 00325-96176-65479-AAOEMSystem type 64-bit operating system, x64-based processorPen and touch Touch support with 2 touch points Microsoft Windows [Version 10.0.19043.1110](c) Microsoft Corporation. All rights reserved.
I have a question I would like to ask before I try resetting the first option of this tutorial as I do not understand the vocabulary and think I might just make matters worse.
Since my sons did a clean install of Windows 10 for me, I can no longer switch between views of two accessible external hard drives so I can copy and paste files or folders between them. Nor can I access 2 identical views of the same HD to enable transferring files between folders on the same drive. Opening This PC view from Search Windows and clicking on the external hard drive brings up a single window showing the folders on that drive. I have tried the various options available on the Home View Menu but nothing seems to help.
Is this a search folders problem or a directory problem ? It used to be possible to expand the ext HD entry on a left section of the window to access individual folders and files without affecting the right section tho I did have to keep a careful eye on the address bar to ensure I was still viewing the same HD.
Any ideas what I have done or can do that will affect this ?
-
New #6
Hello mate,
Just to verify, I believe you are referring to folder view layout settings below instead of what this tutorial is for which mode to project the desktop to another display.
Change Folder View Layout in Windows 10

Display Switch - Change Presentation Mode to Project in Windows 10
How to Change Presentation Mode to Project Display in Windows 10Published by Shawn BrinkCategory: Hardware & Drivers
18 Apr 2021


 Quote
Quote
Tutorial Categories

Related Discussions
