

How to Rename your PC in Windows 10
PCs on a network need unique names so they can identify and communicate with each other. If two PCs have the same name on the same network, it creates a conflict for network communications. Most PCs come with default names, but you can usually change them. It's best to keep PC names short (fifteen characters or less) and easily recognizable.
It is recommend that you use only Internet-standard characters in the PC name. The standard characters are the numbers 0 through 9, uppercase and lowercase letters from A through Z, and the hyphen (-) character. PC names cannot consist entirely of numbers, nor can they contain spaces. The name also cannot contain special characters, such as the following:
` ~ @ # $ % ^ & ( ) = + [ ] { } | ; : , . < > / ?
This tutorial will show you how to change the computer name of your Windows 10 PC to any name you like.
You must be signed in as an administrator to be able to change the PC name.
Some Internet service providers (ISPs) require you to use a specific PC name so they can identify your PC and validate your account. If your ISP requires a specific PC name, then do not change the PC name they give you.
If you set Windows to automatically sign in to a user account at startup and ever change the computer name afterwards, then you will see a Other User at sign in that fails to sign in, and you must manually select your account and sign in instead. You will then need to set Windows to automatically sign in to the user account that you want at startup again to fix it.
Contents
- Option One: To Change Computer Name in Settings
- Option Two: To Change Computer Name in System Properties
- Option Three: To Change Computer Name in Command Prompt
- Option Four: To Change Computer Name in PowerShell
1 Open Settings, and click/tap on the System icon.
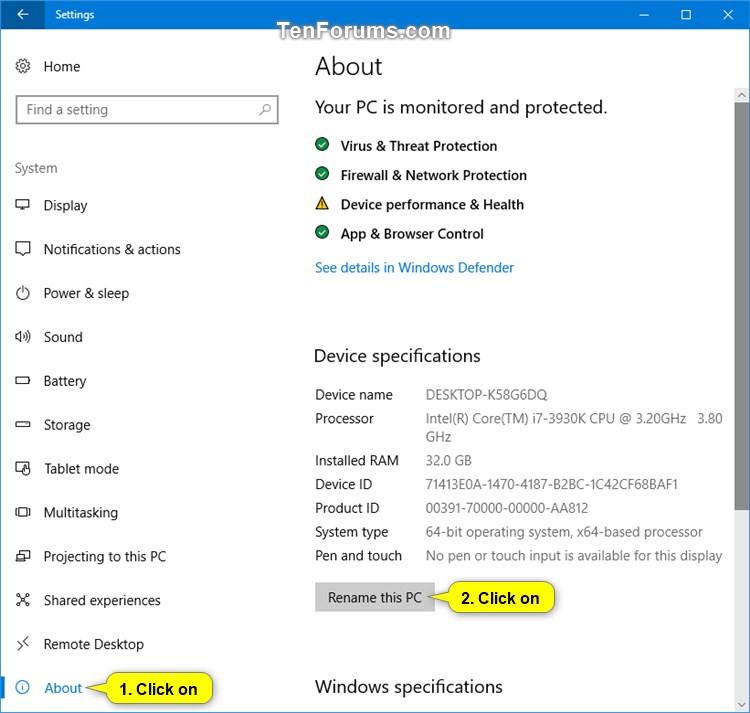
2 Click/tap on About on the left side, and click/tap on Rename this PC on the right side. (see screenshot below)
3 Type in a new name you want for your PC, and click/tap on Next. (see screenshot below)
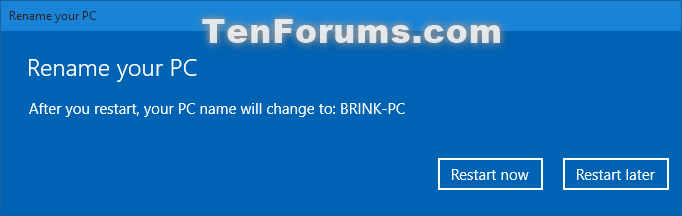
4 Click/tap on Restart now to restart your PC and apply the new PC name. (see screenshot below)
This will restart your PC immediately. Be sure that you save and close anything you have open first.
1 Do step 2 or step 3 for how you want to open System Properties (SystemPropertiesComputerName.exe).
2 Open the Control Panel (icons view), click/tap on the System icon, and go to step 4 below.
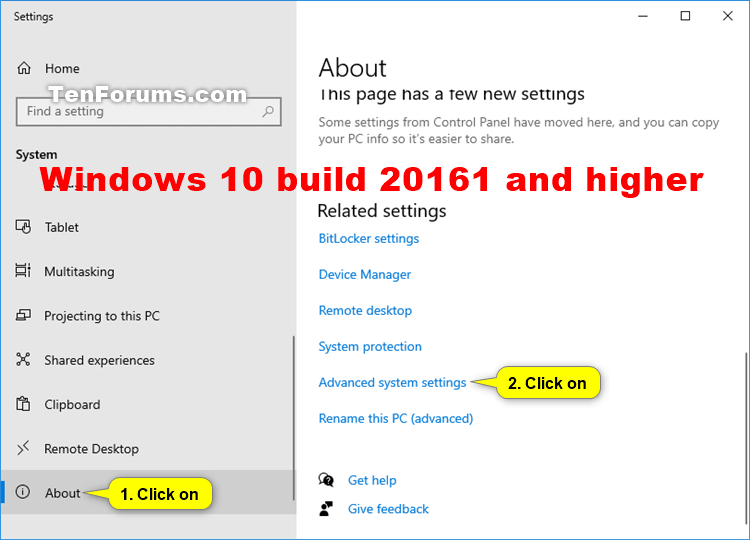
Starting with Windows 10 build 20161, you will need to open Settings instead, click/tap on the System icon, and click/tap on About on the left side.
3 Open the (Win+X) Quick Link menu, click/tap on System, and go to step 4 below.
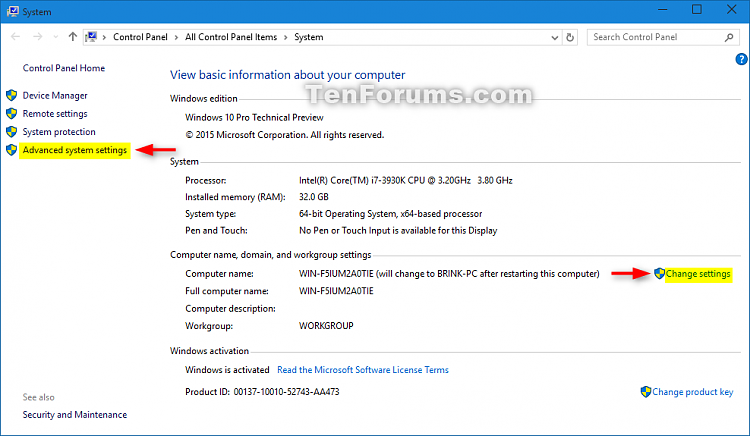
4 Click/tap on the Advanced system settings link on the left side, or click/tap on the Change settings link on the right side. (see screenshots below)
5 If prompted by UAC, then click/tap on Yes.
6 Click/tap on the Computer Name tab, and click/tap on the Change button. (see screenshot below)
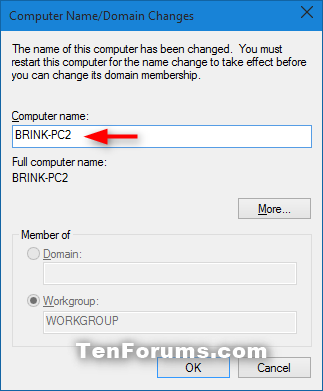
7 Type in a new name you want for your PC at the top, and click/tap on OK. (see screenshot below)
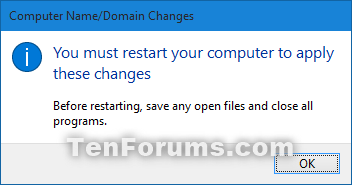
8 Click/tap on OK. (see screenshot below)
This will not restart the computer yet.
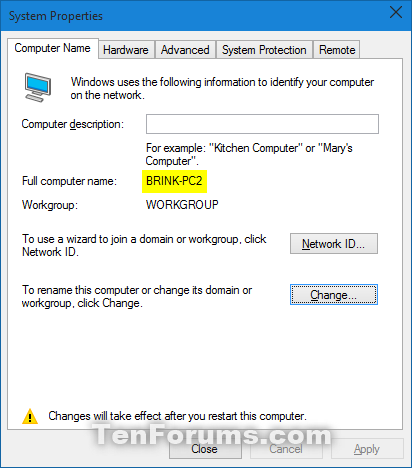
9 Click/tap on Close. Notice your new "Full computer name". (see screenshot below)
10 Click/tap on Restart now to restart your PC and apply the new PC name. (see screenshot below)
This will restart your PC immediately. Be sure that you save and close anything you have open first.
1 Open an elevated command prompt.
2 Type the command below into the elevated command prompt, and press Enter. (see screenshot below)
wmic computersystem where name="%computername%" call rename name="Computer-Name"
Substitute Computer-Name in the command above with the actual name you want for your PC within quotes.
3 When successfully finished, close the elevated command prompt, and restart the computer to apply.
1 Open an elevated PowerShell.
2 Type the command below into the elevated PowerShell, and press Enter. (see screenshot below)
Rename-Computer -NewName "Computer-Name"
Substitute Computer-Name in the command above with the actual name you want for your PC within quotes.
For example:Rename-Computer -NewName "Brink-Laptop"
3 When successfully finished, close the elevated PowerShell, and restart the computer to apply.
That's it,
Shawn Brink
Related Tutorials
- Find Old Previous Computer Name in Windows 10 and Windows 11
- How to Change Workgroup Name in Windows 10
- How to Change Registered Owner and Organization of your Windows 10 PC
Change Computer Name in Windows 10
-
New #1
I accidentally noticed that there is another way to open the system properties, by right clicking on this pc and select properties.
-
New #2
Caution changing computer name
Caution only, not Warning!
Changing the computer name will immediately affect two important areas.
1. Sync will create a new attached computer in your MS online account. Not really an issue unless you change the name back to what it was. You may get old Sync settings and/or data from the previous attached computer. The new attached computer, or the previous still attached computer, can be deleted through your on-line account.
2. If you are using Windows native backup (System Image) and/or native file backup (File History), they will start fresh. File History will warn you and give you a chance to include previous file history it has found. System Image Backup will create a new folder under existing folder "WindowsImageBackup" named as your new computer name. Both will be available if you do a System Image Restore from Recovery options, but choosing an image from the previous computer name will restore the image and your computer will be renamed to the previous name.
Again, caution only.....
-
-
New #4
It depends on:
1) Who set it up in case someone else did it for you by chance and you would rather have it see a different Admin account PC name applied. Or you may decide at some time you want the name changed with one example being you are passing along the now used machine to someone else where being able to change the name without needing to wipe the existing copy of Windows saves a lot of work!
2) For most who are selling an old system the total wipe with a drive cleaner to insure security of total personal data removal would be another matter entirely. You would more then likely remove existing drives to drop in a new one which would be a totally fresh start for the new owner. But if the new owner is someone you know well and most personal stuff is now gone or you never put much on in the first place the rename saves the time and effort.
3) The other 3rd main reason to think of would be the need to change if not simply personal vanity of getting bored you may have other reasons such as displaying things online where you don't want personal information given out such as on any social networks? If you originally gave it your birth name when first new and later realize that for personal security need to make the change the guide is here for it! And if not on your own machine maybe someone else needs it seen to? You never know! :)
-
New #5
Will those methods there will also change the users name under C:\Users\xxxxx ?Last edited by sn00ker; 05 Aug 2015 at 08:17.
-
New #6
Hello sn00ker,
Sorry, but no. This is only to change the name of the computer, and not the name of your user profile folder.
For that, it would be best to add a new local account with the name you wanted instead to have it's user profile folder named that. You can then switch it to a Microsoft account if you like.
-
-
-
-
New #9
One thing to check out if you decide to see a new account created is another one of those great guides you can look over on how to change the type of account since you would want a new admin account to replace the old. Account Type - Change in Windows 10 - Windows 10 Forums[1]=User%20Accounts

Change Computer Name in Windows 10
How to Rename your PC in Windows 10Published by Shawn BrinkCategory: General Tips
28 Nov 2022


 Quote
QuoteTutorial Categories

Related Discussions
