

How to Add or Remove Google Drive in Navigation Pane of File Explorer in Windows 10
Google Drive is a file storage and synchronization service created by Google. It allows users to store files in the cloud, share files, and edit documents, spreadsheets, and presentations with collaborators. Google Drive encompasses Google Docs, Sheets, and Slides, an office suite that permits collaborative editing of documents, spreadsheets, presentations, drawings, forms, and more.
To use Google Drive on your PC, you must first download and install: Backup and Sync from Google
If you have Backup and Sync from Google installed for Google Drive, this tutorial will show you how to add or remove Google Drive from the navigation pane of File Explorer for your account in Windows 10.
If you would like to have more than one Google Drive added to your navigation pane in File Explorer, then please post a request along with the full path of the Google Drive folder you want added. If you moved your user profile folder from the default "C:\Users" location or installed Google Drive to another location than the default "C:\Program Files\Google\Drive" location, please also include the new location.
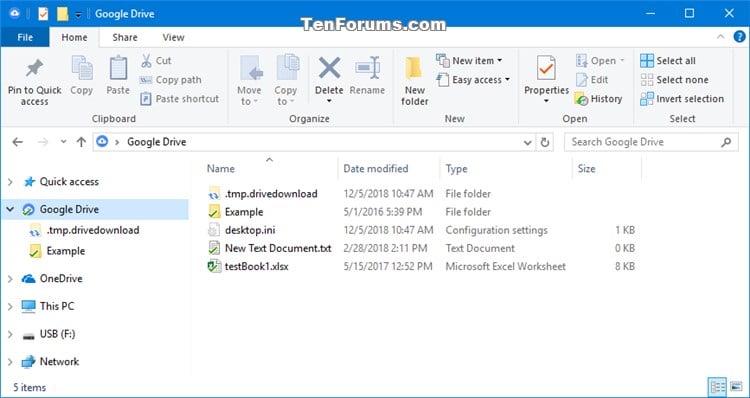
EXAMPLE: Google Drive in navigation pane of File Explorer
Here's How:
1 Do step 2 (add) or step 3 (remove) below for what you would like to do.
If you moved your user profile folder from the default "C:\Users" location or installed Google Drive to another location than the default "C:\Program Files\Google\Drive" location, please post a reply with your location instead. I'll need to create a custom .reg for you with your location for this to work. Reference.
A) Click/tap on the Download button below to download the file below, and go to step 4 below.
Add_Google_Drive_to_navigation_pane.reg
Download
This is the default setting.
A) Click/tap on the Download button below to download the file below, and go to step 4 below.
Remove_Google_Drive_from_navigation_pane.reg
Download
4 Save the .reg file to your desktop.
5 Double click/tap on the downloaded .reg file to merge it.
6 When prompted, click/tap on Run, OK (UAC), Yes, and OK to approve the merge.
7 If the change doesn't get applied immediately, then you can restart the explorer process to apply.
8 You can now delete the downloaded .reg file if you like.[/INDENT]
That's it
Shawn Brink
Related Tutorials
- How to Add or Remove Google Drive Context Menu in Windows
- How to Add or Remove Drives in Navigation Pane of File Explorer in Windows 10
- How to Add or Remove Dropbox in Navigation Pane of File Explorer in Windows 10
- How to Add or Remove Favorites in Navigation Pane of File Explorer in Windows 10
- How to Add or Remove Homegroup in Navigation Pane of File Explorer in Windows 10
- How to Add or Remove Libraries in Navigation Pane of File Explorer in Windows 10
- How to Add or Remove Network in Navigation Pane of File Explorer in Windows 10
- How to Add or Remove This PC in Navigation Pane of File Explorer in Windows 10
- How to Add or Remove OneDrive in Navigation Pane of File Explorer in Windows 10
- How to Add or Remove Quick access in Navigation Pane of File Explorer in Windows 10
- How to Add or Remove Recycle Bin in Navigation Pane of File Explorer in Windows 10
- How to Add or Remove User Folder in Navigation Pane of File Explorer in Windows 10
Add or Remove Google Drive from Navigation Pane in Windows 10
-
New #1
I changed the default location of Drive to "D:\BD Google Drive" hoping I could install multiple Drive instances, which I don't guess is possible. Would I still use the same reg in Win10 64-bit, or do I have to edit the "TargetFolderPath"? You have it in hex, I've tried converting buy it doesn't look anything like your fomat (I'm not a programmer...) Any help!!
-
New #2
Hello Hockeyfreak, and welcome to Ten Forums. :)
Yeah, after you merge the .reg file, you'll need to manually edit the registry keys in Registry Editor for the new path.
-
New #3
Awesome! Thanks, I'll figure out how. Shouldn't be hard. Then just save and reboot, I should be good?
-
New #4
You'll only need to correct the paths. No need to reboot.
If you need any help, please feel free to let me know. :)
-
New #5
SWEET!! Worked like a charm. I'm trying to thank you again, but can't until I spread it around. I'll be here more often. 10 is better than 7 in my opinion, but there are so many things I need to tweak.
Thanks so much.
-
-
New #7
Excellent
-
New #8
Hi Brink , Thanks....
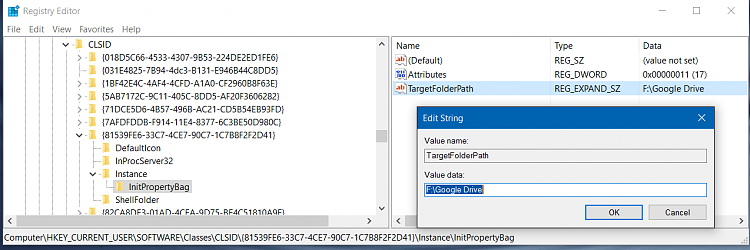
I had the same issue as HockeyFreak , as my Google Drive is using F:\Google Drive , since I didn't want it on my small OS SSD.
Just thought this might help someone else to change their's too if needed. Changing the Target Folder in the registry to F:\Google Drive immediately got it to Show in the Explorer RH Pane (no reboot) instead of throwing the Error message.
The registry Key you need to change:
HKEY_CURRENT_USER\SOFTWARE\Classes\CLSID\{81539FE6-33C7-4CE7-90C7-1C7B8F2F2D41}\Instance\InitPropertyBag
and a pic of mine.... right click on TargetFolderPath >modify ..... and change the Value Data to your Google Drive location.
*** edit: added 64bit Windows Fix.
For those using 64 Bit Windows you also need to modify the following Registry Entry too :
HKEY_CURRENT_USER\SOFTWARE\Classes\WOW6432Node\CLSID\{81539FE6-33C7-4CE7-90C7-1C7B8F2F2D41}\Instance\InitPropertyBag
KBLast edited by Kbird; 18 May 2017 at 11:15.
-
-

Add or Remove Google Drive from Navigation Pane in Windows 10
How to Add or Remove Google Drive in Navigation Pane of File Explorer in Windows 10Published by Shawn BrinkCategory: General Tips
26 Mar 2022

 Quote
Quote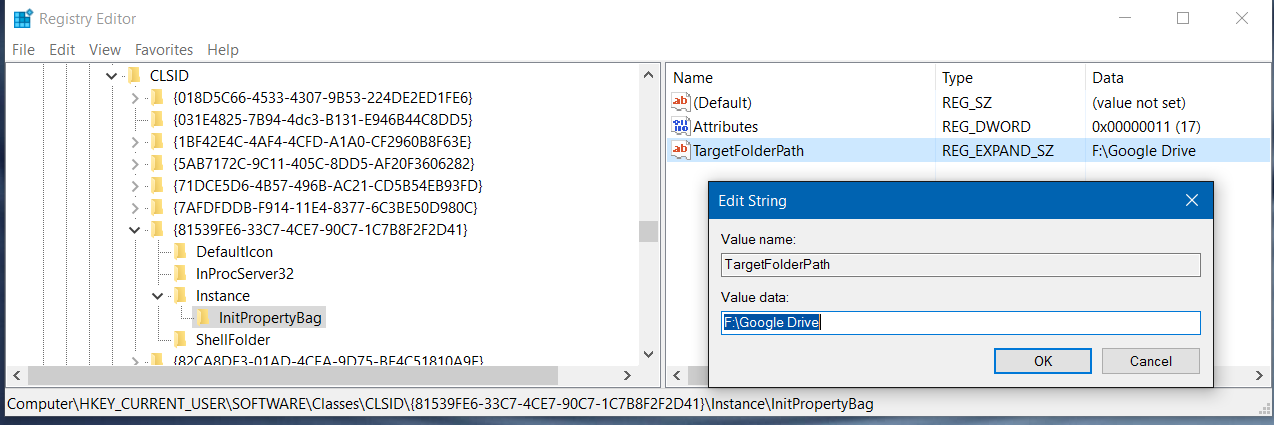

Tutorial Categories

Related Discussions
