

How to Enable or Disable Built-in Elevated Administrator Account in Windows 10
This tutorial will show you how to enable or disable the hidden built-in elevated Administrator account in Windows 10.
If your computer no longer has a working administrator account left to use, you could enable the built-in Administrator account using an available option in this tutorial to have to fix any issues needing an administrator account.
User Accounts in Windows 10:
standard user user account - The standard account is an unelevated restricted user account that can be a local account or Microsoft account that is a member of the Users group. It can help protect your computer by preventing users from making changes to the system that affects everyone who uses the computer. When you are signed in to Windows with a standard account, you can do almost anything that you can do with an administrator account, but if a standard user tries to do something that requires elevated rights (ex: run as administrator), Windows will display a UAC prompt for the standard user to enter the password of an administrator account for approval and confirmation before allowing the action.
administrator user account - Is an unelevated administrator account that is created by default during the installation of Windows, or is already setup for you on an OEM (ex: Dell) computer. This account can be a local account or Microsoft account that is a member of the Administrators group. Members of the Administrators groups can run apps with elevated permissions without using the Run as Administrator option. An administrator account has full control of the files, directories, services, and other resources on the local computer. An administrator account can create other local users, assign user rights, change the owner of items, and assign permissions. An administrator account can take control of local resources at any time simply by changing the owner, user rights, and permissions. If an administrator user tries to do something that requires elevated rights (ex: run as administrator), Windows will display a UAC prompt for the administrator user to approve before allowing the action.
Built-in "Administrator" - The hidden built-in default local Administrator account is an elevated account for the system administrator. It is basically the same as an administrator account above with UAC turned off. By default, the built-in Administrator account will not be prompted by UAC. The built-in Administrator account cannot be deleted or locked out, but it can be renamed or disabled. Anything that runs while signed in to this built-in Administrator account will also have elevated rights on the PC, so it is not recommended to use the built-in Administrator account for everyday usage. It's recommended to only enable and use the built-in Administrator account as needed and disable it when finished instead.
Starting with Windows 10 version 1709 and higher, the built-in Administrator account can now open and use Settings and other Microsoft Store apps.
By default, the built-In Administrator account's password is empty so you can log in to it without entering anything in the password input box on the Sign in screen.
For a Windows 11 version of this tutorial, see:
Enable or Disable Built-in Administrator Account in Windows 11
Contents
- Option One: Enable or Disable Built-in Administrator in Elevated Command Prompt
- Option Two: Enable or Disable Built-in Administrator in Elevated PowerShell
- Option Three: Enable or Disable Built-in Administrator in Local Users and Groups
- Option Four: Enable or Disable Built-in Administrator in Local Security Policy
- Option Five: Enable or Disable Built-in Administrator in Command Prompt at Boot
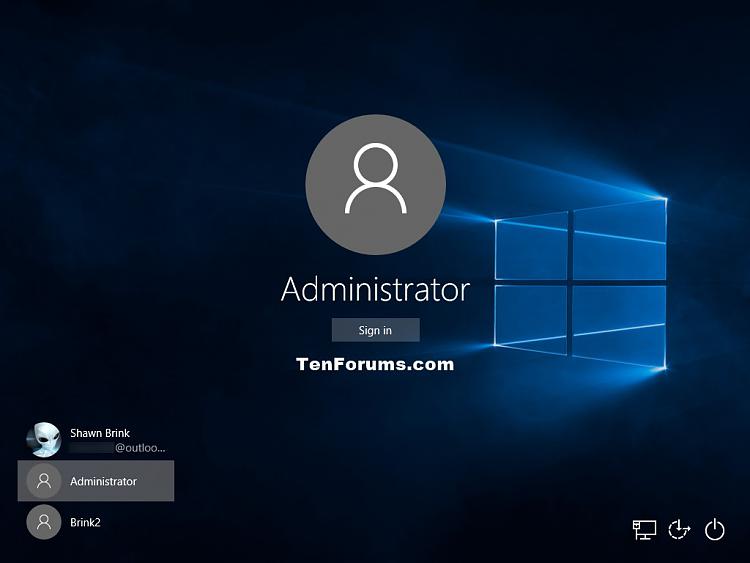
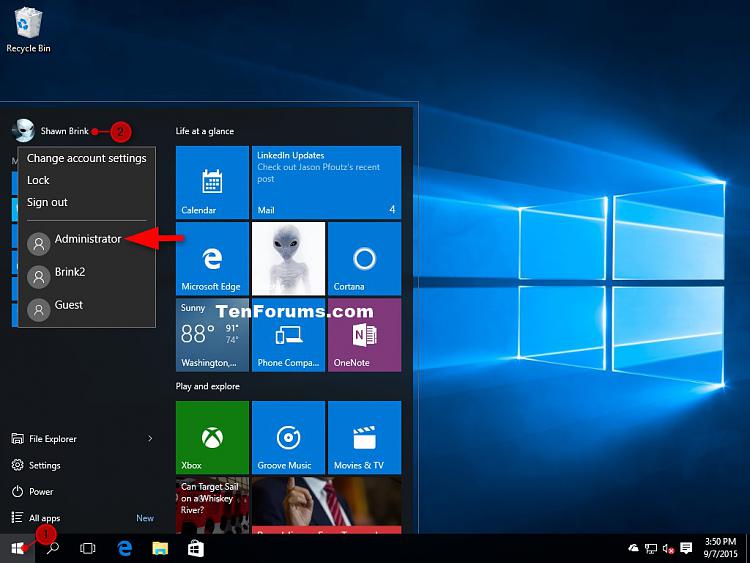
EXAMPLE: Administrator enabled on Sign in and Switch User
You must be signed in as an administrator to do this option.
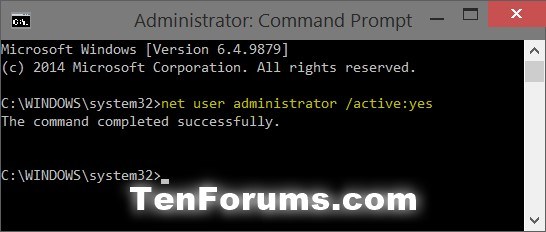
1 Open an elevated command prompt.
2 Do step 3 (enable), step 4 (enable with password), or step 5 (disable) below for what you would like to do.
A) In the elevated command prompt, copy and paste the command below, press Enter, and go to step 6 below. (see screenshot below)
net user Administrator /active:yes
If you had previously renamed the built-in "Administrator" account's name, then you will need to substitute Administrator in the command below with the new name instead.
If your Windows uses a different language than English, then you would need to substitute Administrator in the command below with the translation for your language instead.
A) In the elevated command prompt, copy and paste the command below, press Enter, and go to step 6 below. (see screenshot below)
net user Administrator password /active:yes
Substitute password in the command above with the actual password you want to use to sign in to the built-in Administrator account with.
If you had previously renamed the built-in "Administrator" account's name, then you will need to substitute Administrator in the command below with the new name instead.
If your Windows uses a different language than English, then you would need to substitute Administrator in the command below with the translation for your language instead.
This is the default setting.
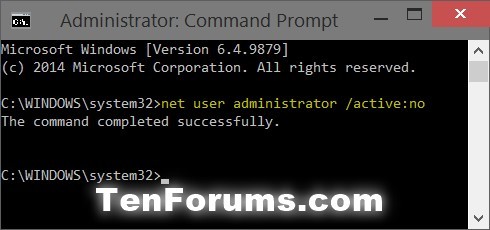
A) In the elevated command prompt, copy and paste the command below, press Enter, and go to step 6 below. (see screenshot below)
net user Administrator /active:no
If you had previously renamed the built-in "Administrator" account's name, then you will need to substitute Administrator in the command below with the new name instead.
If your Windows uses a different language than English, then you would need to substitute Administrator in the command below with the translation for your language instead.
6 When finished, you can close the elevated command prompt if you like.
You must be signed in as an administrator to do this option.
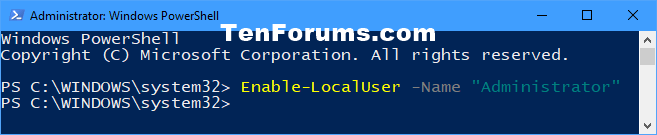
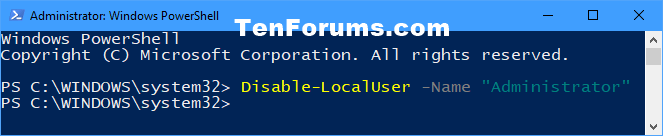
1 Open an elevated PowerShell.
2 Do step 3 (enable) or step 4 (disable) below for what you would like to do.
A) In the elevated command prompt, copy and paste the command below, press Enter, and go to step 5 below. (see screenshot below)
Enable-LocalUser -Name "Administrator"
If your Windows uses a different language than English, then you would need to substitute Administrator in the command below with the translation for your language instead.
This is the default setting.
A) In the elevated command prompt, copy and paste the command below, press Enter, and go to step 5 below. (see screenshot below)
Disable-LocalUser -Name "Administrator"
If your Windows uses a different language than English, then you would need to substitute Administrator in the command below with the translation for your language instead.
5 When finished, you can close the elevated PowerShell if you like.
You must be signed in as an administrator to do this option.
The Local Users and Groups is only available in the Windows 10 Pro, Enterprise, and Education editions.
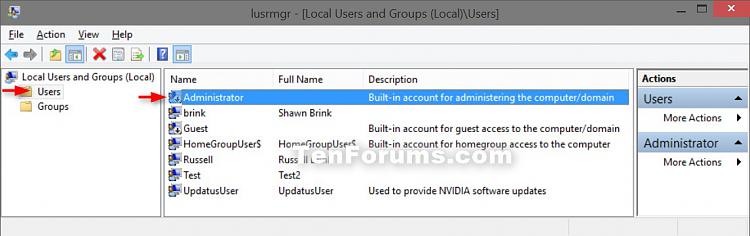
1 Press the Windows + R keys to open the Run dialog, type lusrmgr.msc, and click/tap on OK.
2 In the left pane, click/tap on the Users folder, then in the middle pane, double click/tap on Administrator. (see screenshot below)
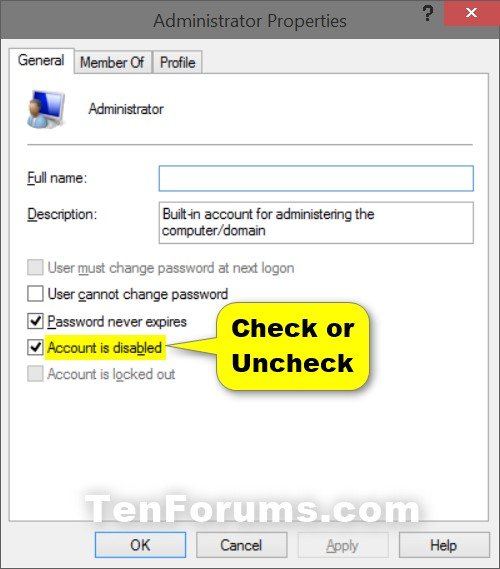
3 Do step 4 (enable) or step 5 (disable) below for what you would like to do.
A) Uncheck the Account is disabled box, click/tap on OK, and go to step 6 below. (see screenshot below step 6)
A) Check the Account is disabled box, click/tap on OK, and go to step 6 below. (see screenshot below step 6)
6 You can now close Local Users and Groups if you like.
You must be signed in as an administrator to do this option.
The Local Security Policy is only available in the Windows 10 Pro, Enterprise, and Education editions.
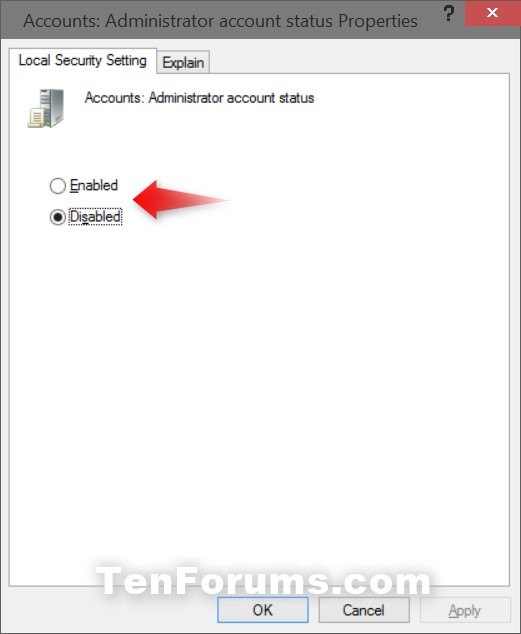
1 Press the Win + R keys to open the Run dialog, type secpol.msc into Run, and click/tap on OK.
2 In the left pane, click/tap on the Local Policies folder to expand it, and click/tap on the Security Options folder. (see screenshot below)
3 In the right pane of Security Options, double click/tap on Accounts: Administrator account status. (see screenshot above)
4 Do step 5 or 6 below for what you would like to do.
A) Select (dot) Enabled, click/tap on OK, and go to step 7 below. (see screenshot below step 7)
A) Select (dot) Disabled, click/tap on OK, and go to step 7 below. (see screenshot below step 7)
7 You can now close Local Security Policy if you like.
This option is good for when you are unable to sign in to Windows 10.
1 Boot from your Windows 10 installation USB or recovery drive, and open a command prompt at boot (Shift+F10).
If you don't have a Windows 10 installation USB or recovery drive, then you can use OPTION SIX here to boot to Advanced Startup like in the screenshot below.
Afterwards, continue to boot to a command prompt at boot.
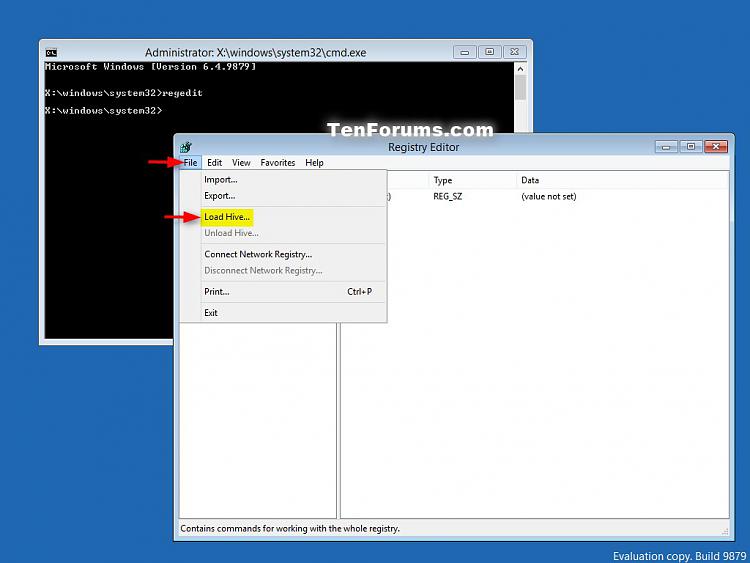
2 In the command prompt, type regedit, and press Enter. (see screenshot below step 3)
3 In the left pane of Registry Editor, click/tap on the HKEY_LOCAL_MACHINE key. (see screenshot below)
4 Click/tap on File (menu bar), and on Load Hive. (see screenshot below)
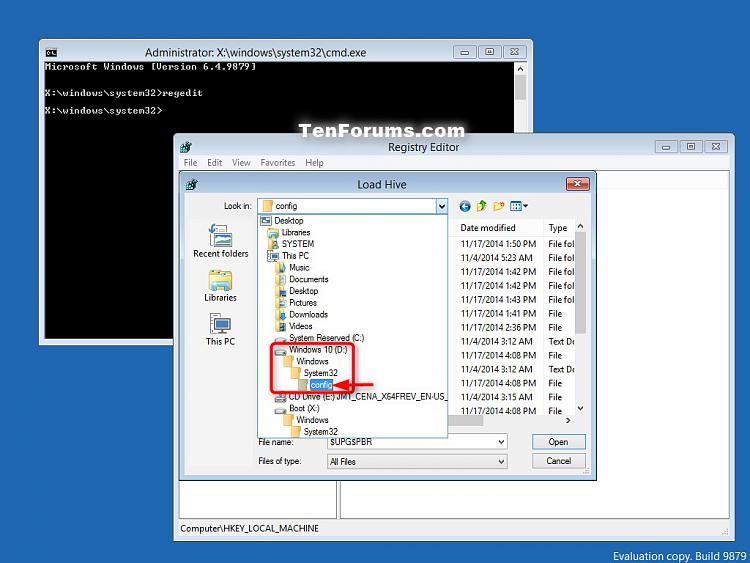
5 In the Load Hive dialog, open the drive (ex: D ) that you have Windows 10 installed on, and browse to the location below. (see screenshot below)
The drive letter (ex: C) will not always be the same at boot as it is from within Windows 10.
The Windows drive will include the Windows, Users, and a PerfLogs folder to help ID it.
It will not be the Boot (X:) drive.
D:\Windows\System32\config
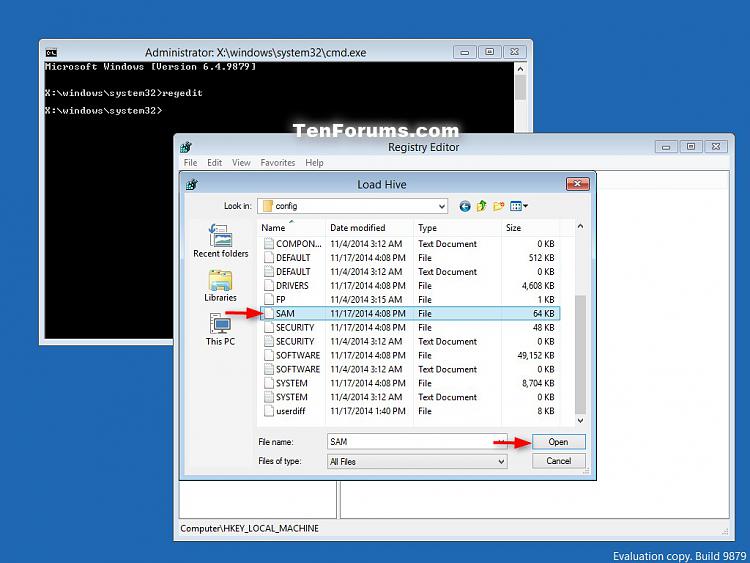
6 Select the SAM file, and click/tap on Open. (see screenshot below)
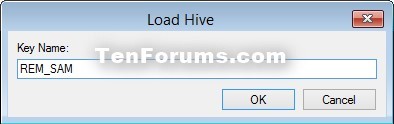
7 In the Load Hive dialog, type REM_SAM, and click/tap on OK. (see screenshot below)
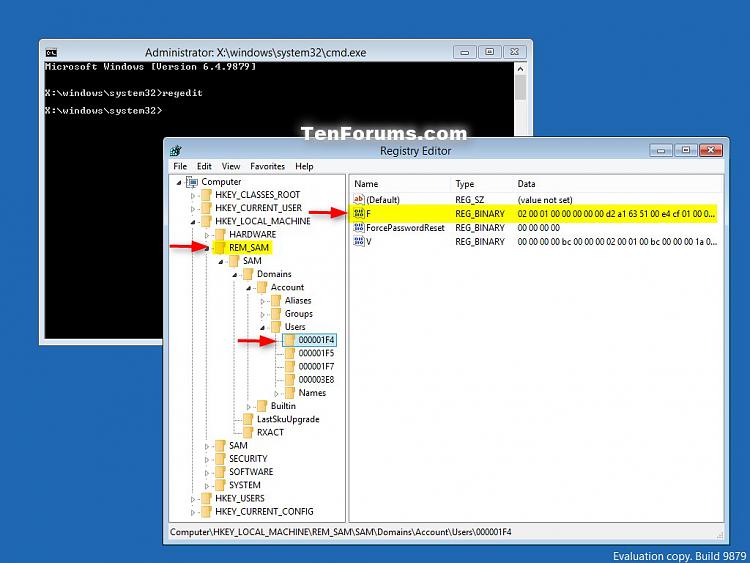
8 In the left pane of Registry Editor, navigate to and open the key below. (see screenshot below)
HKEY_LOCAL_MACHINE\REM_SAM\SAM\Domains\Account\Users\000001F4
9 In the right pane of the 000001F4 key, double click/tap on the F binary value to modify it. (see screenshot above)
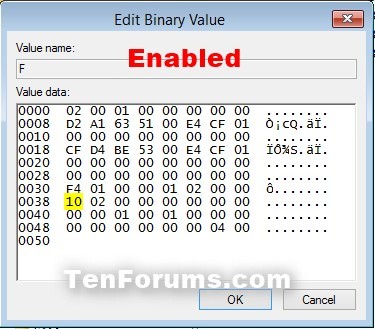
10 Do step 11 (Enable) or step 12 (disable) below for what you would like to do.
A) In the first column of line 0038, change 11 to 10, click/tap on OK, and go to step 13 below. (see screenshot below)
You would do this by clicking to the left of 11 to place the cursor there, press the Delete key, then type 10.
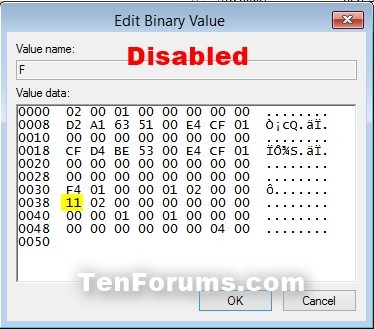
A) In the first column of line 0038, change 10 to 11, click/tap on OK, and go to step 13 below. (see screenshot below)
You would do this by clicking to the left of 10 to place the cursor there, press the Delete key, then type 11.
13 Close Registry Editor and the command prompt. (see screenshot below step 3)
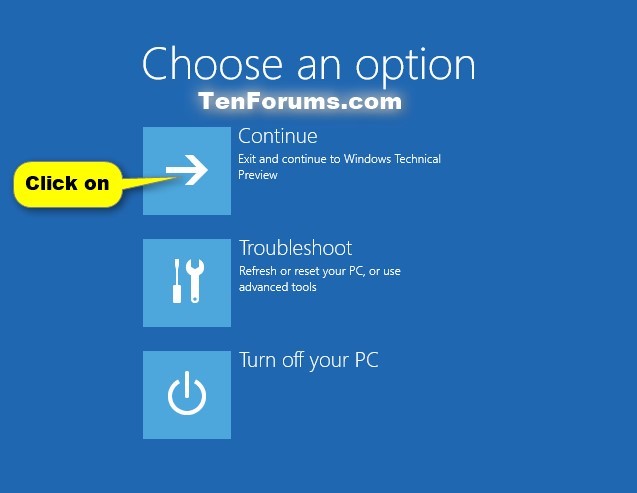
14 Click/tap on Continue to startup back in Windows 10. (see screenshot below)
That's it,
Shawn Brink
Related Tutorials
- How to Fix UAC prompt has greyed out or missing Yes button in Windows 10
- How to Add a New User Account in Windows 10
- How to Determine if Users are an Administrator or Standard User in Windows 10
- How to Change Account Type of Users in Windows 10
- How to Add a Guest Account in Windows 10
- How to Enable or Disable User Accounts in Windows 10
- How to Add or Remove Users from Groups in Windows 10
- How to Enable or Disable User Account Control (UAC) prompt for Built-in Administrator in Windows
Enable or Disable Elevated Administrator account in Windows 10
-
New #1
Thanks for the guide! it worked for me after i deleted my home user administrator account and could no longer log in during the log in screen. Thank you so much!
-
-
New #3
I can't get it to work because when i try and open "SAM", I get "This file is in use" and I have no idea how to close it.
-
New #4
Hello ukcatsfan83, and welcome to Ten Forums. :)
Are you able to use one of the other options instead?
If not, then be sure that you are booting from Windows 10 installation media (ex: USB) to open a command prompt at boot with instead.
-
New #5
-
New #6
Windows apps (aka: modern apps) will not work in an elevated account like the built-in Administrator.
-
New #7
-
New #8
Similar Issue Please Help
Long story short, had windows tech support try to help with an issue, one of the guys deleted me as administrator, and now I can not regain administrator status. Bare in mind, I don't think I'm as Techy as you guys on here but I'm not a dummy.
This tutorial states
You must be signed in as an "administratorto be able to do the steps in this tutorial"
-but what do I do if I can't sign in as administrator?
-or how do I log in as administrator?
-I dont even have a darn password as the administrator!!!
lol anyway please help
This is getting frustrating... grr windows 10
-
-
New #9
Hello Smajor, and welcome to Ten Forums. :)
You should be able to use OPTION FOUR to enable the built-in Administrator.
Afterwards, sign in to the account, and change your other account to an administrator.
https://www.tenforums.com/tutorials/6...dows-10-a.html

Enable or Disable Elevated Administrator account in Windows 10
How to Enable or Disable Built-in Elevated Administrator Account in Windows 10Published by Shawn BrinkCategory: User Accounts
29 Jul 2022


 Quote
QuoteTutorial Categories

Related Discussions
