

How to Enable or Disable Automatic Deletion of BSOD Memory Dumps on Low Disk Space in Windows 10
A blue screen (aka: BSOD) error (also called a stop error) can occur if a problem causes your PC to shut down or restart unexpectedly. When you experience this type of error, you won't be able to see things like the Start menu or the taskbar on the screen when your PC is turned on. Instead you might see a blue screen with a message that your PC ran into a problem and needs to restart.
In the event of your PC encountering a BSOD (Blue Screen of Death) a Dump File will be required for debugging purposes by a BSOD analyst. By default Windows 10 is set to write Automatic memory dumps.
When hard drive space becomes low, the system automatically deletes dumps, both mini dumps in C:\Windows\minidump and full system dump in C:\Windows\MEMORY.DMP.
This is the typical event viewer entry when a dump is deleted because of low disk space:
Event ID: 1018 The dump file at location: C:\windows\memory.dump was deleted because the disk volume had less than 25 GB free space
These dumps are critical for debugging purposes. This tutorial can help you eliminate the deletion of dumps in most, but not all, cases.
Information
Additional related tutorials:
Contents
- Option One: Prevent Dumps from being Deleted due to Low Disk Space via System Properties
- Option Two: Prevent Dumps from being Deleted due to Low Disk Space via a REG file
- Option Three: Prevent Dumps from being Deleted due to Low Disk Space via Registry Editor
1 Press Windows key+R, type SYSDM.CPL and press Enter.
2 In the System Properties window, click on the Advanced tab. Under Startup and recovery, click Settings.
3 In the Startup and Recovery window, under System failure, select Disable automatic deletion of memory dumps when disk space is low option then click OK.
4 Close System Properties window and return to Desktop.
If this doesn't resolve the problem of losing dumps then try Option Two or Option Three below.
It's recommended that you Create a System Restore point before making any changes to the registry in Option Two or Option Three.
The downloadable .reg files below will add or modify the DWORD value in the registry key below.
[HKEY_LOCAL_MACHINE\SYSTEM\CurrentControlSet\Control\CrashControl]
AlwaysKeepMemoryDump DWORD (32 bit)
0 = Disable
1 = Enable
This key does not normally exist so the default value is therefore Disabled. Once the key has been added, 0 and 1 as shown above apply.
1 Do step 2 (enable) or step 3 (disable) below for what you would like to do.
A) Click/tap on the Download button below to download the file below, and go to step 4 below.
Enable_AlwaysKeepMemoryDump.reg
Download
This is the default setting.
A) Click/tap on the Download button below to download the file below, and go to step 4 below.
Disable_AlwaysKeepMemoryDump.reg
Download
4 Save the .reg file to your desktop.
5 Double click/tap on the downloaded .reg file to merge it.
6 When prompted, click/tap on Run, Yes (UAC), Yes, and OK to approve the merge.
7 Restart the computer to apply.
8 You could now delete the downloaded .reg file if you like.
This method will involve making manual changes via the Registry Editor. Making mistakes while manipulating registry could affect your system adversely. So be careful while editing registry entries and as stated earlier, Create a System Restore point first.
1 Press Windows key+R, type regedit and press Enter to open the Registry Editor (if you're not familiar with the Registry Editor, then click here: Microsoft Windows Registry Guide, 2nd Edition - Index-of.co.uk) to download a Microsoft PDF which has an excellent explanation of it.
2 Select then copy (Ctrl+C or right click and Copy) the following registry key:
HKEY_LOCAL_MACHINE\SYSTEM\CurrentControlSet\Control\CrashControl
3 Paste the key (Ctrl+V or or right click and Paste) into the Address bar at the top of the Registry Editor window, then press Enter.
Alternatively, in the left frame you can expand each key node down to and including CrashControl.
HKEY_LOCAL_MACHINE\SYSTEM\CurrentControlSet\Control\CrashControl
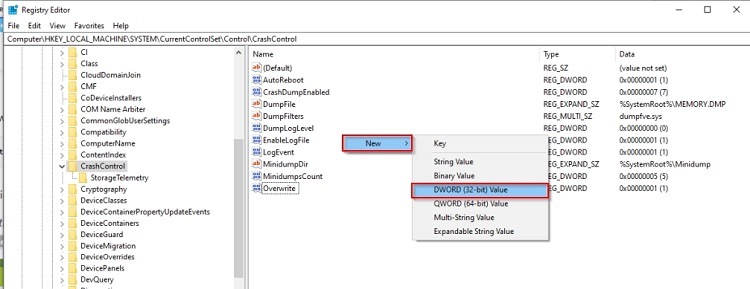
4 In the right pane of the CrashControl key below, double click on registry key AlwaysKeepMemoryDump to open it for editing.
If the value AlwaysKeepMemoryDump does not exist, add it by right clicking in the right pane, selecting New then DWORD (32-bit Value).
Name it AlwaysKeepMemoryDump.
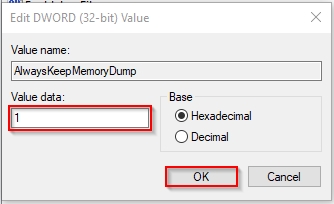
5 Set the Value data to 1 and click OK.
6 Close Registry Editor, reboot to make changes effective.
Disable Auto Deletion of Memory Dumps on Low Disk Space in Windows 10
-
-
-
New #3
Thanks Shawn, thanks Paul. Definite learning experience again. Fun though.
Shawn has some sweat equity in this one too.
-
New #4
This is the typical event viewer entry:
Code:Event ID: 1018 The dump file at location: C:\windows\memory.dump was deleted because the disk volume had less than 25 GB free space
-
-
New #6
Nice.
You're welcome.
'When you experience this type of error, you won't be able to see things like the Start menu or the taskbar on the screen when your PC is turned on. Instead you might see a blue screen with a message that your PC ran into a problem and needs to restart.'
We often see threads in which the OP reports that they did not have BSOD because automatically restart was checked.
They may see the start menu with task bar and continue to have BSOD with or without memory dump deletion.
Consider revising as these are often independent of each other.
-
New #7
These are outside the scope of this tutorial.'When you experience this type of error, you won't be able to see things like the Start menu or the taskbar on the screen when your PC is turned on. Instead you might see a blue screen with a message that your PC ran into a problem and needs to restart.'
They may see the start menu with task bar and continue to have BSOD with or without memory dump deletion.
This is covered in the first Additional related tutorials:We often see threads in which the OP reports that they did not have BSOD because automatically restart was checked.
How to Configure Windows 10 to Create Dump Files on BSOD
-
New #8
I find it simplest to run a command via an elevated Command Prompt:
It will set the data to 1 ( = Enabled). Replace 1 with 0 to disable it.Code:(REG Add "HKLM\SYSTEM\CurrentControlSet\Control\CrashControl" /V "AlwaysKeepMemoryDump" /T REG_DWORD /D 1 /F)
-

Disable Auto Deletion of Memory Dumps on Low Disk Space in Windows 10
How to Enable or Disable Automatic Deletion of BSOD Memory Dumps on Low Disk Space in Windows 10Published by Rich KurtzCategory: BSOD
28 Jun 2020


 Quote
Quote
Tutorial Categories

Related Discussions
