

How to Add a Project Display context menu in Windows 10
Display Switch is used to change the presentation mode of the main display of your Windows 10 PC to project on either the PC screen only, duplicate on second display, extend across all displays, or second screen only.
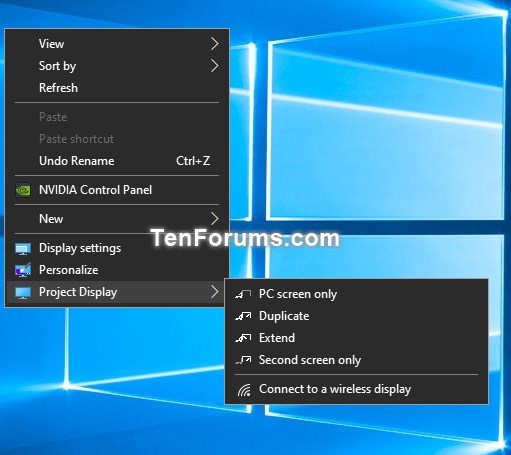
Projection Mode Description PC screen only Only the current main display is enabled. All other connected displays will be disabled. (When you're connected to a wireless projector, this option changes to Disconnect.) Duplicate The main display will be mirrored on the second display. Extend (default) The main display is extended across the all connected display screens and allows you to have a desktop that spans them. Second screen only The current main display will be disabled. All other connected displays will remain enabled with the second screen used as your new main display.
Miracast is a wireless technology your PC, laptop, or tablet can use to connect to a wireless display to project your screen to wireless TVs, projectors, and streaming media players that also support Miracast. You can use this to share what youre doing on your PC, present a slide show, or even play your favorite game on a larger screen.
This tutorial will show you how to add or remove Project Display to the desktop context menu for all users in Windows 10.
While you must be signed in as an administrator to be able to add or remove the context menu, all users will be able to use the context menu.
EXAMPLE: Project Display context menu (light and dark)

Here's How:
1 Do step 2 (add) or step 3 (remove) below for what you would like to do.
A) Click/tap on the Download button below to download the file below for the same light or dark theme mode you are using in Windows 10, and go to step 4 below.
Add_Project_Display_to_desktop_context_menu-LIGHT.reg
Download
OR
Add_Project_Display_to_desktop_context_menu-DARK.reg
Download
This is the default setting.
A) Click/tap on the Download button below to download the file below, and go to step 4 below.
Remove_Project_Display_from_desktop_context_menu.reg
Download
4 Save the .reg file to your desktop.
5 Double click/tap on the downloaded .reg file to merge it.
6 When prompted, click/tap on Run, Yes (UAC), Yes, and OK to approve the merge.
7 You can now delete the downloaded .reg file if you like.
That's it,
Shawn
Related Tutorials
- How to Change Presentation Mode to Project Display in Windows 10
- How to Create a Display Switch shortcut in Windows 10
- How to Connect to a Wireless Display with Miracast in Windows 10
- How to Create a Connect Wireless Display and Audio Devices shortcut in Windows 10
Add Project Display context menu in Windows 10

Add Project Display context menu in Windows 10
How to Add a Project Display context menu in Windows 10Published by Shawn BrinkCategory: Customization
15 Mar 2020
Tutorial Categories

Related Discussions
