

How to Allow or Prevent Users and Groups to Shut down System in Windows 10
If you don't plan to use your PC for a while, then you could shut down (turn off) the PC. A shutdown will close all apps, sign out all users, and completely turn off the PC. Hybrid shutdown performs a shutdown of the computer and prepares it for fast startup.
Each group in Windows has its own default rights and permissions. When a user is a member of a group, the user will be assigned the rights and permissions of the group.
Default Users and Groups Allowed to Shut Down the Computer:
- On a Local Computer or Workstation (ex: home computer): Administrators, Backup Operators, Users
- On a Server: Administrators, Backup Operators
- On Domain: Administrators, Backup Operators, Server Operators, Print Operators
See also: Shut down the system - security policy setting (Windows 10) | Microsoft Docs
This tutorial will show you how to allow or prevent specific users and groups from being able to shut down the system in Windows 10.
You must be signed in as an administrator to allow or prevent users and groups to shut down the system.
- Option One: Allow Users and Groups to Shut down System in Local Security Policy
- Option Two: Prevent Users and Groups to Shut down System in Local Security Policy
- Option Three: Allow or Prevent Users and Groups to to Shut down System in Command Prompt
All editions can use Option Three below.
1. Press the Win+R keys to open Run, type secpol.msc into Run, and click/tap on OK to open Local Security Policy.
2. Expand open Local Policies in the left pane of Local Security Policy, click/tap on User Rights Assignment, and double click/tap on the Shut down the system policy in the right pane. (see screenshot below)
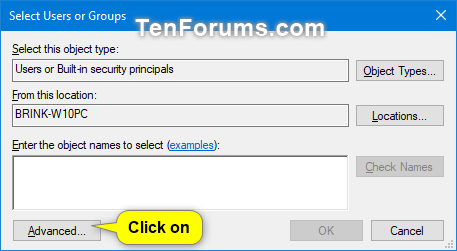
3. Click/tap on the Add User or Group button. (see screenshot below)
4. Click/tap on the Advanced button. (see screenshot below)
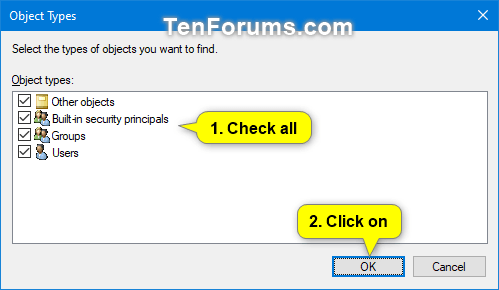
5. Click/tap on the Object Types button. (see screenshot below)
6. Check all the boxes for Object types, and click/tap on the OK. (see screenshot below)
7. Click/tap on the Find Now button, select the name of the user or group (ex: "Users") you want to add, and click/tap on OK. (see screenshots below)
If you like, you can press and hold the Ctrl key to select more than one user and/or group.
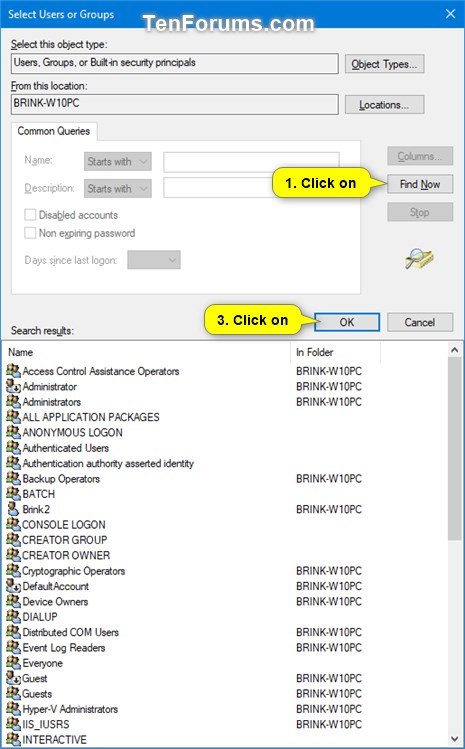
8. Click/tap on OK. (see screenshot below)
9. Click/tap on OK. (see screenshot below)
10. When finished, you can close Local Users and Groups if you like.
All editions can use Option Three below.
1. Press the Win+R keys to open Run, type secpol.msc into Run, and click/tap on OK to open Local Security Policy.
2. Expand open Local Policies in the left pane of Local Security Policy, click/tap on User Rights Assignment, and double click/tap on the Shut down the system policy in the right pane. (see screenshot below)
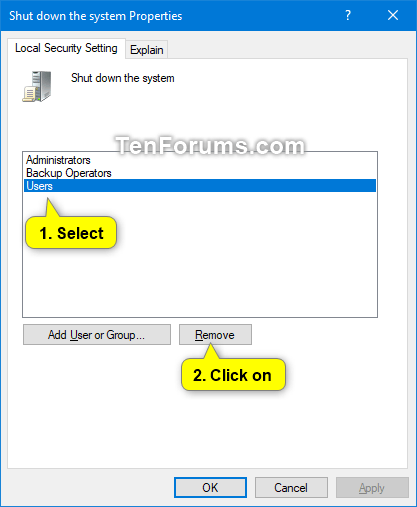
3. Select the user or group (ex: "Users") you want to remove, and click/tap on the Remove button. (see screenshot below)
4. Click/tap on OK. (see screenshot below)
5. When finished, you can close Local Users and Groups if you like.
1. If you haven't already, you will need to do the following below before continuing on to step 2 below.
A) Download the ntrights.exe file below from the Windows Server 2003 Resource Kit Tools.
B) Save the ntrights.zip file to your desktop, and unblock it.
C) Open the ntrights.zip file, copy or move the ntrights.exe file into your C:\Windows\System32 folder, and click/tap on Continue to approve.
2. Open an elevated command prompt.
3. Type the command you want below into the elevated command prompt, and press Enter.
(Add user or group to allow)

ntrights +r SeShutdownPrivilege -u "User or Group"
OR
(Remove user or group to prevent)
ntrights -r SeShutdownPrivilege -u "User or Group"
For example:ntrights +r SeShutdownPrivilege -u "Users"
4. When finished, you can close the elevated command prompt if you like.
That's it,
Shawn Brink
Related Tutorials
- How to Add or Remove Users from Groups in Windows 10
- How to Change User Rights Assignment Security Policy Settings in Windows 10
- How to Shut Down the Computer in Windows 10
- How to Add Shut down Context Menu in Windows 10
- How to Create a 'Slide to Shut down' Shortcut in Windows 10
- How to Read Shutdown Event Logs in Windows
- How to Enable or Disable Shutdown Event Tracker in Windows 10
- How to Play Sound at Shutdown in Windows 10
- How to Add or Remove Power Menu Icon on Sign-in Screen in Windows 10
- How to Enable or Disable Shut Down, Restart, Sleep, and Hibernate in Power Menu in Windows 10
- How to Automatically Shut Down Computer at Scheduled Time in Windows 10
Allow or Prevent Users and Groups to Shut down System in Windows 10
-
New #1
In terms of changing the policy form the command line isn't there nothing more recent than a tool form 2003 in 2021?
-
-
-
New #4
Agreed. secedit looks much more complicated.
https://docs.microsoft.com/en-us/win...mmands/secedit

Allow or Prevent Users and Groups to Shut down System in Windows 10
How to Allow or Prevent Users and Groups to Shut down System in Windows 10Published by Shawn BrinkCategory: User Accounts
04 Nov 2021


 Quote
Quote
Tutorial Categories

Related Discussions
