

How to Move Hyper-V Virtual Machine in Windows 10
Hyper-V enables running virtualized computer systems on top of a physical host. These virtualized systems (aka: guests) can be used and managed just as if they were physical computer systems, however they exist in a virtualized and isolated environment.
If you like, you can move a Hyper-V virtual machine and all files associated with it to a new storage location of your choice.
This tutorial will show you how to completely move a Hyper-V virtual machine to a new location in Windows 10.
- Option One: Move Hyper-V Virtual Machine in Hyper-V Manager
- Option Two: Move Hyper-V Virtual Machine in PowerShell
1. Turn off the Hyper-V virtual machine you want to move if currently running.
2. Open Hyper-V Manager (virtmgmt.msc).
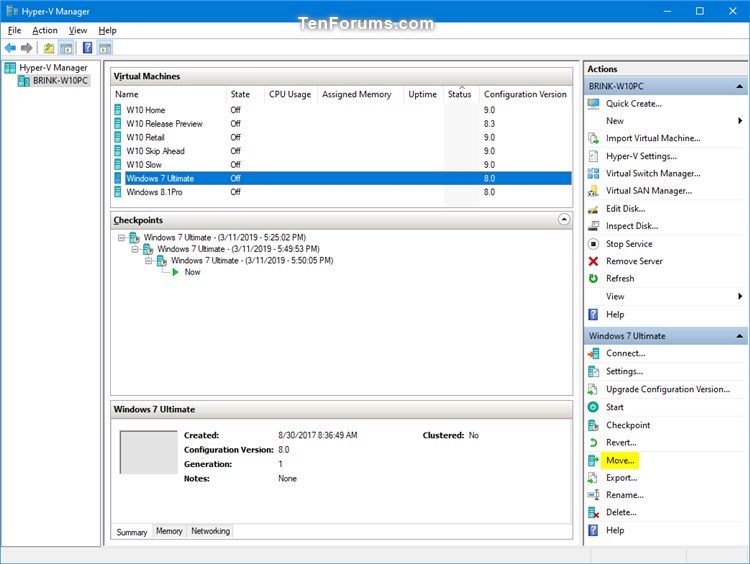
3. Select the Hyper-V virtual machine (ex: "Windows 7 Ultimate") you want to move, and perform one of the following actions: (see screenshot below)
- Click/tap on Move in the Actions pane on the far right.
- Right click or press and hold on the virtual machine, and click/tap on Move.
4. Click/tap on Next. (see screenshot below)
5. Select (dot) Move the virtual machine's storage, and click/tap on Next. (see screenshot below)
6. Select (dot) Move all of the virtual machine's data to a single location, and click/tap on Next. (see screenshot below)
7. Perform the following actions to specify a new location for the virtual machine's items: (see screenshots below)
1) Click/tap on the Browse button.
2) Navigate to and select the folder at the location you want to move the virtual machine to.
3) Click/tap on Select Folder.
4) Click/tap on Next.

8. Verify everything is correct, and click/tap on Finish when ready to move the virtual machine. (see screenshot below)
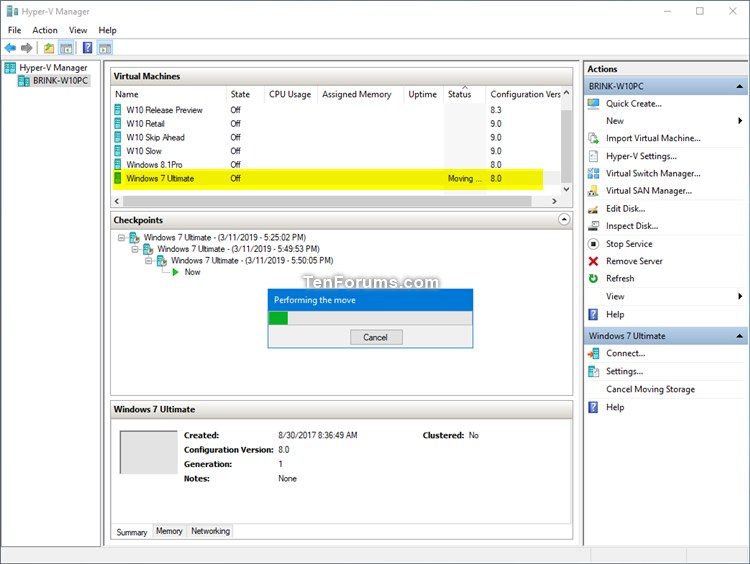
9. The virtual machine will now start moving to the new location. (see screenshot below)
It can take a while to finish moving the virtual machine.
10. When finished, you can close Hyper-V Manager if you like.
1. Turn off the Hyper-V virtual machine you want to move if currently running.
2. Open an elevated PowerShell.
3. TypeGet-VMinto the elevated command prompt, and press Enter. Make note of the Hyper-V virtual machine name (ex: "Windows 7 Ultimate") you want to move. (see screenshot below)
4. Type the command below into the elevated PowerShell, and press Enter. (see screenshot below)

Move-VMStorage "<VM name>" -DestinationStoragePath "<Full Path of New Location>"
Substitute <Full Path of New Location> in the command above with the full path of the folder (ex: "E:\Virtual Machines\Windows 7 Ultimate") at the new location you want to move the virtual machine to.
For example:Move-VMStorage "Windows 7 Ultimate" -DestinationStoragePath "E:\Virtual Machines\Windows 7 Ultimate"
5. When finished, you can close the elevated PowerShell if you like. (see screenshot below)
That's it,
Shawn
Related Tutorials
- How to Setup and Use Hyper-V in Windows 10 for OS Virtualization
- How to Rename Hyper-V Virtual Machine in Windows 10
- How to Delete Hyper-V Virtual Machine in Windows 10
- How to Quick Create a New Hyper-V Virtual Machine
- How to Change Default Folder to Store Hyper-V Virtual Machines
- How to Change Default Folder to Store Hyper-V Virtual Hard Disks
- How to Export Hyper-V Virtual Machines in Windows 10
- How to Import Hyper-V Virtual Machines in Windows 10
- How to Create Shortcut of Hyper-V Virtual Machine in Windows 8 and 10
- How to Use Local Devices and Resources on Hyper-V Virtual Machine in Windows 10
- How to Add or Remove a Physical Hard Disk for Hyper-V Virtual Machine
- How to Add Hyper-V Manager to Control Panel in Windows 10
Move Hyper-V Virtual Machine in Windows 10

Move Hyper-V Virtual Machine in Windows 10
How to Move Hyper-V Virtual Machine in Windows 10Published by Shawn BrinkCategory: Virtualization
19 Apr 2020


Tutorial Categories

Related Discussions
