

How to Enable or Disable Automatic Mounting of New Disks and Drives in Windows
Automount is enabled by default in Windows. When enabled, Windows automatically mounts the file system for a new volume (disk or drive) when it is added (connected) to the system, and then assigns a drive letter to the volume.
If you disable automount, it prevents Windows from automatically mounting and assigning drive letters to any new basic volumes (disk or drive) added (connected) to the system.
Any previously connected disks or drives that have been assigned a drive letter will always continue to be mounted with their former drive letter whenever connected by default, even after disabling automount.
If you like, you can scrub (Option Four or Option Seven) to remove volume mount point directories and registry settings for volumes that are no longer or currently connected to the system. This will clear all assigned drive letters of any previously connected disks and drives that are currently not connected to your PC. This can be handy if you want to disable automount and also want to prevent any previously connected disks and drives from being automatically mounted and assigned a drive letter when connected again. Mounted devices are stored in the registry key below:
HKEY_LOCAL_MACHINE\SYSTEM\MountedDevices
This tutorial will show you how to enable or disable the automatic mounting and assigning a drive letter when a new disk or drive is connected (added) in Windows 7, Windows 8, and Windows 10.
You must be signed in as an administrator to enable or disable the automount feature.
Contents
- Option One: Check if Automount is Currently Enabled or Disabled
- Option Two: Enable Automount using DiskPart > automount Command
- Option Three: Disable Automount using DiskPart > automount Command
- Option Four: Remove Drive Letters of Previously Connected Drives and Disks using DiskPart > automount Command
- Option Five: Enable Automount using mountvol Command
- Option Six: Disable Automount using mountvol Command
- Option Seven: Remove Drive Letters of Previously Connected Drives and Disks using mountvol Command
- Option Eight: Enable or Disable Automount using REG file
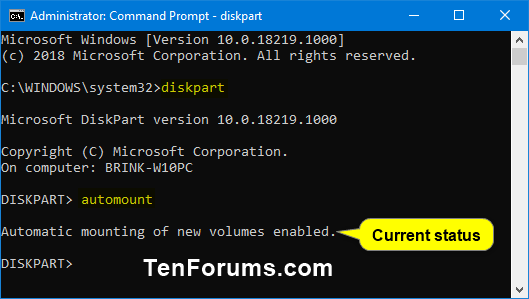
1 Open an elevated command prompt.
2 Type diskpart into the elevated command prompt, and press Enter. (see screenshot below)
3 Typeautomountinto the elevated command prompt, and press Enter.
4 The command will now return with a Automatic mounting of new volumes enabled or disabled message to let you know the current status.
5 When finished, you can close the elevated command prompt if you like.
1 Open an elevated command prompt.
2 Typediskpartinto the elevated command prompt, and press Enter. (see screenshot below)
3 Typeautomount enableinto the elevated command prompt, and press Enter.
4 Close the elevated command prompt.
5 Restart the computer to apply.
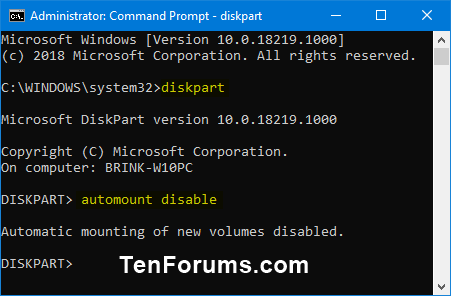
1 Open an elevated command prompt.
2 Typediskpartinto the elevated command prompt, and press Enter. (see screenshot below)
3 Typeautomount disableinto the elevated command prompt, and press Enter.
4 If you would like to remove the drive letters (mount points) of all previously connected drives and disks not currently connected, type theautomount scrubcommand from Option Four into the elevated command prompt, and press Enter.
5 Close the elevated command prompt.
6 Restart the computer to apply.
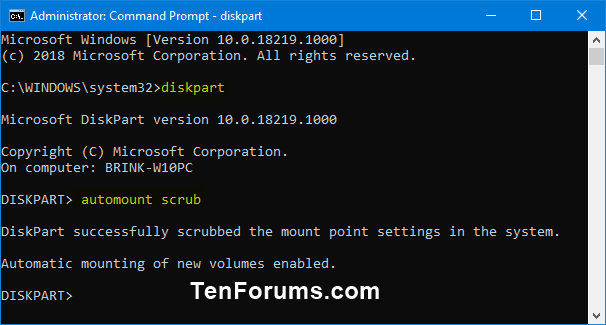
1 Open an elevated command prompt.
2 Typediskpartinto the elevated command prompt, and press Enter. (see screenshot below)
3 Typeautomount scrubinto the elevated command prompt, and press Enter.
4 Close the elevated command prompt.
5 Restart the computer to apply.
1 Open an elevated command prompt.
2 Typemountvol /einto the elevated command prompt, and press Enter. (see screenshot below)
3 Close the elevated command prompt.
4 Restart the computer to apply.
1 Open an elevated command prompt.
2 Typemountvol /ninto the elevated command prompt, and press Enter. (see screenshot below)
3 If you would like to remove the drive letters (mount points) of all previously connected drives and disks not currently connected, type themountvol /rcommand from Option Seven into the elevated command prompt, and press Enter.
4 Close the elevated command prompt.
5 Restart the computer to apply.
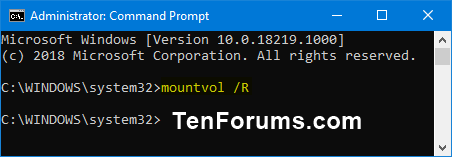
1 Open an elevated command prompt.
2 Typemountvol /rinto the elevated command prompt, and press Enter. (see screenshot below)
3 Close the elevated command prompt.
4 Restart the computer to apply.
The downloadable .reg files below will add and modify the DWORD value in the registry key below.
HKEY_LOCAL_MACHINE\SYSTEM\CurrentControlSet\Services\mountmgr
NoAutoMount DWORD
0 = Enable
1 = Disable
1 Do step 2 (enable) or step 3 (disable) below for what you would like to do.
This is the default setting.
A) Click/tap on the Download button below to download the file below, and go to step 4 below.
Enable_automatic_mounting_of_new_volumes.reg
Download
A) Click/tap on the Download button below to download the file below, and go to step 4 below.
Disable_automatic_mounting_of_new_volumes.reg
Download
4 Save the .reg file to your desktop.
5 Double click/tap on the downloaded .reg file to merge it.
6 When prompted, click/tap on Run, Yes (UAC), Yes, and OK to approve the merge.
7 Restart the computer to apply.
8 If you like, you can now delete the downloaded .reg file.
That's it,
Shawn
Related Tutorials
- How to Enable or Disable Installation of Removable Devices in Windows
- How to Format a Disk or Drive in Windows 10
- How to Change and Assign Drive Letter in Windows 10
- How to Remove a Drive Letter in Windows 10
- How to Hide Specific Drives in Windows
- How to Mount and Unmount a Drive or Volume in Windows
Enable or Disable Automount of New Disks and Drives in Windows
-
New #1
Hi,
Good one another keeper
-
-
New #3
Looks like I could really use this useful tip but could I just get some clarification on this first, please? Win 10 Home (1803).
I have a number of external USB Drives that I connect from time to time but the drive letters assigned keep changing.
If I disable Automount will the drive letters last used still be assigned to the same drive each time?
Can you also confirm that all the internal drives I have, which are permanently connected, wont have their drive letter changed?
Many thanks
-
New #4
Hello Sam,
This will have no affect on your internal drives.
I can't guarantee that this will stop the USB drives from having their assigned drive letter change, but it won't hurt to test and see.
-
New #5
If you have a couple of USB drives, as a simple workaround you could assing a "high letter", like "S" or "R", so that they will not interfere with the system assigned ones wich most often are in the range of "E,F,G ..etc"
Change and Assign Drive Letter in Windows 10 | Tutorials
HTH.
-
New #6
Many thanks to both of you for the replies.
Brink - great job you're doing. I think I'll try Roy111's suggestion first as it is the lower letters that seem to get changed most often. If that doesn't cure it I'll try the Automount option.
Thanks Again
PS: The Web is full of people having the same problem but no real fix is apparent. It never used to happen to me pre-Win10. Thank you MS.
-
New #7
When I try to mount a VHDX file encrypted with BitLocker, false positive error messages appear (Not possible to mount the file, etc.). It seems that these messages appear because Windows is trying to mount an encrypted disk, before it has been unlocked.
Apparently, disabling automount solves this problem.
Also, when I insert a UFD encrypted with BitLocker, sometimes File Explorer or the whole system freeze. Maybe the same solution applies. I haven´t tried it yet.
-
New #8
I tried the option to set the USB drives with letters starting at R and they seem to have stayed with these same letters for the last week or so.
Thanks for the help
-
-
New #9
Hello!
First let me thank you for this very nice guide.
My problem: WhenI plug an USB drive in the computer, I want Windows 10 tostay the f... put NOT assign a drive leter to it. Right now I've ehausted all of the options I found on Google about disabling volume automount (or disk, partition etc.) in Windows.
OS specs: Windows 10 Pro x64, ver. 1803, build 17134.648.
The USB drives I've used: various, FAT32 formatted.
I've followed the above guide to a T, but no dice: every time I plug an USB drive in the computer, Windows merrily mounts it (and assigns a drive letter to it).
Current system config, in respect to this issue:
- ejected and removed all USB drives;
- checked Automount: diskpart → automount = Automatic mounting of new volumes disabled. Registry check: HKEY_LOCAL_MACHINE\SYSTEM\CurrentControlSet\Services\MountMgr\NoAutoMount=1
- removed non-present volume drive mappings: diskpart → automount scrub = successfuly done. Registry check: HKEY_LOCAL_MACHINE\SYSTEM\MountedDevices - only one value shown: \DosDevices\C: .
Other things I've done:
- diskpart → san policy=offlineall . Registry check: HKEY_LOCAL_MACHINE\SYSTEM\CurrentControlSet\Services\partmgr\Parameters\SanPolicy=3 . Taken from here: Ondrej Seveceks English Pages
-restarted the computer after doing the above settings and then plugged the USB drive.
The only distantly related thing that worked was setting "Write Protect" for removable devices. Of course this does not prevent volume mounting, but at least data cannot be written on the USB drive.
This is how I did it: diskpart → list disk → select disk desired_disk_number → attributes disk set readonly. Verify: attributes disk : "Current Read-only State : Yes" & "Read-only : Yes".
That's it.
Thanks fo reading!
Enable or Disable Automount of New Disks and Drives in Windows
How to Enable or Disable Automatic Mounting of New Disks and Drives in WindowsPublished by Shawn BrinkCategory: Hardware & Drivers
16 Jun 2020


 Quote
QuoteTutorial Categories

Related Discussions
