

How to Change and Assign Drive Letter in Windows 10
By default, Windows 10 will automatically assign an available drive letter to any connected internal and external storage devices.
Windows progresses through the alphabet from A to Z to assign available drive letters to devices as connected.
- Windows usually assigns the drive letters A and B for floppy drives, but they can still be used to manually assign to drives if wanted.
- The drive letter C can only be used for the drive Windows is installed on. If you multi boot operating systems, the currently running Windows will always show its drive letter as C.
- If non-assigned drives are connected then the letters D onwards are allocated in turn.
- If the assigned drive is not connected then Windows will give away its drive letter as part of these allocations.
- If the drive with the assigned drive letter is connected later on then it will simply be allocated the next letter that happens to be available.
If you use multiple USB drives, then you may have noticed that the driver letter can sometimes be different each time you connect one.
If you like, you can change the drive letter of a drive to be any available drive letter you want instead of the driver letter automatically assigned by Windows. When you change the drive letter of a drive, it will assign letter to the drive that will not change on your PC unless you change it or possibly when you disconnect the drive. The assigned drive letters are stored in the registry per drive referenced by their volume ID like in option 4. This doesn't set the drive letter in stone to the device.
See also: Change a drive letter | Microsoft Docs
This tutorial will show you different ways on how to change the drive letter of a drive to assign a permanent drive letter you want to the drive in Windows 10.
You must be signed in as an administrator to change or assign a drive letter.
For a Windows 11 version of this tutorial, see:
Change Drive Letter in Windows 11
Contents
- Option One: To Change Drive Letter in Disk Management
- Option Two: To Change Drive Letter in Command Prompt
- Option Three: To Change Drive Letter in PowerShell
- Option Four: To Change Drive Letter in Registry Editor
- Option Five: To Change Drive Letter in Settings
1 Press the Win + R keys to open Run, type diskmgmt.msc into Run, and click/tap on OK to open Disk Management.
2 Right click or press and hold on the drive (ex: "F") you want to add or change the drive letter, and click/tap on Change Drive Letter and Paths. (see screenshot below)
3 Click/tap on the Change button. (see screenshot below)
Click/tap on the Add button instead if the drive doesn't have a drive letter assigned to it.
4 Select (dot) Assign the following drive letter, select an available drive letter you want to assign, and click/tap on OK. (see screenshot below)
5 Click/tap on Yes to confirm. (see screenshot below)
6 When finished, you can close Disk Management if you like.
1 Open an elevated command prompt.
2 Typediskpartinto the elevated command prompt, and press Enter. (see screenshot below)
3 Typelist volumeinto the elevated command prompt, and press Enter.
4 Make note of the volume number (ex: 5) for the drive letter (ex: "F") of the drive (volume) you want to change.
5 Type the command below into the elevated command prompt, and press Enter.
select volume <volume number>
Substitute <volume number> in the command above with the actual volume number (ex: "5") from step 4 above for the drive you want to change the drive letter of.
For example:select volume 5
6 Type the command below into the elevated command prompt, and press Enter.7 When finished, you can close the elevated command prompt if you like.
assign letter=<new drive letter>
Substitute <new drive letter> in the command above with the actual new drive letter (ex: "G") you want to assign to the drive.
For example:assign letter=G
If the new drive letter you assign is not available, you will get an error message indicating so in the command prompt. You will just need to repeat this step to assign an available drive letter.
1 Open an elevated PowerShell.
2 TypeGet-Partitioninto the elevated PowerShell, and press Enter. (see screenshot below)
3 Make note of the drive letter (ex: "G") of the drive you want to change.
4 Type the command below into the elevated PowerShell, and press Enter.
Get-Partition -DriveLetter <current drive letter> | Set-Partition -NewDriveLetter <new drive letter>
Substitute <current drive letter> in the command above with the actual current drive letter (ex: "G") of the drive you want to change.
Substitute <new drive letter> in the command above with the actual new drive letter (ex: "F") you want to assign to the drive.
For example:Get-Partition -DriveLetter G | Set-Partition -NewDriveLetter F
If the new drive letter you assign is not available, you will get an error message indicating so in PowerShell. You will just need to repeat this step to assign an available drive letter.
5 When finished, you can close the elevated PowerShell if you like.
1 Open Registry Editor (regedit.exe).
2 Navigate to the key below in the left pane of Registry Editor. (see screenshot below)
HKEY_LOCAL_MACHINE\SYSTEM\MountedDevices
3 In the right pane of the MountedDevices key, right click or press and hold on the binary (REG_BINARY) value (ex: "\DosDevices\G:") for the drive letter (ex: "G") of the drive you want to change, and click/tap on Rename. (see screenshot below)
4 Rename only the drive letter part of the binary (REG_BINARY) value (ex: "\DosDevices\G:") name with an available drive letter (ex: "\DosDevices\F:") you want for the drive instead, and press Enter to apply. (see screenshot below)
5 When finished, you can close Registry Editor.
6 Sign out and sign in, or restart the computer to apply.
This option is only available starting with Windows 10 build 20197.
1 Open Settings, and click/tap on the System icon.
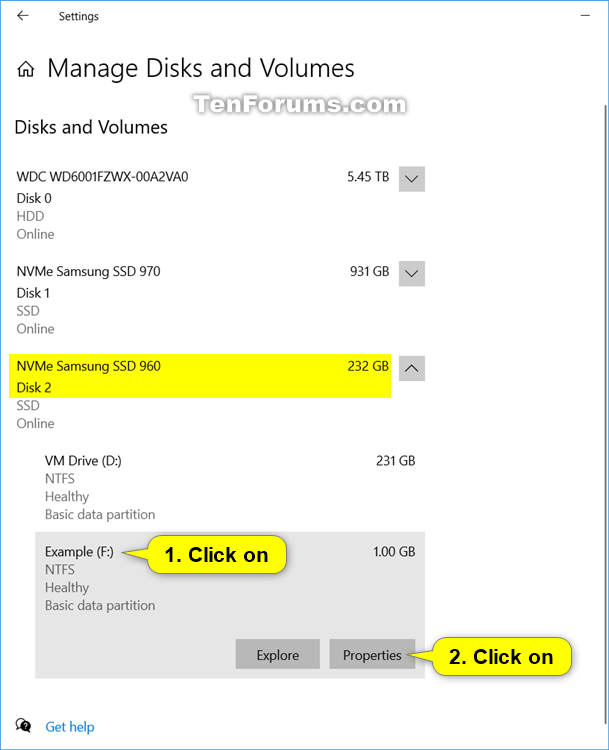
2 Click/tap on Storage on the left side, and click/tap on the Manage Disks and Volumes link on the right side. (see screenshot below)
3 Expand open the disk (ex: "Disk 2") that contains the volume you want to change the drive letter of. (see screenshot below)
4 Click/tap on the drive (ex: "F") you want to change the drive letter of, and click/tap on Properties. (see screenshot below)
5 Click/tap on the Change drive letter button under the Volume Data section. (see screenshot below)
6 Select a drive letter (ex: "G") you want in the drop menu, and click/tap on OK. (see screenshot below)
7 You can now close Settings if you like.
That's it,
Shawn
Related Tutorials
- How to Remove a Drive Letter in Windows 10
- How to Hide or Show Drive Letters in Windows 10
- How to Show Drive Letters Before or After Drive Name in Windows 10
- How to Change a Drive Icon in Windows 10
- How to Rename Drive Label in Windows 10
- How to Hide Specified Drives in Windows
- How to Format a Disk or Drive in Windows 10
- How to Delete Volume or Partition in Windows 10
- How to Extend Volume or Partition in Windows 10
- How to Shrink a Volume or Partition in Windows 10
- How to Enable or Disable Automatic Mounting of New Disks and Drives in Windows
- How to Mount and Unmount a Drive or Volume in Windows
Change and Assign Drive Letter in Windows 10
-
New #1
Hi Shawn, this tutorial's title includes 'assign' a letter- actually it's only about changing it, as pointed out by the poster when I quoted it:
Missing Disk drive on new W10 installation
Could I suggest it include the case of an unformatted drive to which a letter is assigned for the first time? Thanks!
-
New #2
Hey mate,
I have added an assign option to the command in step 5 option 3 of the tutorial below when formatting the drive to help.
Format Disk or Drive in Windows 10
-
-
New #4
Hi Brink:
I currently have two USB external drives connected to USB ports on the front panel of my desktop:
- Seagate Backup Plus Drive (F:); 6 TB HDD
- WD-My Passsport (G:); 2 TB HDD
I have just used Option 1 to change the drive letter assignment from (I:) to (G:) for the WD external USB HDD drive.
In the tutorial is says:
"When you change the drive letter of a drive, it will assign a permanent letter to the drive that will not change on your PC unless you change it."
I wonder if I understand that correctly? If I do, then with this new knowledge, I plan to affix a physical label next to the USB port that is currently in use as Drive (G:), then I can rely on it always being identified and accessed as Drive (G:) (until I change it again).
So, I think physical labels affixed adjacent to each USB port will help me in the future when I have thumb drives attached, etc.
Do you see any reason why I should not go ahead with my plan?
-
New #5
It's the drive that's identified as, say, G: - unless...
a. you already have G: in use
b. you have subsequently assigned G: to a different drive
Recommendation- choose a drive letter late in the alphabet.
-
New #6
Assignment of "Static" Drive Letters
Hi dalchina:
Thanks for your info.
Please tell me the reasoning behind your recommendation. I have already affixed drive letter labels on the desktop cabinet, but can redo them, if necessary.
I have used drive letters D: thru J: ; not all have been assigned a static drive letter as yet.
- D: is DVD R/W drive
- E: is Memory card
- F: and G: are front panel USB ports used for USB external HDDs
- H: and I: are USB ports housed within the Seagate (F:) cabinet
- J: and K: are top panel USB ports
I would appreciate your suggestion.
-
New #7
Imagine you have several USB devices that you might plug in. You have one backup drive that you must allocate to a given drive letter for the backup to work.
If you allocate it the next available drive letter, next time you have something else plugged in it will take that letter.
Then you plug in your backup drive, and it's not allocated the drive letter your backup expects.
Then you get an error message.
Instead, allocate your backup drive say X
You would have to plug in a lot of other devices for X not to be available.
QED
-
New #8
OK, and thanks Dalchina.
With the knowledge that "When you change the drive letter of a drive, it will assign a permanent letter to the drive that will not change on your PC unless you change it." I plan to configure each USB port with a "static" (my word) drive letter (as identified by the adjacent label) using Option 1 of the aforementioned tutorial.
This approach shall allow me to feel very confident that whenever a USB device is connected to any specific USB port the label correctly identifies the assigned WIN10 drive, for reference in apps, etc.
Stay well.
-
-
New #9
Not quite.
Assigned drive letters apply to the drives themselves not to the port through which they are connected.
- If you assign a particular drive to F: then it will be F: whichever of your connections you plug it into.
- If you plug a different drive into the same connection, its drive letter will be entirely independent of your F: assignment
Denis
Change and Assign Drive Letter in Windows 10
How to Change and Assign Drive Letter in Windows 10Published by Shawn BrinkCategory: Hardware & Drivers
07 Aug 2022


 Quote
QuoteTutorial Categories

Related Discussions
