This is the checklist I use for setting up a network:-
[Last revised 31st March 2024]
0 Non-essential preparation - Change computer name
The default name of a computer is not necessarily easy to recognise. I change mine to something that I can recognise instantly such as
Lenny16 for my Lenovo 16inch laptop. That makes it easier to avoid misunderstandings when setting up or using shared folder shortcuts or shared folder paths written in the File explorer address bar.
Change computer name - TenForumsTutorials
Change computer name - ElevenForumTutorials
1 The
Sharing wizard is on by default so just check on each computer that you have not turned it off.
- Windows 10 - File explorer, View menu, Options, View tab, scroll down to the bottom & make sure the
Sharing wizard checkbox is set.
- Windows 11 - File explorer, ..., Options, View tab, scroll down to the bottom & make sure the
Sharing wizard checkbox is set.
Attachment 378773 -
Attachment 388023
2 On each computer, if you log in using a Windows Hello [PIN, face, fingerprint, ...], make sure that you have logged on using your password at least once since setting up Windows Hello.
3 Set the same WorkGroup name on each computer
4 Create a local Admin account on each computer with both the same username and the same password.
- This will be used to authorise mutual network access upon the first connection to each computer but does not restrict which user accounts can subsequently access the network.
- This can actually be an MSAccount but a local one is simpler & more resilient.
- Anyway, it's always a good idea to have a spare, password-protected local Admin account as a hedge against possible user profile corruption in the future.
5 Set up all Control Panel, Network and Sharing Center, Advanced sharing settings. Turn on all three of these settings on each computer.
6 Share the desired folders - each folder in turn on on each computer in turn.
Sharing is set up on the computer containing the folder to be shared [you cannot make another computer's folder a shared one].
- In File explorer, right-click on the folder, Properties, Sharing tab, Advanced sharing
- Set the checkbox for Share this folder
- Give it a Share name
- Click on Permissions,
- Everyone - Set Full control, Change or Read as desired
There is additional guidance in Share Files and Folders Over a Network - TenForumsTutorials [This tutorial also applies to Windows 11]
One user has warned me that my Step 6 works but the
Give access to Options 2, 3 of the tutorial did not in one Windows 11 case.
7 If a network includes
- pre-Vista Windows versions, or
- non-Windows computers, or
- a network drive connected to the router that only has SMB1 capabilities,
then SMB1 needs to be set up but this is not a topic I know about -
Enable SMB1 File Sharing Protocol - TenForumsTutorials [This tutorial also applies to Windows 11]
8 Connect each computer to the router's network and set it up as a Private network -
Set Network Location to Private - ElevenForumTutorials
- This connection step assumes use of Windows defender.
- If you use different security software then you should check if it requires any additional steps, such as manually approving use of specific network adapters, but I imagine they are all pretty decently automated these days and would at least tell you if they were rejecting a network / network adapter.
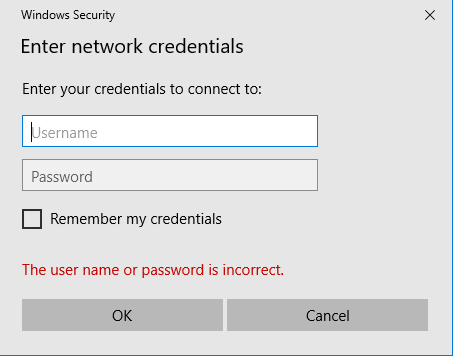
9 Access the shared drives both ways between each pair of computers & provide network credentials.
- Access them by entering each other's \\COMPUTERNAME directly into File explorer's Address bar.
- The first time you do this you will need to enter the common local Admin account username and common password {the one set up on each computer at step 4 above}
Unexpected new behaviour witnessed when I added a new Windows 11 computer to my existing Private network. There was no Network credentials challenge when first connecting my new computer to my existing network computers - neither on the existing network computers nor on the new computer. All computers have Password-protected sharing on. So the rest of this [para 9] does not apply - for reasons that I do not understand.
- Set the Remember my credentials checkbox so that you are never required to do this again
- You will be able to access the shared drives using all other user accounts not just the Admin account used to set it all up.
10 Now you can test individual shared folders by
- browsing to them from the \\COMPUTERNAME location used in step 9, or
- entering their full address in File explorer's Address bar \\COMPUTERNAME\SHARENAME, or
- creating then using shortcuts to each one \\COMPUTERNAME\SHARENAME, or
- browsing to them in File explorer's Network section [a facility which has been known to work on several occasions].
11 An additional note about
Network discovery
- I have always set
Network discovery on.
- At some risk of oversimplification,
Network discovery serves
File explorer's chronically unreliable
Network section.
- So if, like me, you are always going to address shared computers & Shared folders directly using these methods
then
Network discovery might just as well be turned off since such direct addressing does not make use of it.
All the best,
Denis
@
hsehestedt
@
pseymour
@
Pocah
I think that I have correctly incorporated your contributions.


 Quote
Quote
