
New
#11
Changing BIOS from Legacy to UEFI/BIOS so I can use Win 11 on this PC
-
-
New #12
[QUOTE=therealsimpsons;2629350]I got this:
/QUOTE]
OK... one of these should work...
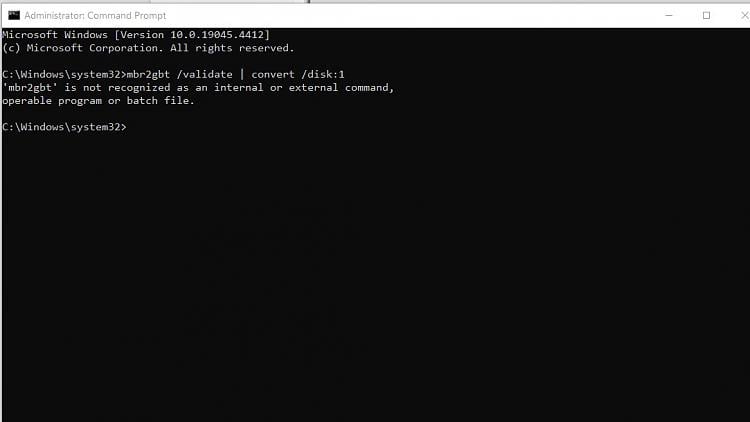
mbr2gpt /validate | convert /disk:1
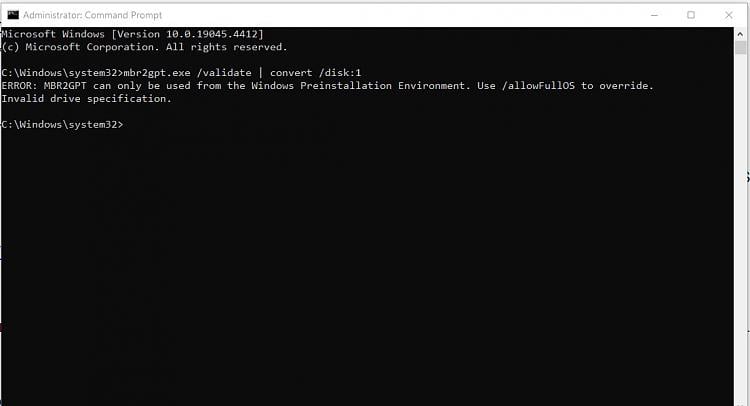
mbr2gpt.exe /validate | convert /disk:1
COPY and Paste these commands... you spelled GPT wrong.
-
New #13
Open a command prompt as Admin ant type this command...
mbr2gpt /validate | convert /disk:1
The post a screen shot of the result.
I got this:
-
-
New #15
mbr2gpt.exe /validate | convert /disk:1
-
-
New #17
@therealsimpsons
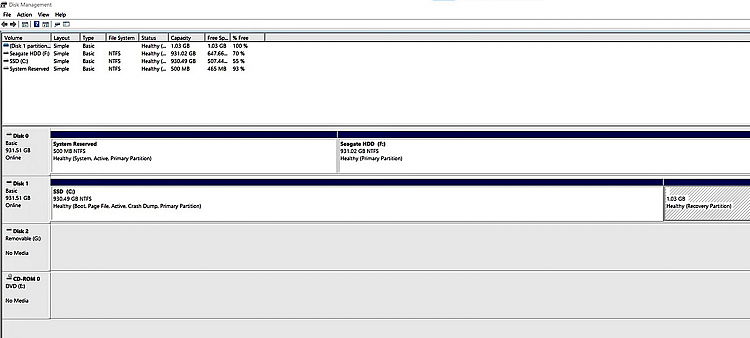
The problem we're having is that the System Reserve partition and the C:\ partition are on different disks.
I have no idea if the mbr2gpt command will work in this situation.
When installing Windows... you should always UNHOOK all the other drives... so things like this don't happen.
Unfortunately... I'm pretty bad at "adjusting" commands for weird situations like this.
So I messaged someone who is much better.
-
New #18
@therealsimpsons
The problem we're having is that the System Reserve partition and the C:\ partition are on different disks.
I have no idea if the mbr2gpt command will work in this situation.
When installing Windows... you should always UNHOOK all the other drives... so things like this don't happen.
Unfortunately... I'm pretty bad at "adjusting" commands for weird situations like this.
So I messaged someone who is much better.
@dalchina already posted the proper tutorial in post #2...
Convert Windows 10 from Legacy BIOS to UEFI without Data Loss
...but the tutorial assumes that the System Reserve partition and the C:\ (Windows) partition, are on the same disk.
Back in 2021 I used the same tutorial, but in my case, the System Reserve partition and the C:\ (Windows) partition... were on the same disk.
DALCHINA... here is the OPs Disk Management screen shot...
-
-
New #19
Thanks for your help GHOT. The hockey game is over so I'm going to bed. I will work on this more tomorrow.
-
New #20
Dalchina and or someone better at command prompt commands, than I am should be online tomorrow.
Sorry I couldn't be more help.
When I install Windows... I always unhook the internet and the other drives, so I don't HAVE these problems.
Of course you could just clean install Windows 11.
Clean Install Windows 11 Tutorial | Windows 11 Forum
You'll need to make sure that the BIOS is set to UEFI rather than Legacy.
On the Peripherals tab, you'll need to enable Trusted Computing.
On the BIOS tab... you'll need to disable CSM support, and enable Secure Boot.
But don't do this unless you have converted the disk to GPT or are clean installing Windows 11.
The USB stick with the Windows 11 install media will show twice... as UEFI and not as UEFI.
If you do the clean install, choose the UEFI option.
=====================================================================
Another option would be to just do a clean install of Windows 10, with the BIOS set as above.
Again... on the Windows 10 install media... choose the UEFI option.
Then you'll be on a GPT disk already, and can just Update or Upgrade to Windows 11.
Make sure... in either case... to unhook all the other drives, except the one you want Windows installed on.
Unhook the internet as well.
Here's the link to your motherboard manual (PDF)...
https://download.gigabyte.com/FileLi...a1544dcb4a5ee3


 Quote
Quote


Related Discussions
