
New
#1
When Insider build upgrade fails - A Workaround
Note
OK geeks, this is if not a solution but at least a workaround to get upgrade done when it fails whatever you do. I apologize for the length of this post; as the workaround involves some elements not familiar to all users I decided to post this with explanatory screenshots describing each step.
You try this at your own risk. However, I am convinced this will work, having spent 16+ hours today testing it over dozen times on two different physical devices and on a virtual machine, always restoring a Macrium image and letting upgrade to fail first then applying the fix. Every test was successful, upgrade working when everything else had failed.
Time required = about 10 minutes more than upgrade usually takes.
My upgrades from 16199 to 16215 on two devices failed twice on both devices (first try from Settings > Windows Update, second try from ISO). Both devices have totally different hardware, a Medion tablet running W10 PRO x32 and an Asus laptop running W10 PRO x64, both giving the same error:
On further testing I got various other errors, for instance this:
Researching all errors I found out that most often the upgrade seemed to fail because of either a hardware device or a user profile. In addition, a boot menu on multiboot system seemed to cause upgrade to fail.
I decided to test an upgrade scenario where upgrade is run from an ISO image using a system profile instead of a normal user profile, with default Windows 10 drivers before most of the hardware specific drivers have been loaded.
1.) Make ISO from upgrade files (tutorial). Rename ISO using a short, simple name (in this example I rename ISO as W10PRO.iso). Save / copy ISO to a location where it can be accessed by any user (not in a user profile or other system folder). A good location is for instance C:\Users\W10PRO.iso, or another internal drive. In this example I saved ISO as E:\W10PRO.iso
2.) Make a new local admin user, I call it Dummy1 (tutorial to create new user, tutorial to change account type to administrator)
3.) Sign out from all user accounts, sign in to Dummy1
4.) Disable all existing user accounts except Dummy1 (tutorial)
5.) On multiboot systems, backup boot menu (tutorial)
6.) On multiboot systems, press WIN + R and type msconfig, click OK to open System Configuration. Select Boot tab, select all but current OS (the one you want to upgrade) one by one deleting their boot menu entries them:
7.) Disconnect all external devices except mouse, keyboard and display
8.) Press WIN+R, run following command:
%windir%\system32\Sysprep\Sysprep.exe /oobe /reboot
Sysprep will run and Windows will restart.
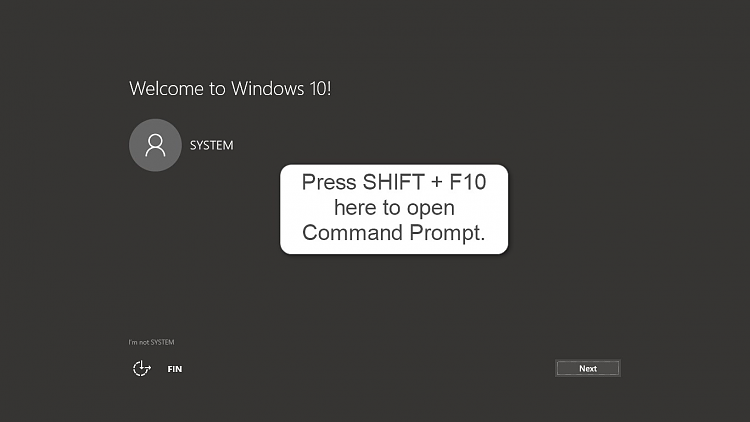
9.) When OOBE starts after restart showing region selection prompt you will be signed in with a system profile defaultuser0. Open Command Prompt with SHIFT + F10
Notice please: If any system folders have been relocated to another drive than C: you might see a Welcome to Windows 10 screen instead of region selection screen shown above. In this case you will be signed in using a system profile C:\Windows\System32\Config\Systemprofile. Steps 9 through 16 apply also in this case:
Screenshot for steps 10. through 16. (numbers in screenshot refer to list item numbers below):
(Click to enlarge.)
10.) Enter commandpowershellto switch to PowerShell mode
11.) Mount your Insider upgrade ISO with cmdletMount-DiskImage E:\W10PRO.isoreplacing E:\W10PRO.iso with actual path and ISO filename
12.) Type exit and press Enter to exit PowerShell mode
13.) Type Diskpart to start Disk Partitioning utility
14.) Type list vol to get list of all volumes (partitions). Check and note the drive ID letter for mounted ISO
15.) Type exit and press Enter to exit Diskpart
16.) Run commandZ:\Setup.exeto start Windows build upgrade from ISO replacing Z:\ with actual drive ID for your mounted ISO
Any accidental click in OOBE might make the OOBE screen active hiding everything else. If this happens, if you lose sight of Windows Upgrade window. press ALT + TAB to show app selection, press ALT + TAB again to select Windows 10 Setup:
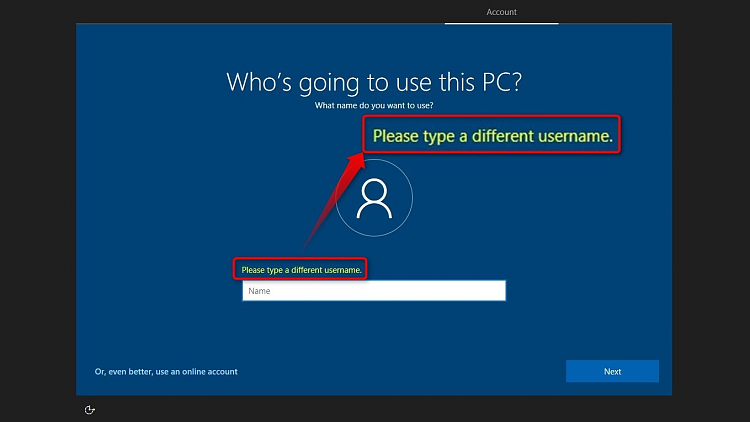
17.) When upgrade has been done, OOBE requires you to create an initial user account. Make it a local account. You cannot use any username already reserved including those accounts you disabled in step 4. The same with Dummy1, it can't be used now. Use Dummy2 or anything else you prefer. If you try an existing username, you will be told to use another one:
18.) When on Desktop open elevated Command Prompt and re-activate all disabled user accounts (tutorial), sign out from Dummy account, sign in to your original admin account, remove Dummy1 and Dummy2 accounts (tutorial)
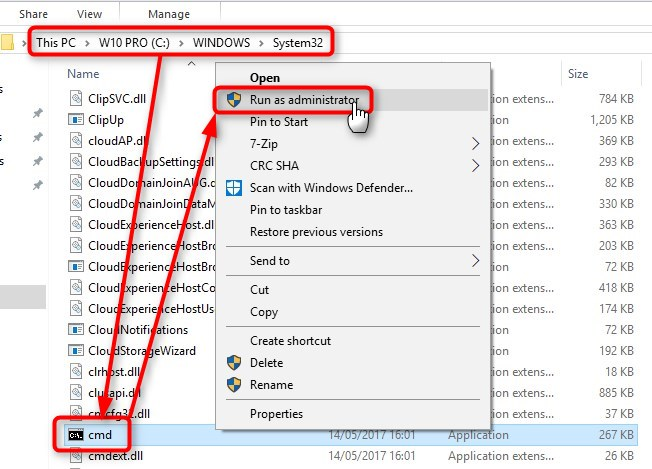
The reason that we used Dummy accounts temporarily disabling your actual user accounts is that sometimes when running Sysprep on an existing Windows installation, active user accounts lose Start and Cortana / Search functionality. If this happens you must open elevated Command Prompt by pressing WIN + E to open File Explorer, browse to C:\Windows\System32 folder, right click CMD.exe and select Run as administrator:
19.) On multiboot systems, restore boot menu (tutorial)
Tip
Attention Macrium and Hyper-V users:
A nice way to do this, or even upgrade when there's nothing wrong and upgrade would work on your host PC is to let Windows Update download and initialize upgrade, make an ISO, then create a Macrium image and boot it in Macrium viBoot (tutorial).
Attach upgrade ISO on viBoot VM, follow the instructions to upgrade, save viBoot image and restore it to your host.
This way you can continue using your host PC all the time during the upgrade.
That's it geeks! Let me know if this worked for you :)
Kari


Last edited by Kari; 11 Jun 2017 at 07:39. Reason: Incredible amount of typos!

 Quote
Quote