New
#230
My earlier test was made by applying your answer file to default Windows image, and doing a normal clean install, partitioning manually and running Windows Setup. OOBE was fully automated, your answer file worked without issues.
Today I decided to make one more test, this time doing it as you would have done. I created a new Generation 2 (UEFI / GPT) VM in Hyper-V, downloaded a fresh new Windows 10 ISO with MCT and installed W10 Home, booting to Audit Mode from OOBE region selection screen.
I did some customizations, copied your answer file to Sysprep folder, making only minor changes (Finnish keyboard 040b:0000040b, OS language en-GB instead of en-US), leaving it otherwise unchanged. The answer file I used:
Code:<?xml version="1.0" encoding="utf-8"?> <unattend xmlns="urn:schemas-microsoft-com:unattend"> <settings pass="oobeSystem"> <component name="Microsoft-Windows-International-Core" processorArchitecture="amd64" publicKeyToken="31bf3856ad364e35" language="neutral" versionScope="nonSxS" xmlns:wcm="http://schemas.microsoft.com/WMIConfig/2002/State" xmlns:xsi="http://www.w3.org/2001/XMLSchema-instance"> <InputLocale>040b:0000040b</InputLocale> <SystemLocale>en-GB</SystemLocale> <UILanguage>en-GB</UILanguage> <UILanguageFallback>en-GB</UILanguageFallback> <UserLocale>en-GB</UserLocale> </component> <component name="Microsoft-Windows-Shell-Setup" processorArchitecture="amd64" publicKeyToken="31bf3856ad364e35" language="neutral" versionScope="nonSxS" xmlns:wcm="http://schemas.microsoft.com/WMIConfig/2002/State" xmlns:xsi="http://www.w3.org/2001/XMLSchema-instance"> <OOBE> <HideEULAPage>true</HideEULAPage> <HideOEMRegistrationScreen>true</HideOEMRegistrationScreen> <HideOnlineAccountScreens>true</HideOnlineAccountScreens> <HideWirelessSetupInOOBE>true</HideWirelessSetupInOOBE> <ProtectYourPC>1</ProtectYourPC> <UnattendEnableRetailDemo>false</UnattendEnableRetailDemo> </OOBE> <UserAccounts> <LocalAccounts> <LocalAccount wcm:action="add"> <Description>Main local login</Description> <DisplayName>Owner</DisplayName> <Group>Administrators</Group> <Name>Owner</Name> </LocalAccount> </LocalAccounts> </UserAccounts> <RegisteredOwner>ACTS</RegisteredOwner> <TimeZone>Eastern Standard Time</TimeZone> </component> </settings> <settings pass="specialize"> <component name="Microsoft-Windows-Shell-Setup" processorArchitecture="amd64" publicKeyToken="31bf3856ad364e35" language="neutral" versionScope="nonSxS" xmlns:wcm="http://schemas.microsoft.com/WMIConfig/2002/State" xmlns:xsi="http://www.w3.org/2001/XMLSchema-instance"> <OEMInformation> <Manufacturer>ACTS</Manufacturer> </OEMInformation> <CopyProfile>true</CopyProfile> <OEMName>ACTS</OEMName> <RegisteredOrganization>ACTS</RegisteredOrganization> <RegisteredOwner>Owner</RegisteredOwner> <TimeZone>Eastern Standard Time</TimeZone> </component> </settings> <cpi:offlineImage cpi:source="catalog://desktop/lenovo_gcustom_os/oscdimage_source/sources/install_windows 10 Home.clg" xmlns:cpi="urn:schemas-microsoft-com:cpi" /> </unattend>
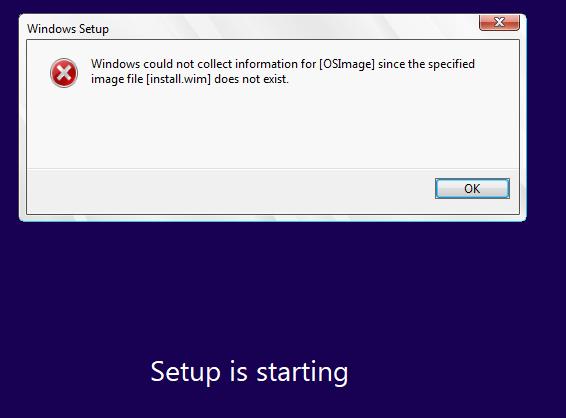
I sysprepped Windows with /generalize switch, and captured WIM.
Next, I copied the contents of MCT ISO to a folder, deleted the original install.esd replacing it with my captured custom install.wim file. I added an autounattend.xml file to the root of the folder to do GPT partitioning and run Windows Setup, and created new ISO.
Again, only changes I made compared to autounattend.xml I imagine you use were the locales, Finnish keyboard and OS in en-GB, and replaced my standard W10 PRO generic key with that of W10 Home. The answer file:
Code:<?xml version="1.0" encoding="utf-8"?> <unattend xmlns="urn:schemas-microsoft-com:unattend"> <settings pass="windowsPE"> <component name="Microsoft-Windows-International-Core-WinPE" processorArchitecture="amd64" publicKeyToken="31bf3856ad364e35" language="neutral" versionScope="nonSxS" xmlns:wcm="http://schemas.microsoft.com/WMIConfig/2002/State" xmlns:xsi="http://www.w3.org/2001/XMLSchema-instance"> <SetupUILanguage> <UILanguage>en-GB</UILanguage> </SetupUILanguage> <InputLocale>040b:0000040b</InputLocale> <UILanguage>en-GB</UILanguage> <UILanguageFallback>en-GB</UILanguageFallback> <UserLocale>en-GB</UserLocale> <SystemLocale>en-GB</SystemLocale> </component> <component name="Microsoft-Windows-Setup" processorArchitecture="amd64" publicKeyToken="31bf3856ad364e35" language="neutral" versionScope="nonSxS" xmlns:wcm="http://schemas.microsoft.com/WMIConfig/2002/State" xmlns:xsi="http://www.w3.org/2001/XMLSchema-instance"> <DiskConfiguration> <Disk wcm:action="add"> <CreatePartitions> <CreatePartition wcm:action="add"> <Order>1</Order> <Size>450</Size> <Type>Primary</Type> </CreatePartition> <CreatePartition wcm:action="add"> <Order>2</Order> <Size>100</Size> <Type>EFI</Type> </CreatePartition> <CreatePartition wcm:action="add"> <Order>3</Order> <Size>16</Size> <Type>MSR</Type> </CreatePartition> <CreatePartition wcm:action="add"> <Extend>true</Extend> <Order>4</Order> <Type>Primary</Type> </CreatePartition> </CreatePartitions> <ModifyPartitions> <ModifyPartition wcm:action="add"> <TypeID>DE94BBA4-06D1-4D40-A16A-BFD50179D6AC</TypeID> <Order>1</Order> <PartitionID>1</PartitionID> <Format>NTFS</Format> <Label>WinRE</Label> </ModifyPartition> <ModifyPartition wcm:action="add"> <Order>2</Order> <PartitionID>2</PartitionID> <Label>System</Label> <Format>FAT32</Format> </ModifyPartition> <ModifyPartition wcm:action="add"> <Order>3</Order> <PartitionID>3</PartitionID> </ModifyPartition> <ModifyPartition wcm:action="add"> <Order>4</Order> <PartitionID>4</PartitionID> <Letter>C</Letter> <Label>Windows</Label> <Format>NTFS</Format> </ModifyPartition> </ModifyPartitions> <WillWipeDisk>true</WillWipeDisk> <DiskID>0</DiskID> </Disk> </DiskConfiguration> <UserData> <AcceptEula>true</AcceptEula> <Organization>ACME Computers</Organization> <ProductKey> <Key>TX9XD-98N7V-6WMQ6-BX7FG-H8Q99</Key> </ProductKey> </UserData> <ImageInstall> <OSImage> <InstallTo> <DiskID>0</DiskID> <PartitionID>4</PartitionID> </InstallTo> </OSImage> </ImageInstall> </component> </settings> </unattend>
That's it. Worked like a charm, booting up the VM from new custom ISO, everything went without any user interaction, until OOBE stopped here:
All customizations were there, including the theme:
Time lapse video showing the automated Windows installation on a VM can be seen on my OneDrive. At the end, I'll open the answer file used just to show it is the same than yours, only changes being the keyboard and OS languages.
Long story, short version: there's absolutely nothing wrong in your unattend.xml file. I have no issues in using it on either virtual or physical machines (tested also using it to install for dual boot on laptop).
Kari


Last edited by Kari; 26 Aug 2019 at 07:36. Reason: Fixed some typos.

 Quote
Quote