

How to Clear Troubleshooting History in Windows 10
If something isn't working in Windows 10, running a troubleshooter might help. Troubleshooters can find and fix many common problems for you.
Whenever you run a troubleshooter, a history of its details is kept for you to be able to view if needed.
This tutorial will show you how to clear troubleshooting history for your account in Windows 10.
Contents
- Option One: Delete History of Specific Troubleshooters
- Option Two: Clear All Troubleshooting History
- Option Three: Clear All User Troubleshooting History in Command Prompt
- Option Four: Clear All Administrator Troubleshooting History in Command Prompt
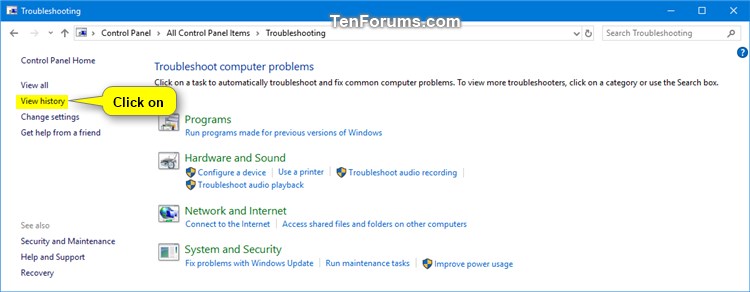
1 Open the Control Panel (icons view), and click/tap on the Troubleshooting icon.
2 Click/tap on the View history link at the top left corner in Troubleshooting. (see screenshot below)
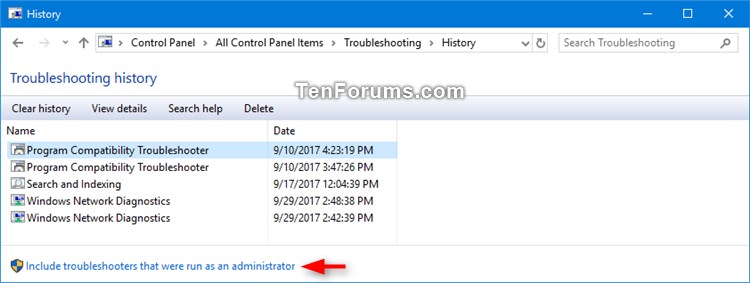
3 If you are currently signed in as an administrator, then you can click/tap on the Include troubleshooters that were run as an administrator link if wanted. (see screenshot below)
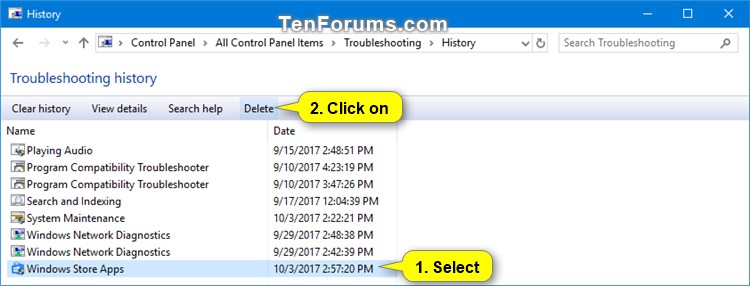
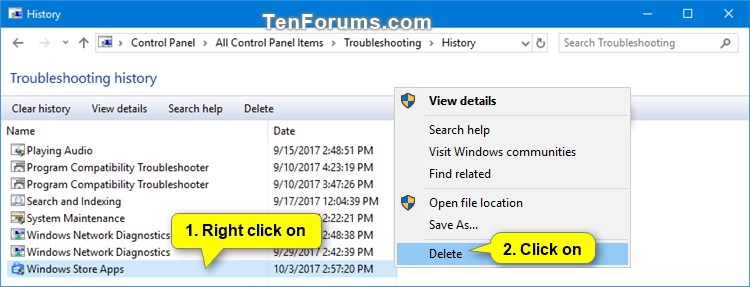
4 Perform either action below to delete a selected troubleshooter from troubleshooting history. (see screenshots below)
- Select a listed troubleshooter, and click/tap on Delete on the toolbar.
- Right click or press and hold on a listed troubleshooter, and click/tap on Delete.
5 When finished deleting any other troubleshooters you want from history, you can close the History window if you like.
1 Open the Control Panel (icons view), and click/tap on the Troubleshooting icon.
2 Click/tap on the View history link at the top left corner in Troubleshooting. (see screenshot below)
3 If you are currently signed in as an administrator, then you can click/tap on the Include troubleshooters that were run as an administrator link if wanted. (see screenshot below)
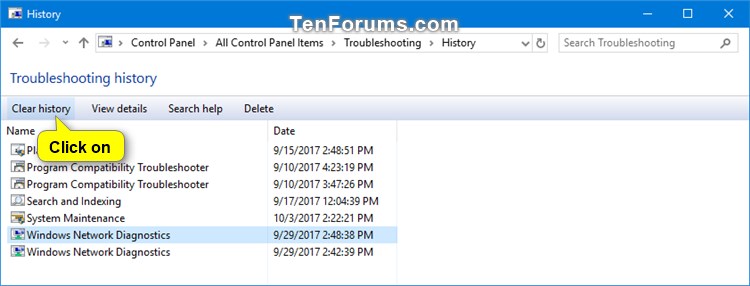
4 Click/tap on Clear history on the toolbar. (see screenshot below)
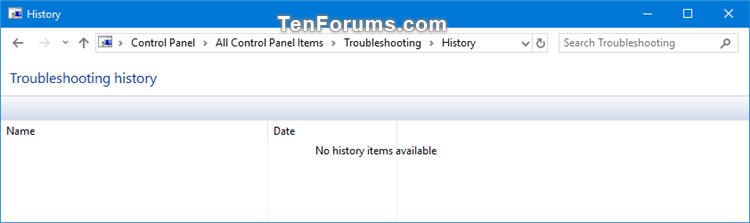
5 Troubleshooting history will now be completely cleared. (see screenshot below)
6 You can now close the History window if you like.
This will include all troubleshooting history from troubleshooters that were run as the current user.
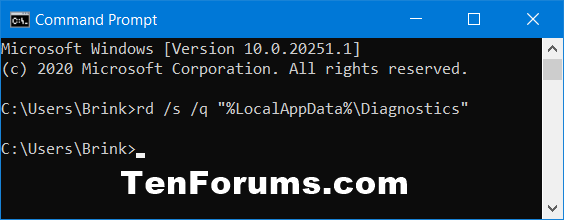
1 Open a command prompt.
2 Copy and paste the command below into the command prompt, and press Enter. (see screenshot below)
rd /s /q "%LocalAppData%\Diagnostics"
3 You can now close the command prompt if you like.
You must be signed in as an administrator to do this option.
This will include all troubleshooting history from troubleshooters that were run as administrator.
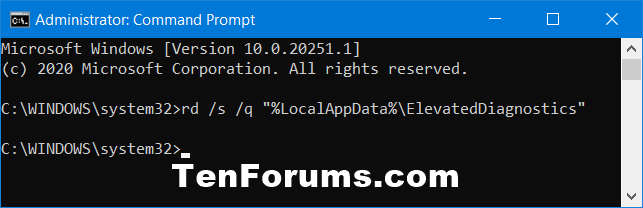
1 Open an elevated command prompt.
2 Copy and paste the command below into the elevated command prompt, and press Enter. (see screenshot below)
rd /s /q "%LocalAppData%\ElevatedDiagnostics"
3 You can now close the elevated command prompt if you like.
That's it,
Shawn
Related Tutorials
- How to Run Troubleshooters to Find and Fix Common Problems in Windows 10
- How to View Troubleshooting History and Details in Windows 10
- How to Add or Remove Troubleshoot Compatibility Context Menu in Windows 10
- How to Download and Use Start Menu Troubleshooter in Windows 10
- How to Download and Use Program Install and Uninstall Troubleshooter in Windows
- How to Free Up Drive Space in Windows 10
- How to Run System Maintenance Troubleshooter in Windows
- How to Add or Remove Troubleshooting Context Menu in Windows 10
- How to Add or Remove Troubleshooters Toolbar on Taskbar in Windows 10
Clear Troubleshooting History in Windows 10
-
New #1
Tutorial updated to add options 3 and 4 to delete troubleshooting history via command prompt.
-
New #2
Hello @Brink,
As previously mentioned in the thread => How to Add or Remove Troubleshooters Toolbar on Taskbar in Windows 10, here is the batch script to delete EITHER or BOTH folders for the Trouble-Shooting History Details.
The first script includes a folder test to see if the folder actually exists before performing the process, whereas the second script runs without any check first [ any error is suppressed within the script ]. I think the second script will suffice.
Script 1:
Code:@echo off :: ######################################################################################################### :: # Title : Clear Trouble-Shooting History Details # :: # Created By: Paul Black at TenForums.com/members/paul-black.html # :: # Created In: November 2020 # :: # Tutorial : https://www.tenforums.com/tutorials/94755-clear-troubleshooting-history-windows-10-a.html # :: ######################################################################################################### title Clear Trouble-Shooting History Details - Written by Paul Black. mode con: cols=80 lines=22 & color 17 set "params=%*" cd /d "%~dp0" && ( if exist "%temp%\getadmin.vbs" del "%temp%\getadmin.vbs") && fsutil dirty query %systemdrive% 1>nul 2>nul || ( echo Set UAC = CreateObject^("Shell.Application"^) : UAC.ShellExecute "cmd.exe", "/k cd ""%~sdp0"" && %~s0 %params%", "", "runas", 1 >> "%temp%\getadmin.vbs" && "%temp%\getadmin.vbs" && Exit /b) %windir%\system32\reg.exe query "HKU\S-1-5-19" 1>nul 2>nul || ( echo. & echo ERROR: This Batch file MUST be run in an ELEVATED cmd prompt [ Administrator ] & echo. & echo Right-click the Batch file and click ^<Run as administrator^>. & echo. & echo ^>Press ANY key to EXIT . . . & pause >nul & goto :Exit ) set "Folder_User=%LocalAppData%\Diagnostics" set "Folder_Admin=%LocalAppData%\ElevatedDiagnostics" :Options echo. & echo ============================================================================== echo Clear Trouble-Shooting History Details. echo ============================================================================== echo. & echo Options: echo. & echo [0] EXIT this Program. echo. & echo [1] Clear User Details. echo [2] Clear Administrator Details. echo [3] Clear BOTH Details. echo. & echo ============================================================================== echo. CHOICE /N /C 0123 /M ">Enter an Option:" if %errorlevel%==4 goto Both if %errorlevel%==3 goto Administrator if %errorlevel%==2 goto User if %errorlevel%==1 goto Exit goto :Options :User if not exist "%Folder_User%" ( echo. & echo NO results available [ NO action taken ]. echo. & echo ^>Press ANY key to return to the Options . . . & pause >nul & cls & goto :Options ) else ( echo. & echo Processing . . . rmdir /s /q "%Folder_User%" >nul 2>&1 echo Processing COMPLETE. echo. & echo ^>Press ANY key to return to the Options . . . & pause >nul & cls & goto :Options ) :Administrator if not exist "%Folder_Admin%" ( echo. & echo NO results available [ NO action taken ]. echo. & echo ^>Press ANY key to return to the Options . . . & pause >nul & cls & goto :Options ) else ( echo. & echo Processing . . . rmdir /s /q "%Folder_Admin%" >nul 2>&1 echo Processing COMPLETE. echo. & echo ^>Press ANY key to return to the Options . . . & pause >nul & cls & goto :Options ) :Both echo. & echo Processing . . . rmdir /s /q "%Folder_User%" >nul 2>&1 rmdir /s /q "%Folder_Admin%" >nul 2>&1 echo Processing COMPLETE. echo. & echo ^>Press ANY key to return to the Options . . . & pause >nul & cls & goto :Options :Exit
Script 2:
Code:@echo off :: ######################################################################################################### :: # Title : Clear Trouble-Shooting History Details # :: # Created By: Paul Black at TenForums.com/members/paul-black.html # :: # Created In: November 2020 # :: # Tutorial : https://www.tenforums.com/tutorials/94755-clear-troubleshooting-history-windows-10-a.html # :: ######################################################################################################### title Clear Trouble-Shooting History Details - Written by Paul Black. mode con: cols=80 lines=22 & color 17 set "params=%*" cd /d "%~dp0" && ( if exist "%temp%\getadmin.vbs" del "%temp%\getadmin.vbs") && fsutil dirty query %systemdrive% 1>nul 2>nul || ( echo Set UAC = CreateObject^("Shell.Application"^) : UAC.ShellExecute "cmd.exe", "/k cd ""%~sdp0"" && %~s0 %params%", "", "runas", 1 >> "%temp%\getadmin.vbs" && "%temp%\getadmin.vbs" && Exit /b) %windir%\system32\reg.exe query "HKU\S-1-5-19" 1>nul 2>nul || ( echo. & echo ERROR: This Batch file MUST be run in an ELEVATED cmd prompt [ Administrator ] & echo. & echo Right-click the Batch file and click ^<Run as administrator^>. & echo. & echo ^>Press ANY key to EXIT . . . & pause >nul & goto :Exit ) set "Folder_User=%LocalAppData%\Diagnostics" set "Folder_Admin=%LocalAppData%\ElevatedDiagnostics" :Options echo. & echo ============================================================================== echo Clear Trouble-Shooting History Details. echo ============================================================================== echo. & echo Options: echo. & echo [0] EXIT this Program. echo. & echo [1] Clear User Details. echo [2] Clear Administrator Details. echo [3] Clear BOTH Details. echo. & echo ============================================================================== echo. CHOICE /N /C 0123 /M ">Enter an Option:" if %errorlevel%==4 goto Both if %errorlevel%==3 goto Administrator if %errorlevel%==2 goto User if %errorlevel%==1 goto Exit goto :Options :User echo. & echo Processing . . . rmdir /s /q "%Folder_User%" >nul 2>&1 echo Processing COMPLETE. echo. & echo ^>Press ANY key to return to the Options . . . & pause >nul & cls & goto :Options :Administrator echo. & echo Processing . . . rmdir /s /q "%Folder_Admin%" >nul 2>&1 echo Processing COMPLETE. echo. & echo ^>Press ANY key to return to the Options . . . & pause >nul & cls & goto :Options :Both echo. & echo Processing . . . rmdir /s /q "%Folder_User%" >nul 2>&1 rmdir /s /q "%Folder_Admin%" >nul 2>&1 echo Processing COMPLETE. echo. & echo ^>Press ANY key to return to the Options . . . & pause >nul & cls & goto :Options :Exit
EDIT: You may want to change . . .
. . . to . . .Code:echo. & echo ^>Press ANY key to return to the Options . . . & pause >nul & cls & goto :Options
Code:echo. & echo ^>Press ANY key to EXIT . . . & pause >nul & cls & goto :Exit
I hope this helps!Last edited by Paul Black; 24 Nov 2020 at 08:40.
-
-
-
-
Clear Troubleshooting History in Windows 10
How to Clear Troubleshooting History in Windows 10Published by Shawn BrinkCategory: Performance & Maintenance
08 Nov 2020

 Quote
Quote
Tutorial Categories

Related Discussions
