

How to Enable or Disable Search Indexing in Windows
Indexing the contents of your PC helps you get faster results when you're searching it for files and other things.
Indexing is the process of looking at files, email messages, and other content on your PC and cataloging their information, such as the words and metadata in them. When you search your PC after indexing, it looks at an index of terms to find results faster.
When you first run indexing, it can take up to a couple hours to complete. After that, indexing will run in the background on your PC as you use it, only re-indexing updated data.
The search index only includes your selected locations. These locations can be filtered for what file types (extensions), file properties, and file contents you want indexed.
The index uses the Windows Search service and runs as the Searchindexer.exe process in the background. The index will automatically rebuild and update for changes made to the included locations since the last index rebuild to increase search result accuracy.
By default, the search indexer backoff feature will reduce indexing speed while rebuilding the index when there is user activity, and will automatically continue at full speed when no user activity is detected.
If you prefer to search without using the index, then you could completely disable search indexing. If you disable search indexing, searches will take longer to finish, but search results will always be up to date and accurate.
If you do a lot of file content searching, then you may not want to disable search indexing since it will take a lot longer to search file contents without the index.
Starting with Windows 10 build 19592, the Windows Search Platform (Indexer) has been updated with improved logic to help find better times to perform indexing of your files and avoiding heavily indexing while you are using your machine. An improvement was also made to significantly limit the amount of times the service indexes your files for content that doesnt have an impact on search experiences, and gives you a better experience on Windows.
For more details, see:
- Indexing Process in Windows Search | Windows Dev Center
- Search indexing in Windows 10: FAQ - Windows Support
This tutorial will show you how to enable or disable search indexing for all users in Windows 7, Windows 8, and Windows 10.
You must be signed in as an administrator to enable or disable search indexing.
If you disable search indexing, users will no longer be able to search within libraries.
Timeline requires the Windows Search service to be enabled, running, and set to Automatic (Delayed Start).
Contents
- Option One: To Enable or Disable Search Indexing in Services
- Option Two: To Enable or Disable Search Indexing in Elevated Command Prompt
EXAMPLE: Search indexing disabled

The "Search indexing was turned off." message in Search (Win+S) below can be removed (if wanted) by turning off Search online and include web results from Bing in Windows 10.
1 Press the Win + R keys to open Run, type services.msc into Run, and click/tap on OK to open Services.
2 Do step 3 (enable) or step 4 (disable) below for what you would like to do.
This is the default setting.
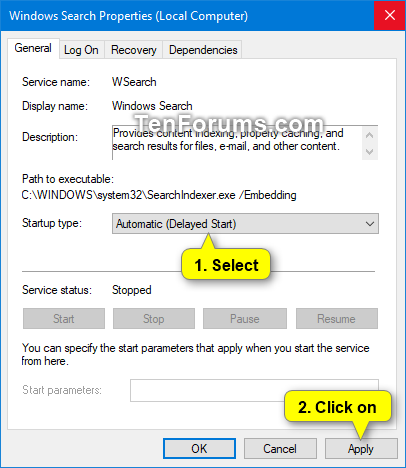
A) Double click/tap on the Windows Search service to open its properties page. (see screenshot below)
B) Select Automatic (Delayed Start) in the Startup type drop menu, and click/tap on Apply. (see screenshot below)
C) Click/tap on Start. (see screenshot below)
D) Click/tap on OK, and go to step 5 below. (see screenshot below)
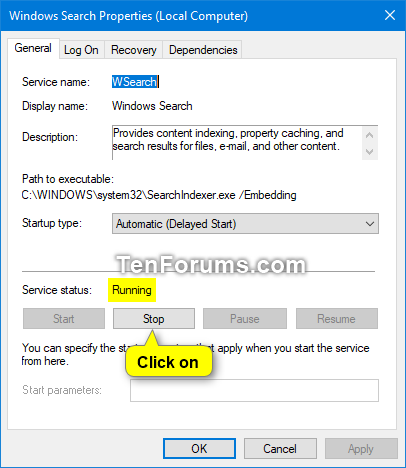
A) Double click/tap on the Windows Search service to open its properties page. (see screenshot below)
B) Click/tap on Stop if the service is currently running. (see screenshot below)
C) Select Disabled in the Startup type drop menu, click/tap on OK, and go to step 5 below. (see screenshot below)
5 You can now close Services if you like.
1 Open an elevated command prompt.
2 Do step 3 (enable) or step 4 (disable) below for what you would like to do.
This is the default setting.
A) Enter the command below into the elevated command prompt, press Enter, and go to step 5 below.
sc config "wsearch" start=delayed-auto && sc start "wsearch"
A) Enter the command below into the elevated command prompt, press Enter, and go to step 5 below.
sc stop "wsearch" && sc config "wsearch" start=disabled
5 You can now close the elevated command prompt if you like.
That's it,
Shawn
Related Tutorials
- How to Search in File Explorer in Windows 10
- How to Change Search Options in Windows 10
- How to Enable or Disable Indexer Backoff in Windows
- How to Create an Indexing Options Shortcut in Windows 10
- How to Add or Remove Locations for Search Index in Windows 10
- How to Add or Remove Excluded Folders for Search Indexer in Windows 10
- How to Enable or Disable Modifying Indexed Locations in Windows
- How to Enable or Disable Advanced Indexing Options in Windows
- How to Add or Remove File Types for Search Index in Windows 10
- How to Turn On or Off Indexing Contents and Properties of Files on a Drive in Windows
- How to Change Storage Location of Search Index in Windows 10
- How to Turn On or Off to Index Encrypted Files in Windows 10
- How to Reset and Rebuild Search Index in Windows 10
- How to Enable or Disable Indexing when on Battery Power in Windows
- How to Turn On or Off Enhanced Mode for Search Indexer in Windows 10
- How to Turn On or Off Search Indexer Respect Device Power Mode Settings in Windows 10
- How to Use Indexer Diagnostics App for Windows Search Issues in Windows 10
- How to Enable or Disable Indexing Network Locations in Photos app in Windows 10
- How to Reset Windows Search in Windows 10
Enable or Disable Search Indexing in Windows
-
New #1
Does this also turn off the prompt to turn search indexing on for faster results. I have a SSD and it is recommended to turn Search indexing off.
-
New #2
Hello Jerry, :)
Yes, it will completely disable the search indexing feature including that prompt.
-
-
-
New #5
Thank you, Brink, for another clear, concise Win 10 tutorial.
I DISABLED Win 10 Indexing because Everything (Search) is much faster, efficient, and reliable... based on my experience. (Everything is a happy freeware!)
Appreciate!
~ Alan
-
New #6
-
New #7
Hello makiraper:
I do not understand what you are really asking... however I provided a link... check out the reviews... and see what you think.
Personally, I have used many Win indexers over the years... and I have found Everything (Search) to be much superior.
Hope this proves helpful.
~ Alan
-
New #8
-
-

Enable or Disable Search Indexing in Windows
How to Enable or Disable Search Indexing in WindowsPublished by Shawn BrinkCategory: Apps & Features
06 Oct 2020


 Quote
QuoteTutorial Categories

Related Discussions
