

How to Change System Cooling Policy for Processor Power Management in Windows 10
The System cooling policy setting under Processor power management in Power Options allows you to specify an active or passive cooling mode for your system.
System Cooling Policy Description Active Increase fan speed before slowing the processor. Passive Slow the processor before increasing fan speed.
This tutorial will show you how to change the system cooling policy for processor power management in your active power plan in Windows 10.
This setting will affect all users that use the same active power plan scheme.
- Option One: To Change System Cooling Policy for Processor Power Management in Power Options
- Option Two: To Change System Cooling Policy for Processor Power Management in Command Prompt
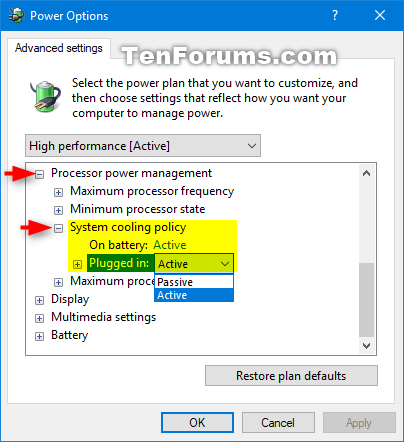
1. Open your advanced power plan settings.
2. Expand open Processor power management and System cooling policy, select Active or Passive for what you want in the drop down(s), and click/tap on OK. (see screenshot below)
1. Open a command prompt.
2. Enter the command(s) below you want to use into the command prompt, and press Enter. (see screenshots below)
(On battery: Passive)

powercfg /SETDCVALUEINDEX SCHEME_CURRENT 54533251-82be-4824-96c1-47b60b740d00 94d3a615-a899-4ac5-ae2b-e4d8f634367f 0
OR
(On battery: Active)
powercfg /SETDCVALUEINDEX SCHEME_CURRENT 54533251-82be-4824-96c1-47b60b740d00 94d3a615-a899-4ac5-ae2b-e4d8f634367f 1
AND/OR
(Plugged in: Passive)
powercfg /SETACVALUEINDEX SCHEME_CURRENT 54533251-82be-4824-96c1-47b60b740d00 94d3a615-a899-4ac5-ae2b-e4d8f634367f 0
OR
(Plugged in: Active)
powercfg /SETACVALUEINDEX SCHEME_CURRENT 54533251-82be-4824-96c1-47b60b740d00 94d3a615-a899-4ac5-ae2b-e4d8f634367f 1
That's it,
Shawn
Related Tutorials
- How to Change Power Plan Settings in Windows 10
- How to Add or Remove 'System cooling policy' from Power Options in Windows
Change System Cooling Policy for Processor in Windows 10
Change System Cooling Policy for Processor in Windows 10
How to Change System Cooling Policy for Processor Power Management in Windows 10Published by Shawn BrinkCategory: Hardware & Drivers
12 Apr 2018


Tutorial Categories

Related Discussions
