

How to Add Slide Show to Context Menu of Files in Windows 10
When you select one or more images in a folder containing pictures (image files) in Windows 10, you can view them as a slide show.
By default, you can click/tap on the Slide show button in the "Picture Tools" Manage tab of the File Explorer ribbon to view pictures in the folder as a slide show.
If you like, you can add a Slide show context menu item to also use.
This tutorial will show you how to add or remove Slide show to the context menu of all image files for all users in Windows 10.
While you must be signed in as an administrator to be able to add or remove the context menu, all users can use the context menu.
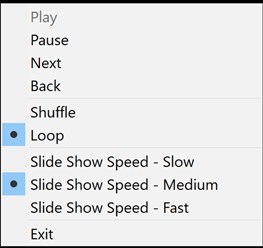
While the slide show is playing, you can right click or press and hold on the slide show to have the settings below available.
For a Windows 11 version of this tutorial, see:
Add Slide Show Context Menu in Windows 11
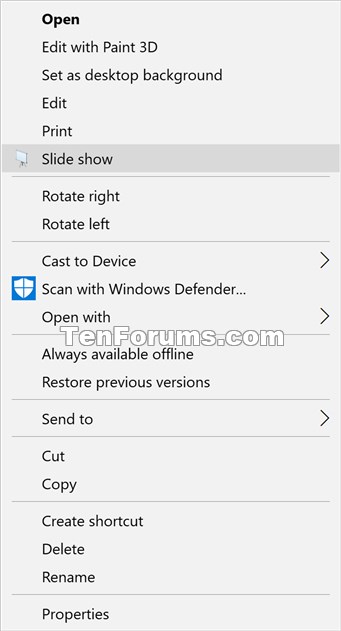
EXAMPLE: Slide show context menu
Here's How:
1 Do step 2 (add) or step 3 (remove) below for what you would like to do.
A) Click/tap on the Download button below to download the file below, and go to step 4 below.
Add_Slide_show_to_context_menu.reg
Download
This is the default setting.
A) Click/tap on the Download button below to download the file below, and go to step 4 below.
Remove_Slide_show_from_context_menu.reg
Download
4 Save the .reg file to your desktop.
5 Double click/tap on the downloaded .reg file to merge it.
6 When prompted, click/tap on Run, Yes (UAC), Yes, and OK to approve the merge.
7 You can now delete the downloaded .reg file if you like.
That's it,
Shawn Brink
Related Tutorials
- How to View Pictures as a Slide Show in Windows 10
- How to Change your Desktop Background in Windows 10
- Add or Remove Desktop Background 'Slide show' from Power Options in Windows 10
Add Slide Show Context Menu in Windows 10
-
New #1
Good evening Brink!
Edit FYI: The add to slideshow context menu tweak needs the guid in the [HKEY_CLASSES_ROOT\*\shell\Windows.slideshow\command] line for the tweak to operate properly.
Thanks!
-
-
New #3
Certainly. I think the GUID needs to be in quotes. Otherwise, when the reg file is merged, and pictures are selected to view in slide show, an error message pops up indicating no default program is available to view. If you look in the registry where the slideshow context menu entries are entered, no GUID is entered in the command string.
-
-
New #5
Very welcome!

Add Slide Show Context Menu in Windows 10
How to Add Slide Show to Context Menu of Files in Windows 10Published by Shawn BrinkCategory: Customization
24 Sep 2022

 Quote
Quote
Tutorial Categories

Related Discussions
