

How to Import Your EFS File Encryption Certificate and Key in Windows 10
Information
The Encrypting File System (EFS) is the built-in encryption tool in Windows used to encrypt files and folders on NTFS drives to protect them from unwanted access. EFS enables transparent encryption and decryption of files for your user account by using advanced, standard cryptographic algorithms. Any individual or app that doesn't possess the appropriate file encryption key cannot open any encrypted files and folders. Encryption is the strongest protection that Windows provides to help you keep your individual files and folders secure.
Creating a backup of your file encryption certificate and key to a PFX file helps you avoid permanently losing access to your encrypted files and folders if the original certificate and key are lost or corrupted.
If you lose access to your encrypted files and folders, you will not be able to open them again unless you are able to restore your file encryption certificate and key used with EFS.
This tutorial will show you how to import the PFX file for your file encryption certificate and key used with Encrypting File System (EFS) in Windows 10 Pro, Enterprise, and Education editions.
Warning
When you back up your file encryption certificate and key as a PFX file, you will be required to enter a password used to protect the private key to maintain the security of your encrypted files and folders.
No one will be able to restore the backed up file encryption certificate and key to gain access to your encrypted files and folders unless they are able to enter this password.
It is extremely important that you do not lose this password. Keep it written down in a safe secure location in case you need to restore your backed up file encryption certificate and key.
Be sure to also keep the PFX file backup of your encryption certificate and key saved in a safe and secure location in case you need to restore your backed up file encryption certificate and key.
CONTENTS:
- Option One: To Import PFX file to Restore your EFS File Encryption Certificate and Key from PFX file
- Option Two: To Import PFX file to Restore your EFS File Encryption Certificate and Key from Certificates Manager
1. Either double click/tap on the backed up PFX file, or right click or press and hold on the PFX file and click/tap on Install PFX. (see screenshot below)
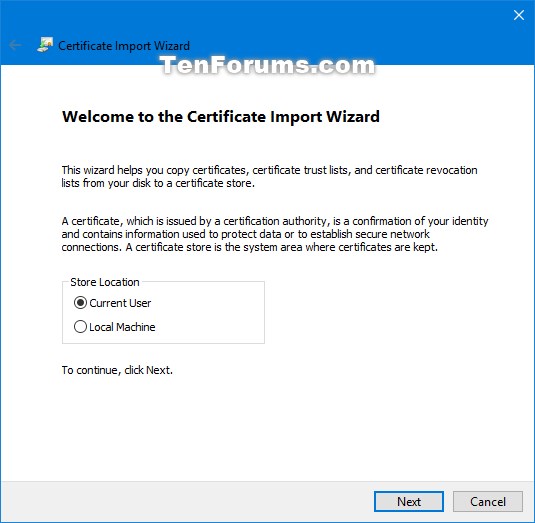
2. Click/tap on Next. (see screenshot below)
3. Click/tap on Next. (see screenshot below)
4. Enter the password for the private key included in the PFX file , check Mark this key as exportable, check Include all extended properties, and click/tap on Next. (see screenshot below)
5. Select (dot) Automatically select the certificate store based on the type of certificate, and click/tap on Next. (see screenshot below)
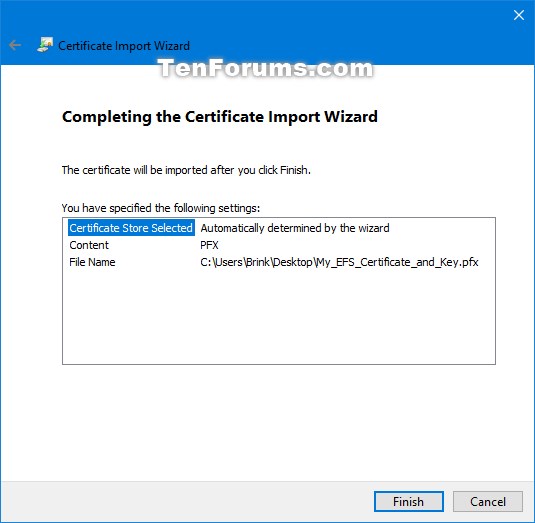
6. Click/tap on Finish. (see screenshot below)
7. Click/tap on OK. (see screenshot below)
1. Press the Win+R keys to open Run, type certmgr.msc, and click/tap on OK to open Certificates Manager.
2. In the left pane of certmgr, right click or press and hold on the Personal store, click/tap on All Tasks, and click/tap on Import. (see screenshot below)
3. Click/tap on Next. (see screenshot below)
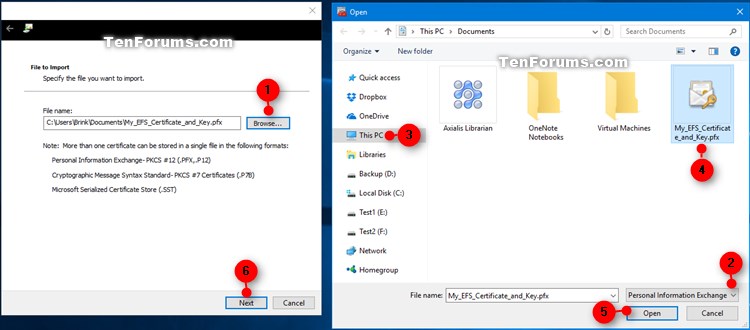
4. Click/tap on the Browse button, select Personal Information Exchange from the file type drop down, navigate to the location you saved the PFX file, select the PFX file, click/tap on Open, and click/tap on Next. (see screenshot below)
5. Enter the password for the private key included in the PFX file , check Mark this key as exportable, check Include all extended properties, and click/tap on Next. (see screenshot below)
6. Select (dot) Automatically select the certificate store based on the type of certificate, and click/tap on Next. (see screenshot below)
7. Click/tap on Finish. (see screenshot below)
8. Click/tap on OK. (see screenshot below)
9. You can now close the certmgr window if you like. (see screenshot below)
Note
You will need to refresh (F5) certmgr to see your imported EFS file encryption certificate and key now restored in Certificates in the Personal store.
That's it,
Shawn
Related Tutorials
- How to Encrypt Files and Folders with Encrypting File System (EFS) in Windows 10
- How to Decrypt Files and Folders Encrypted with EFS in Windows 10
- How to Find and List All Your EFS Encrypted Files in Windows 10
- How to Back Up Your EFS File Encryption Certificate and Key in Windows 10
- How to Change or Remove Lock Icon on Encrypted Files and Folders in Windows 10
- How to Turn On or Off to Index Encrypted Files in Windows 10
Import Encrypting File System Certificate and Key in Windows 10

Import Encrypting File System Certificate and Key in Windows 10
How to Import Your EFS File Encryption Certificate and Key in Windows 10Published by Shawn BrinkCategory: Security System
14 Mar 2017


Tutorial Categories

Related Discussions
