

How to Add or Remove Sleep from Power menu in Windows 10
Sleep uses very little power, your PC starts up faster, and youre instantly back to where you left off. You dont have to worry that you'll lose your work because of your battery draining because Windows automatically saves all your work and turns off the PC if the battery is too low. Use sleep when youre going to be away from your PC for just a little while like when youre taking a coffee break.
For a lot of PCs (especially laptops and tablets), your PC goes to sleep when you close your lid or press the power button.
This tutorial will show you how to add or remove sleep from showing in the Power menu for all users in Windows 10.
You must be signed in as an administrator to add or remove sleep in the Power menu.
Contents
- Option One: Add or Remove Sleep in Power Menu using Power Options
- Option Two: Add or Remove Sleep in Power Menu using a REG file
- Option Three: Add or Remove Sleep in Power Menu using Local Group Policy Editor
- Option Four: Add or Remove Sleep in Power Menu via Group Policy using a REG file
EXAMPLE: Sleep in Power menu
Alt+F4 Shut Down Windows
Ctrl+Alt+Del
Sign-in screen
Start menu
Win+X Quick Link menu
1 Open the Control Panel (icons view), and click/tap on the Power Options icon.
2 Click/tap on the Choose what the power buttons do link on the left side. (see screenshot below)
3 Click/tap on the Change settings that are currently unavailable link at the top. (see screenshot below)
4 If prompted by UAC, click/tap on Yes.
5 Do step 6 (on) or step 7 (off) below for what you would like to do.
This is the default setting
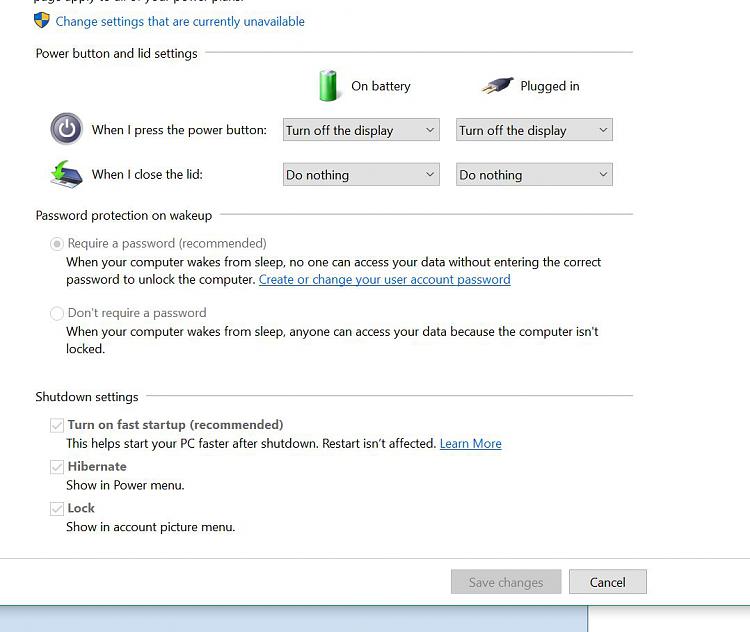
A) Check the Sleep box under Shutdown settings, and click/tap on Save changes. (see screenshot below step 7)
A) Uncheck the Sleep box under Shutdown settings, and click/tap on Save changes. (see screenshot below)
The downloadable .reg files below will modify the DWORD in the registry key below.
HKEY_LOCAL_MACHINE\SOFTWARE\Microsoft\Windows\CurrentVersion\Explorer\FlyoutMenuSettings
ShowSleepOption DWORD
0 = Remove
1 = Add
1 Do step 2 (add) or step 3 (remove) below for what you would like to do.
This is the default setting.
A) Click/tap on the Download button below to download the file below, and go to step 4 below.
Add_Sleep_in_Power_menu.reg
Download
A) Click/tap on the Download button below to download the file below, and go to step 4 below.
Remove_Sleep_in_Power_menu.reg
Download
4 Save the .reg file to your desktop.
5 Double click/tap on the downloaded .reg file to merge it.
6 When prompted, click/tap on Run, Yes (UAC), Yes, and OK to approve the merge.
7 If you like, you can delete the downloaded .reg file if you like.
If enabled of disabled, this option will override and gray out Option One and Option Two.
The Local Group Policy Editor is only available in the Windows 10 Pro, Enterprise, and Education editions.
All editions can use Option Four below to set this policy.
1 Open the Local Group Policy Editor.
2 In the left pane of Local Group Policy Editor, navigate to the location below. (see screenshot below)
Computer Configuration/Administrative Templates/Windows Components/File Explorer
3 In the right pane of File Explorer in Local Group Policy Editor, double click/tap on the Show sleep in the power options menu policy to edit it. (see screenshot above)
4 Do step 5 (add), step 6 (remove), or step 7 (default) below for what you would like to do.
A) Select (dot) Enabled, click/tap on OK, and go to step 8 below. (see screenshot below)
A) Select (dot) Disabled, click/tap on OK, and go to step 8 below. (see screenshot below)
8 When finished, you can close the Local Group Policy Editor if you like.
If enabled of disabled, this option will override and gray out Option One and Option Two.
The downloadable .reg files below will add and modify the DWORD value in the registry key below.
HKEY_LOCAL_MACHINE\SOFTWARE\Policies\Microsoft\Windows\System
ShowSleepOption DWORD
(delete) = default
1 = Add
0 = Remove
1 Do step 2 (add), step 3 (remove), or step 4 (default) below for what you would like to do.
A) Click/tap on the Download button below to download the file below, and go to step 5 below.
Add_Sleep_to_power_menu_by_policy.reg
Download
A) Click/tap on the Download button below to download the file below, and go to step 5 below.
Remove_Sleep_from_power_menu_by_policy.reg
Download
A) Click/tap on the Download button below to download the file below, and go to step 5 below.
Default_Not_Configured_Sleep_power_menu_policy.reg
Download
5 Save the .reg file to your desktop.
6 Double click/tap on the downloaded .reg file to merge it.
7 When prompted, click/tap on Run, Yes (UAC), Yes, and OK to approve the merge.
8 When finished, you can delete the downloaded .reg file if you like.
That's it,
Shawn
Related Tutorials
- How to Put Your Computer to Sleep in Windows 10
- How to Change Computer Sleep After Time in Windows 10
- How to Add or Remove Hibernate from Power menu in Windows 10
- How to Add or Remove Lock in Account Picture Menu in Windows 10
- How to Add or Remove Power Menu Icon on Sign-in Screen in Windows 10
- How to Enable or Disable Windows To Go Workspace using Sleep on Windows 10 PC
- How to Enable or Disable Shut Down, Restart, Sleep, and Hibernate in Power Menu in Windows 10
- How to Add or Remove 'Sleep button action' from Power Options in Windows
- How to Change Default Action of Shut Down Windows Dialog in Windows 10
Add or Remove Sleep in Power menu in Windows 10
-
New #1
Hi,
First, this forum is awsome!
Second, here is my problem. I did what they say in this video to unable High Performance power option ( Unlock All Power Options On Surface Pro 3 High performance mode, cpu ang gpu options ulocked - YouTube ). It was pretty simple. I basically just change a number in Regedit (1 to 0). But then I lost the Sleep option. It is no longer available in the Shutdown settings (see picture). Do you have a solution to bring it back?
I have a Surface Pro 3 i5 with windows 10 update.
Thx for your time,
Phil
-
New #2
Hello Phil, and welcome to Ten Forums. :)
The video was for disabling Connected Standby. You should just have to change CsEnabled back to 1, and restart the computer to undo it.
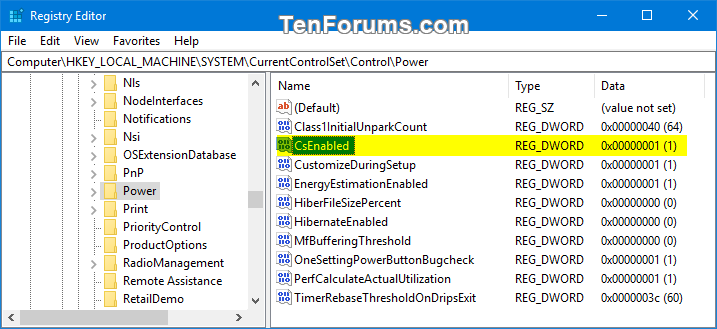
Last edited by Brink; 24 Jan 2018 at 09:20. Reason: added image
-
New #3
haha wow that's weird! I tried it yesterday and it didn't work. I've just tried it again and BAM, it worked!
Thx a lot for the quick answer,
Have a nice day :)
Phil
-
-
New #5
Any idea how to apply the 'FlyourMenuSetting' reg entry in Audit mode?
When I set it and then sysprep a system the Sleep option comes back.
My current 'solution' is to use the old 7 tweak:
[HKEY_LOCAL_MACHINE\SOFTWARE\Policies\Microsoft\Power\PowerSettings\abfc2519-3608-4c2a-94ea-171b0ed546ab]
"ACSettingIndex"=dword:00000000
"DCSettingIndex"=dword:00000000
But that Disables Sleep and Removes the Options from the Power screen as well.
-
-
-
-
-

Add or Remove Sleep in Power menu in Windows 10
How to Add or Remove Sleep from Power menu in Windows 10Published by Shawn BrinkCategory: Performance & Maintenance
14 Jun 2020


 Quote
Quote

Tutorial Categories

Related Discussions
