

How to Turn On or Off Automatic Replies in Mail app in Windows 10
The Mail and Calendar apps included with Windows 10 help you stay up to date on your email, manage your schedule and stay in touch with people you care about the most. Designed for both work and home, these apps help you communicate quickly and focus on whats important across all your accounts. Supports Office 365, Exchange, Outlook.com, Gmail, Yahoo! and other popular accounts.
You can use automatic replies in the Mail app to notify others that you are out of office, on vacation, or not available to reply to email messages.
This tutorial will show you how to turn on or off automatic replies in the Mail app for your account in Windows 10.
Here's How:
1 Open the Mail app, and click/tap on the Settings button, and click/tap on Automatic replies in Settings. (see screenshot below)
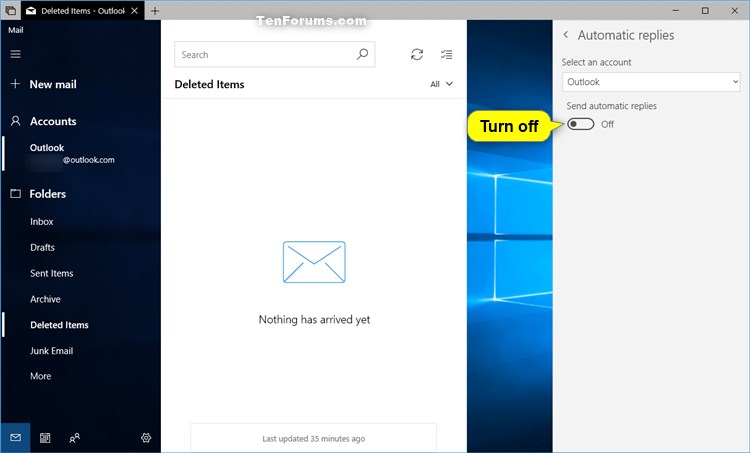
2 Select the email account name (ex: Outlook) that you want to turn automatic replies on or off for. (see screenshot below)
3 Do step 4 (on) or step 5 (off) below for what you want to do.
A) Turn on Send automatic replies, enter the message you want automatically sent, and: (see screenshot below)
- Check or uncheck the Send replies outside of my organization for what you want.
- If checked, enter the message you want automatically sent.
- Check or uncheck the Send replies only to my contacts for what you want.
B) For as long as automatic replies is turned on for the account, you will get a You're sending automatic replies from <account name> prompt to Turn off or Dismiss (leave on) whenever you open the account's inbox. (see screenshot below)
This is the default setting.
A) Turn off Send automatic replies. (see screenshot below)
That's it,
Shawn
Turn On or Off Automatic Replies in Windows 10 Mail app

Turn On or Off Automatic Replies in Windows 10 Mail app
How to Turn On or Off Automatic Replies in Mail app in Windows 10Published by Shawn BrinkCategory: Browsers & Email
08 Mar 2020


Tutorial Categories

Related Discussions
