

How to Add a Guest Account in Windows 10
A guest account is a local account for users who don't have a permanent account on your PC or domain. It allows people (guest/visitor) to use your PC without having access to your personal files. Users signed in to the guest account can't install apps, open Windows Store apps, install hardware, and change Settings.
You can no longer enable the built-in Guest account in Windows 10, but you can workaround this by manually adding a guest account.
See also: Guest access in SMB2 disabled by default in Windows | Windows Support
This tutorial will show you how to add a guest account on your Windows 10 PC.
You must be signed in as an administrator to be able to add a guest account.
Contents
- Option One: How to Add a Guest Account in Command Prompt
- Option Two: How to Add a Guest Account in Local Users and Groups
Video by: simrick
1 Open an elevated command prompt.
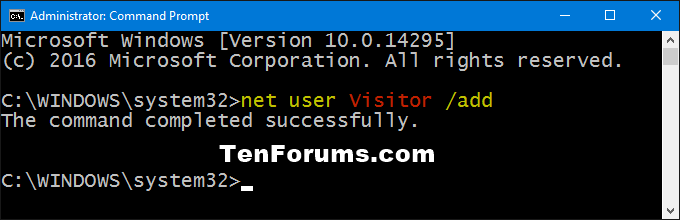
2 Type the command below into the elevated command prompt, and press Enter to add a new local account. (see screenshot below)
net user Name /add
Substitute Name in the command above with the actual name (ex: Visitor) you want for this guest account. You will not be able to use the name Guest.
For example:net user Visitor /add
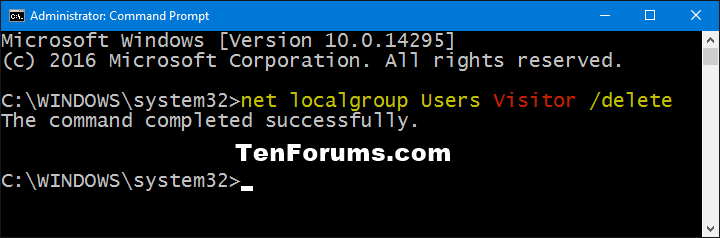
3 Type the command below into the elevated command prompt, and press Enter to remove this new local account (ex: Visitor) from the Users group. (see screenshot below)
net localgroup Users Name /delete
Substitute Name in the command above with the actual name (ex: Visitor) of this guest account.
For example:net localgroup Users Visitor /delete
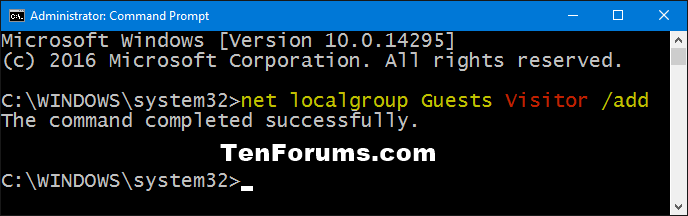
4 Type the command below into the elevated command prompt, and press Enter to add this new local account (ex: Visitor) to the Guests group. (see screenshot below)
net localgroup Guests Name /add
Substitute Name in the command above with the actual name (ex: Visitor) of this guest account.
For example:net localgroup Guests Visitor /add
5 If you like, you can add a password to this guest account.
6 When finished, you can close the elevated command prompt if you like.
7 The "C:\Users\(user-name)" profile folder for this guest account will be created the first time the account is signed in to.
The Local Users and Groups is only available in the Windows 10 Pro, Enterprise, and Education editions.
1 Press the Win + R keys to open Run, type lusrmgr.msc into Run, and click/tap on OK to open Local Users and Groups.
2 Click/tap on the Users folder in the left pane to open it, and click/tap on More Actions and New User in the right "Actions" pane. (see screenshot below)
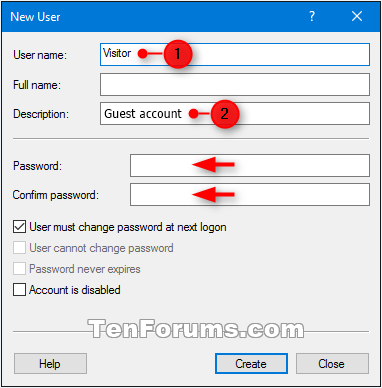
3 Type in a user name (ex: Visitor) you want for the new guest account, fill out any other details (ex: password and description) if you like, click/tap on Create, and click/tap on Close. (see screenshot below)
4 Double click/tap on the new user account (ex: Visitor) in the middle pane of Local Users and Groups. (see screenshot below)
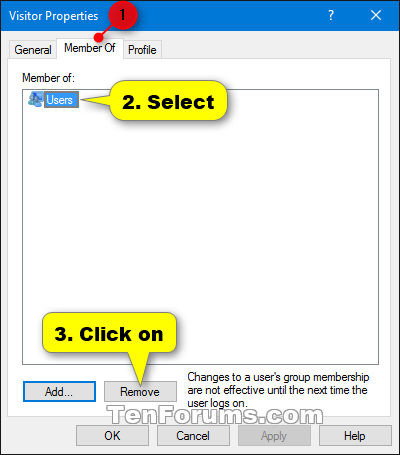
5 Click/tap on the Member Of tab, select Users, and click/tap on Remove to remove this account from being a member of the "Users" group. (see screenshot below)
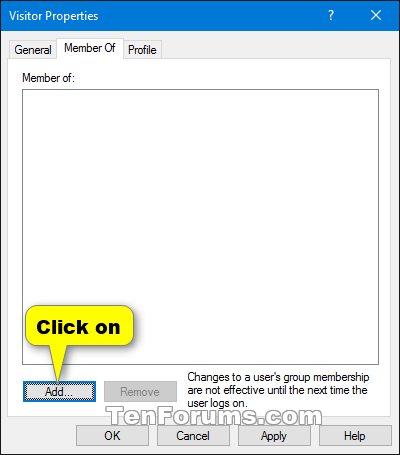
6 Click/tap on Add. (see screenshot below)
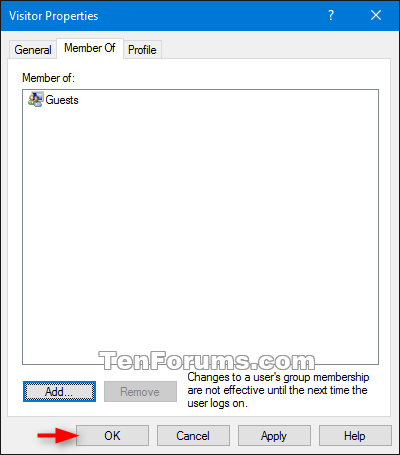
7 Type Guests in the "Enter the object names to select" box, and click/tap on OK. (see screenshot below)
8 Click/tap on OK to add this account as a member of the "Guests" group. (see screenshot below)
9 When finished, you can close Local Users and Groups if you like.
10 The "C:\Users\(user-name)" profile folder for this guest account will be created the first time the account is signed in to.
That's it,
Shawn
Related Tutorials
- How to Add a Local Account or Microsoft Account in Windows 10
- How to Delete a User Account in Windows 10
- How to Change Your Account Picture in Windows 10
- How to Change Account Type of Users in Windows 10
- How to Enable or Disable Built-in Elevated Administrator Account in Windows 10
- How to Enable or Disable User Accounts in Windows 10
- How to Setup Assigned Access (Kiosk Mode) in Windows 10
- How to Add or Remove Users from Groups in Windows 10
Add Guest Account in Windows 10
-
New #1
THANK YOU for your 'OPTION ONE' method; it worked perfectly.
NO WAY was I gonna allow Internet access w/o the Guest LID!!!
-
-
New #3
Brink, what is meant by a guest account cannot be a member of a homegroup? I thought workstations were members of HomeGroups, not users.
Also, in the info box it says "you can no longer enable the built-in Guest account in Windows 10". Would you happen to know if this was always the case with Windows 10 or did it come with an update?
-
New #4
Hello Pyprohly, :)
When a PC joins a homegroup, all user accounts (except guest account (members of "Guests" group)) on the PC become members of the homegroup. Each user on the PC will always be able to choose what libraries and devices to share with the homegroup.
When you leave a homegroup, all user accounts on your computer also leave the homegroup.
I can't remember exactly when, but it was pretty much from the start of Windows 10 that we couldn't enable the built-in "Guest" account. Instead, we have to use the method in this tutorial as a workaround to have a guest account.
-
New #5
-
-
New #7
Though, I would have gone for something like “Guests cannot participate in HomeGroups” to express that.
-
New #8
.
Hi Shawn,
I used your Option 1 to create a "Kids" account.
For the Password, I simply hit Return and Return (so no password).
The account has been added to the list of available accounts on the login screen. When I test the login by double-clicking on the account name, "Kids" appears in the centre of the screen, with "Sign in" underneath.
When I click "Sign in", I see "Welcome", immediately followed by "Signing out". Then the "Kids" login screen is again presented.
Please advise.
Thanks.
.
-
-
New #9
Hello @OldGrantonian, :)
Type the command below into a command prompt, press Enter, and post back with a copy of the output. It'll report the details of the "Kids" account to see if anything stands out.
net user Kids

Add Guest Account in Windows 10
How to Add a Guest Account in Windows 10Published by Shawn BrinkCategory: User Accounts
14 Oct 2020


 Quote
QuoteTutorial Categories

Related Discussions
