

How to Run an App as Administrator in Windows 10
Some legitimate applications require a full administrator access token (elevated) to perform their functions or tasks. For example, when a program that you are trying to run is giving you a Access Denied or No Permission type error.
The User Account Control (UAC) message is displayed to request consent or credentials to allow an application to use the full administrator access token in any of the following circumstances:
- The application developer marked the application to require an administrator access token. This is done by using a development technique known as an embedded manifest.
- UAC detected that the application is an installer or setup application. (Automatic detection can be disabled by using Group Policy.)
- Microsoft analyzed the application and provided an application compatibility shim. A shim is a small amount of extra code provided by Microsoft that supports certain non-Microsoft applications.
- An administrator configured the application compatibility settings on the application's Program Properties page.
- An interactive user right-clicked the application and then clicked Run as administrator to start the application.
This tutorial will show you different ways on how to have an application Run as administrator with full unrestricted elevated rights in Windows 10.
The "Run as administrator" option is only available for desktop apps, and not available for Windows apps (aka: modern apps).
You must be signed in as an administrator or provide the credentials of a member of the local Administrators group to Run as administrator.
If you are signed in as a standard user, or if UAC is configured to always require credentials, enter the appropriate administrative credentials, and then click OK.
If you are signed in as an administrator and UAC is not configured to always require credentials, click Yes to start the application.
Contents
- Option One: To Run as Administrator using Keyboard Shortcut
- Option Two: To Run as Administrator using Context Menu
- Option Three: To Run as Administrator from Run Dialog
- Option Four: To Run as Administrator with Task Scheduler
- Option Five: To Run as Administrator in Start Menu
- Option Six: To Run as Administrator in File Explorer Ribbon
- Option Seven: To Run as Administrator on Taskbar
- Option Eight: To Run as Administrator in Task Manager
- Option Nine: To Always Run as Administrator in Shortcut Advanced Properties
- Option Ten: To Always Run as Administrator in Compatibility Properties
- Option Eleven: To Always Run as Administrator in Registry Editor
1 Select an app to highlight it.
2 Press and hold the CTRL + Shift keys.
3 Press Enter or click/tap on the app.
4 Release the CTRL + Shift keys.
1 Right click on an app, and click/tap on Run as administrator. (see screenshot below)
How to Add 'Run as administrator' to MSI File Context Menu in Windows 10
How to Add 'Run as administrator' to PS1 File Context Menu in Windows 10
How to Add 'Run as administrator' to VBS File Context Menu in Windows 10
1 Press the Win + R keys to open the Run dialog.
2 Type the app file name (ex: "cmd") you want to run into the Run dialog.
3 Either press the CTRL + Shift + Enter keys OR press CTRL + Shift and click/tap on OK.
1 Right click or press and hold on an app in All Apps or on Start, click/tap on More, and click/tap on Run as administrator. (see screenshot below)
1 While in File Explorer (Win+E), select an app (ex: cmd.exe).
2 Click/tap on the Application Tools Manage tab, and do step 3 or step 4 below for what you would like to do.
3 Click/tap on the top half of the Run as administrator button in the ribbon. (see screenshot below)
4 Click/tap on the bottom half of the Run as administrator button in the ribbon, and click/tap on Run as administrator. (see screenshot below)
1 Right click or press and hold on a program's (ex: Command Prompt) icon on the taskbar to open its jump list. (see screenshot below step 2)
2 In the jump list, right click or press and hold on the program's name (ex: Command Prompt), and click/tap on Run as administrator.
1 Open Task Manager in more details view.
2 Click/tap on File (menu bar), and click/tap on Run new task. (see screenshot below)
3 Type the name of the app's .exe file (ex: cmd) or browse to and select the program's .exe file or shortcut, check the Create this task with administrative privileges box, and click/tap on OK. (see screenshot below)
1 Right click or press and hold on a shortcut of an app on your desktop or in File Explorer, and click/tap on Properties in the context menu.
2 Click/tap on the Shortcut tab, and click/tap on the Advanced button. (see screenshot below)
3 Do step 4 or step 5 below for what you would like to do.
A) Check the Run as administrator box, click/tap on OK, and go to step 6below. (see screenshot below step 5)
A) Uncheck the Run as administrator box, click/tap on OK, and go to step 6below. (see screenshot below)
6 Click/tap on OK. (see screenshot below step 2)
1 Right click or press and hold on an app on your desktop (Win+D) or in File Explorer (Win+E), and click/tap on Properties in the context menu.
2 Click/tap on the Compatibility tab, and do step 3 or step 4 below for what you would like to do. (see screenshot below)
A) In the Settings section, check or uncheck the Run this program as an administrator box for what you would like to do, and click/tap on OK. (see screenshot below)
If the Run this program as an administrator setting is grayed out, then you will need to do step 4 below instead.
A) Click/tap on the Change settings for all users button. (see screenshot below step 4B)
B) In the Settings section, check or uncheck the Run this program as an administrator box for what you would like to do, and click/tap on OK. (see screenshot below)
C) Click/tap on OK. (see screenshot below)
If you checked the Run this program as an administrator box in step 4B, then the Run this program as an administrator setting in step 3 will be grayed out and unable to be changed unless you do step 4A again.
1 Press the Win + R keys to open Run, type regedit into Run, and click/tap on OK to open Registry Editor.
2 If prompted by UAC, click/tap on Yes.
3 In regedit, navigate the location below that you want to use. (see screenshot below)
If the Layers key is not there, then right click or press and hold on the AppCompatFlags key, click/tap on New, click/tap on Key, type Layers, and press Enter.
(for current account only)
HKEY_CURRENT_USER\Software\Microsoft\Windows NT\CurrentVersion\AppCompatFlags\Layers
OR
(for all users)
HKEY_LOCAL_MACHINE\SOFTWARE\Microsoft\Windows NT\CurrentVersion\AppCompatFlags\Layers
4 In the right pane of Layers, right click or press and hold on an empty area, then click/tap on New, and click/tap on String Value. (see screenshot above)
5 Type in the full path of the app's exe file (ex: "C:\Program Files\CCleaner\CCleaner.exe") you want to always run as administrator, press Enter, then double click/tap on the full path in the right pane to modify it. (see screenshot below step 3)
6 Copy and paste the~ RUNASADMINdata value, and click/tap on OK. (see screenshot below)
7 When finished, you can close Registry Editor if you like.
That's it,
Shawn Brink
Related Tutorials
- How to See if Process is Running as Administrator (elevated) in Windows 10
- How to Add or Remove 'Run as administrator' Context Menu in Windows 10
- How to Open an Elevated Command Prompt in Windows 10
- How to Add 'Run as administrator' to MSI File Context Menu in Windows 10
- How to Add 'Run as administrator' to PS1 File Context Menu in Windows 10
- How to Add 'Run as administrator' to VBS File Context Menu in Windows 10
- How to Change User Account Control (UAC) Settings in Windows 10
- How to Create Elevated App Shortcut without UAC Prompt in Windows 10
- How to 'Run as different user' in Windows 10
Run as Administrator in Windows 10
-
New #1
Hello,
I have followed your steps as instructed to effectively create key entries for both Command Prompt, and Registry Editor. Registry Editor usually opens with administrator privileges although I was hoping this registry edit would bypass the UAC prompt, and the command line simply opens as usual, not as elevated. I know I could create a shortcut for cmd and create a scheduled task to run as administrator or even select the 'Run as Administrator' checkbox within the shortcuts advanced properties but again I was hoping this would too bypass the UAC prompt when using the direct application path, and not a shortcut. Am I missing something?
Regards
Wh0pper28
-
New #2
Hello Wh0pper28, :)
By default, any time you run anything as administrator (elevated), you will get a UAC prompt for approval first.
This will not bypass it.
To try and understand for a better solution, why did you want to bypass UAC when opening Registry Editor?
-
New #3
Woah, thanks for such a quick response!
Basically just to fulfill my personal preference, I hate having to constantly select yes when running things as an administrator but I don't want to disable UAC completely, I just simply want the option to disable it for specific applications such as Registry Editor and Command Prompt. I don't know any way to achieve this nor have I found any solutions for it, I guess it was hopeful thinking believing it'd be as simple as this registry edit. I'd also like the ability for cmd to open as administrator by default without the use of shortcuts and without the UAC prompts.
Regards
Wh0pper28
-
New #4
Wh0pper28,
In that case, you could use the method in the tutorial below to create an elevated shortcut that won't give you a UAC prompt.
Elevated Program Shortcut without UAC Prompt - Create - Windows 7 Help Forums
-
New #5
Ideally I wanted to be able to do this without making a shortcut, but I suppose I'll have to compromise. I've tried this for both the Command Prompt and Registry Editor, when I run the tasks on demand from within the Scheduled Task UI, they both work fine, but when I double-click the desktop shortcuts for them neither of them seem to work, the cmd simply flashes on screen really quickly and then nothing after that. I really do appreciate the assistance, it's not often I come across a forum such as this where the majority of users go out of their way to be helpful.
Regards
Wh0pper28
-
-
New #7
Yeah, as I mentioned in my previous post, the scheduled tasks work as expected within the Task Scheduler itself but the shortcuts for them don't seem to work, the cmd just flashes and neither one of the programs opens. Find attached my screenshots, maybe you will notice an error on my part.
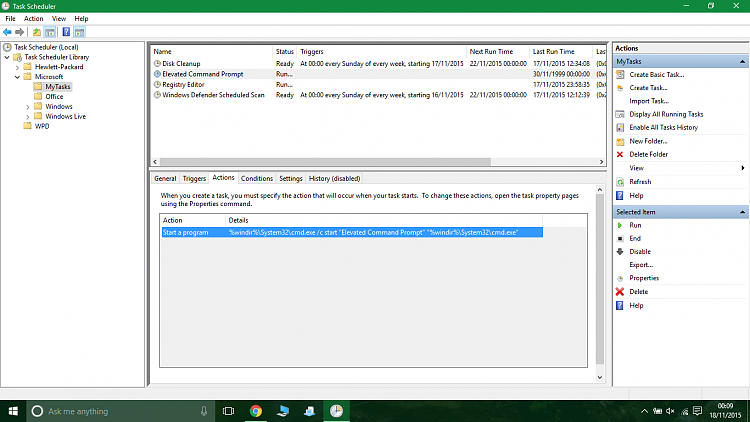


-
New #8
The elevated shortcut is not working since it's not pointing to the correct path. The tutorial is for having the task in the Task Scheduler Library folder in Task Scheduler instead.
-
-
New #9

Run as Administrator in Windows 10
How to Run an App as Administrator in Windows 10Published by Shawn BrinkCategory: Apps & Features
18 Oct 2021


 Quote
Quote


Tutorial Categories

Related Discussions
