Information
First a quote from Microsoft TechNet: Understanding Audit Mode:
The Audit Mode, although originally intended to be used in corporate environment in preparing Windows images for deployment (a fancy geek wordWhen Windows boots first time, the computer can start in one of the following two modes:Windows Welcome ModeWindows Welcome, also named Out-Of-Box Experience (OOBE), is the first user experience. Windows Welcome prompts end users to customize their Windows installation. End users create user accounts, read and accept the Microsoft® Software License Terms, and select their language and time zones. By default, immediately after installation, Windows® starts Windows WelcomeAudit ModeAudit mode is used to add customizations to Windows images. When you use audit mode, the system does not have to apply settings in Windows Welcome. OEMs and corporations should use audit mode to complete their manual customizations before shipping a computer to an end user, installing same image on multiple computers) is a nice and flexible tool also for private users, easy to use to customize Windows. As you can enter Audit Mode before any user accounts are created, computer named and networks joined, you can prepare your All Inclusive Windows image to be used instead of the traditional install media.
All customizations are done with native Windows System Preparation Tool (Sysprep). To instruct Sysprep we create a so called unattended answer file, a script file in XML file format listing everything Sysprep needs to know to modify Windows as we want to. The answer file command syntax is quite complicated, luckily we don't have to write it manually but can instead use the Windows System Image Manager (SIM), free tool from Microsoft which is part of the likewise free Windows Assesment & Deployment Kit (ADK).
This tutorial only covers some basics of Windows Image Customization in Audit Mode using Sysprep with answer files created with SIM, however it gives you enough to get started to get just the Windows you'd like to have.
Have fun :).
(Videos originally posted in Windows 10 instructional videos by Ten Forums members - Windows 10 Forums)
UPDATE:
Below video will show well the process works in Windows 10 version 1607, the Anniversary Update:
Full video description in this post: Windows 10 Image - Customize in Audit Mode with Sysprep - Page 48 - Windows 10 Forums
Note
Please notice before proceeding!
- Disconnect your technician machine used for customizing the Windows image completely from all networks before starting the installation
- Be sure that you install Windows 10 without entering the product key and without any whatsoever network connection
- When booted to Audit Mode desktop (Part Two), you can connect the machine to the network to download and install Windows ADK and software
- As Windows is not activated when booted to Audit Mode when following these guidelines you cannot customize the theme. Use a Windows themepack file instead, for instance creating the theme (colors, backgrounds, sounds, screensaver) you'd like to use for the default user profile on another computer and applying the themepack file on the technician machine before the Sysprep
You can now run Sysprep normally and without issues.
Part One: Install Windows
Part Two: Entering Audit Mode
Part Three: Install Windows ADK & SIM
Part Four: Customize Windows
Part Five: Create an Answer File
Part Six: Run Sysprep
Part Seven: Prepare for Imaging
Part Eight: Create a System Image
Part Nine: Complete Windows installation
1.1) Perform Windows installation normally as told in this tutorial until you reach the Settings dialog, first dialog after the last reboot during the installation
1.2) Instead of choosing custom or express settings, press and hold down the CTRL and SHIFT keys, then still holding the these keys down press F3:1.3) Release the keys, Windows will now reboot to Audit Mode.
2.1) After the reboot Windows will enter the Audit Mode using the built-in administrator account.
2.2) The Windows System Preparation Tool (later in tutorial Sysprep) dialog is automatically shown when Windows enters the Audit Mode. For our purposes now we need to close it without running it. Click Cancel to close the dialog:
3.1) Open IE or Edge and go to Kits and Tools for Windows 10. Download the Windows ADK and run it when done.3.2) Accept the default install location, click Next:
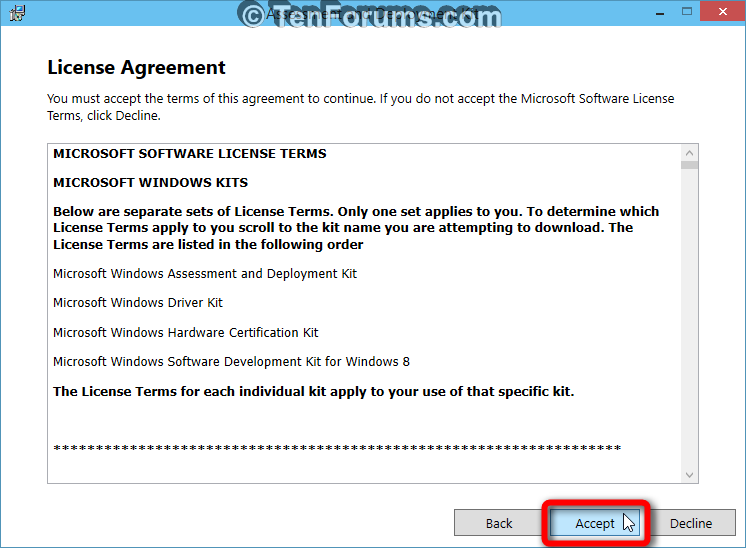
3.3) Click Next, thereafter accept the license by clicking Accept:
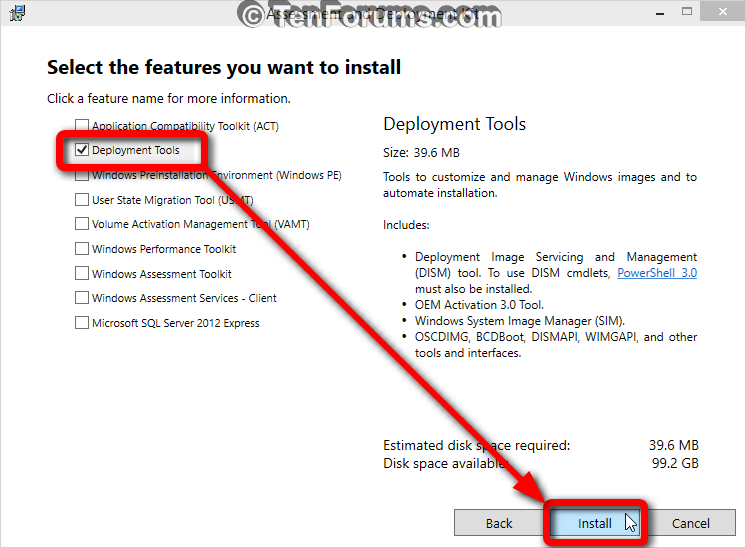
3.4) Select what to install. Personally I want to have the ADK completely installed which is why I usually select everything which is an almost 7 GB download taking some time, but for the purpose of this tutorial we only need the Deployment Tools, a small under 70 MB download. Make your choice and click Install:
3.5) The installation does not take very long if you selected the Deployment Tools only. Wait that the installation is finished and close the dialog.
If you decided to download and install everything, it takes time as I mentioned above. Just minimize the dialog and let it run in the background, you can continue from next step and let installation run by itself.
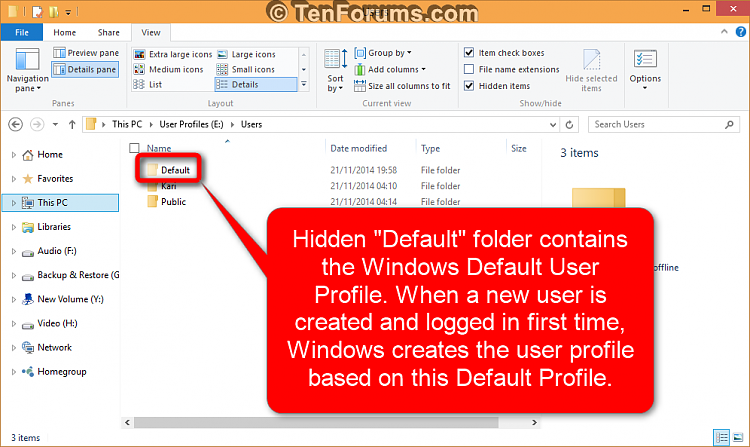
4.1) When you create a user account (profile) in Windows, system needs to know what should be done, which content should be created for the new user. Windows gets this information from the Default User Profile, located in a hidden system folder Default in main profile folder Users:Reading the contents of this default profile Windows then knows to create personal folders like Documents, Pictures, Music and so on, knows which theme, wallpaper, screensaver and colors to use, which homepage and favorites and so on. If the default profile is not modified prior to finalizing the Windows installation, all new users get the default theme, colors, favorites and so on.
4.2) Audit Mode and Sysprep give us the opportunity to modify this default user profile. Everything (almost!) done now will be saved to modified and customized default profile when we finally run the Sysprep later on in this tutorial. See our Ten Forums tutorial for customizing the default user profile for more information, below only a short list of what can and cannot be done: Default User Profile - Customize in Windows 10. Please notice that for purpose of this tutorial you should only do what's told in Part Two of said customization tutorial.
Examples of what can be modified:
- Windows wallpaper, icons, theme, colors and sounds
- Screensaver
- Taskbar location (bottom, left, top, right)
- File Explorer settings like icon spacing, ribbon ON / OFF, hide / show hidden items, view as, group / sort, additional panes and so on
- Desktop icon spacing and size
- Software installed now will be available to all users
Examples of what can't be modified:My customizations for this tutorial, I installed Office 2013, XBMC, VLC Player, Adobe Reader, Chrome, Firefox, Opera and Maxthon browsers and 7.Zip compression tool. I set my favorite Windows forums as favorites in Internet Explorer and its homepage as www.tenforums.com, set File Explorer to use details view, show ribbon and item check boxes, and finally placed my usual shortcuts on desktop.
- Pinned icons (Taskbar and Start) will not be copied to default profile
- Start Menu and Start Screen will remain default, cannot be modified
Tip
I installed all the above mentioned software except Office with OneGet in PowerShell, all programs installed with one single command instead of going to each website and downloading the installers. The command:
The Find-Package cmdlet lists programs I told it to find, all versions of them because I gave theCode:Find-Package -Name AdobeReader, 7-Zip, VLC, XBMC, Opera, GoogleChrome, Firefox, Maxthon -AllVersions | Out-GridView -PassThru | Install-Package
-AllVersions switch. This list is then piped to a grid view table, the -PassThru switch lets me select my preferred version for each program. This selection is then piped to Install-Package cmdlet which installs all software I selected.
Interested in OneGet? See the tutorial: https://www.tenforums.com/tutorials/2742-powershell-oneget-install-apps-command-line.html
Consult the default user profile tutorial mentioned above for more information what can and can't be done now.
Note
Please notice that all customizations work for local user accounts but some of them may be overwritten when using a Microsoft Account for signing in to Windows, depending on sync settings user has selected. Microsoft Account synced profile customizations void any default user profile customizations.
5.1) This part is for the real "I will do it by myself" geeks who want to learn how to use Windows SIM and create their own answer files.
If you are a "No, I'll check if I can copy & paste this somewhere" lazy geek, check the user profile customization tutorial Part Three for a copy & paste answer file and continue then from the next part, Part Six.
5.2 The original install media must be present now. If you have removed the USB or ejected the DVD when using a disk, insert it now. If you are installing Windows 10 from a writable media (USB) you can skip this step, but if you are using a non-writable media (DVD or write protected USB) you need to copy the Windows install.wim file first to another location. I recommend the Desktop.
Open your Windows 10 install media in File Explorer, go to its Sources folder, find install.wim file and copy it to Desktop:5.3) The Windows ADK we installed in Part Three has for sure now finished the installation. Open Start Menu > All apps > W > Windows Kits folder, click Windows System Image Manager to open it.
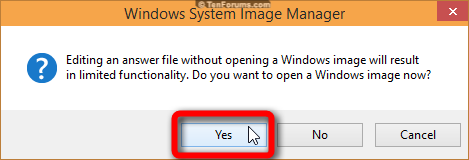
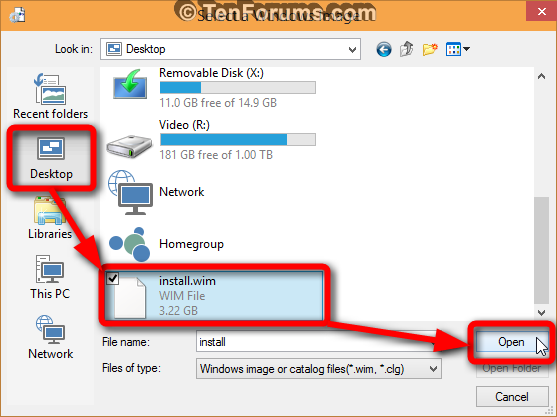
5.4) We start by creating a new Answer File:5.5) An Answer File is based on Windows Image which we want to modify. As we are creating one for Windows 10 we have just installed, we need to open a Windows image (install.wim file) from the current install media, or from desktop if you copied it as told in Step 5.2. Click Yes, browse to and open the install.wim file:5.6) Windows needs to create a so called catalog file now. Accept this by clicking Yes. Generating the catalog file takes some time, go and get a beer while it will be created
:
5.7) When done the SIM window shows you what the answer file contains at the moment (#1 in screenshot below, titles only as we have just started), and the components and packages which can be added (#2). When we add a component we can modify it in Properties pane (#3):5.8) In an answer file all various components and instructions are given in one of 7 different passes. We need now to add and modify something in Pass 4, Specialize.
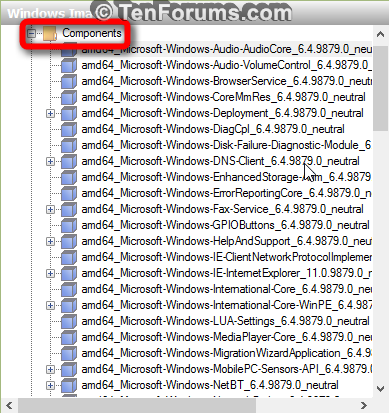
Open the Components tree in Windows Image pane (bottom left), browse to amd64_Microsoft-Windows-Shell-Setup (if installing a 32 bit Windows 10 you must use x86_Microsoft-Windows-Shell-Setupinstead), right click it and select Add Setting to Pass 4 Specialize:5.9) You will now see that the component we added is present in Answer File pane (top middle). Click the plus (+) sign to open this component's subtree:
5.10) ]The one and only value we must set in order to copy all modifications we have and will made to Default User Profile is the variable CopyProfile, which must be set as TRUE:
5.11) CopyProfile set we can now add values to other variables. Here I have named the computer as TenForumsPC, set RegisteredOrganization as Ten Forums and RegisteredOwner as Kari:
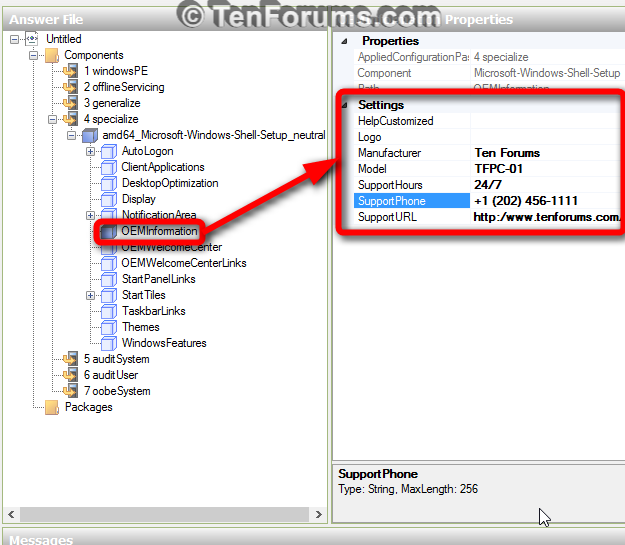
5.12) If you want to you can add for instance manufacturer, PC model, support information and such. This information will be shown in Windows System window after the installation is finished:
5.13) When you have finished modifying the answer file, validate it (check for errors):
5.14) Here's result of validating my answer file. Nothing to worry, it only shows some warnings that because values were not modified they will not be included in answer file, Sysprep using default values instead (yellow highlight) and some legacy values which can no longer be modified in Windows 10 (red highlight):
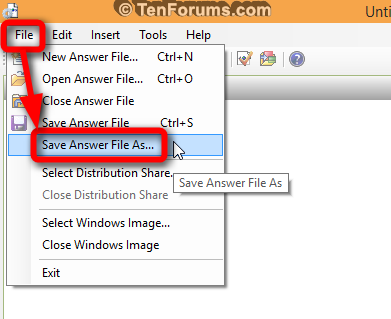
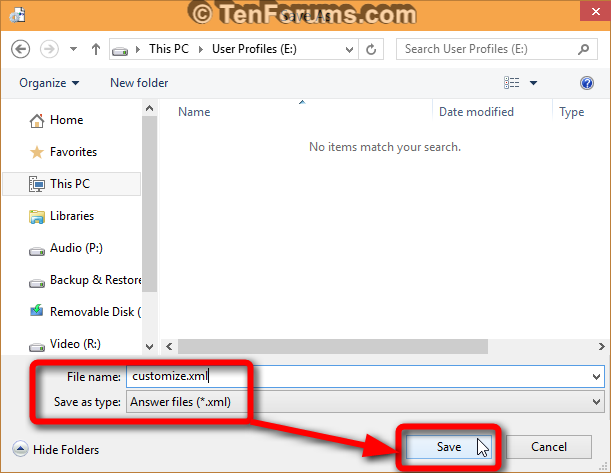
5.15) Save the answer file, name it as you want to, add the .xml extension. The answer file must be saved on root of any drive except C: and the drive where Windows install media is located. I saved this answer file as customize.xml on root of E: drive:
5.16) Although I know that the SIM has created the answer file correctly I have a habit to open it and see the details by myself. To do this, open Internet Explorer and press CTRL + O, browse to your answer file and open it in browser:
5.17) The things to check:
- Processor architecture is correct (amd64 for 64 bit Windows regardless if Intel or AMD processor, x86 for 32 bit Windows) (#1 in screenshot above)
- The information we added and modified in Steps 5.10 to 5.12 is correct (#2)
Note
Please read before proceeding:
Sysprepping with the Generalize switch and CopyProfile=TRUE has a small issue or rather a small inconvenience: it leaves the last used user folders (#1 in screenshot below) and recent files (#2) of built-in admin to end user's Quick Access:
A very simple and fast workaround is to add this batch file to built-in admin's %appdata%\Microsoft\Windows\Start Menu\Programs\Startup folder in Audit Mode before running Sysprep. Name it as you want to using the .bat extension, I named it RunOnce.bat:
The batch file explained:Code:echo Y | del %appdata%\microsoft\windows\recent\automaticdestinations\* del %0
- echo Y | = Pipes (sends) a letter Y to the command given after the Pipe (|) character
- del %appdata%\microsoft\windows\recent\automaticdestinations\* = Resets the Quick Access to defaults. This command expects the user to enter either Y for Yes or N for No. As the Y will be in this case piped, user interaction is not needed but instead the Y will be entered automatically
- del %0 = Deletes the batch file itself after it has been run. Leaving this away, not deleting the batch file, would reset the Quick Access every time the user signs in
File is now saved in built-in admin's Startup folder, which will be copied among other customizations to Default User Profile when you sysprep with CopyProfile set TRUE using the /generalize switch.
Now whenever a new user account will be created, be it the initial user created in OOBE or any user created anytime later, the batch will be run once for each user resetting the Quick Access to defaults and then removing itself.
Other than this minor inconvenience I have not found any whatsoever issues in Audit Mode, Sysprep, generalizing and CopyProfile functions.
6.1) Close all open apps and programs, press WIN + X to open Start context menu, select Command Prompt (Admin):6.2) Admin Command Prompt opens in C:\Windows\System32. We want to go one level deeper, to Sysprep folder. This is done by giving the following command (#1 in next screenshot below):
The Windows Media Player Network Sharing Service will cause Sysprep to fail if it is running. To be sure, let's stop the service, there's no harm done if it was already stopped (#2):Code:cd sysprep
Finally the Sysprep command (#3):Code:net stop wmpnetworksvc
The Sysprep command explained:Code:sysprep.exe /generalize /oobe /shutdown /unattend:E:\customize.xml
- Run Sysprep
- /generalize = Remove all device and hardware information, needed in order to copy the default user profile
- /oobe = Boot to Welcome (OOBE) first run mode when Windows will be booted next time
- /shutdown = When finished shutdown the PC (other alternatives would be /reboot and /quit ( just quit and stay in Audit Mode))
- /unattend:Path = location and name of the answer file, in this case E:\customize.xml
6.3) Click Enter after typing the Sysprep command with its switches, Sysprep runs for a while:
Note
Sysprep must be left alone, do not open or close any other programs while Sysprep runs, just wait without touching the mouse or keyboard!
6.4) When the Sysprep has finished, close the Command Prompt and shutdown the computer.
Note
This (Part Seven) is only needed if you will never use the image created in next part on any other computer than the one you are using now. The Generalize switch we used with Sysprep command have removed all hardware related information so the image is hardware neutral; however, going through instructions in this Part Seven reinstalls hardware, the image being no longer hardware independent.
This part exists only to make your future image restores faster on this particular computer as Windows has already gone through most of the OOBE boot.
If you even remotely think that you might use this image in deploying (installing) Windows to other computers in the future, skip this part and continue from Part Eight.
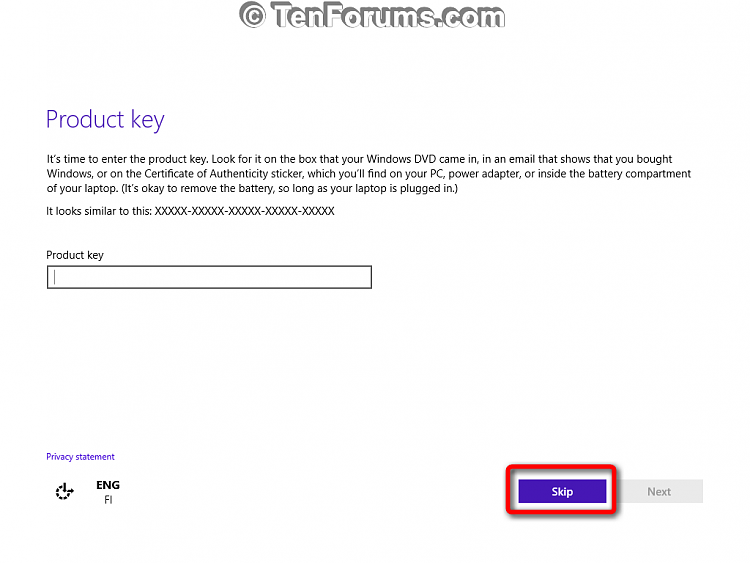
7.1) Turn the computer on. Windows boots now normally to Welcome (OOBE) first run mode. Set the Windows language and region when asked,when installation asks for product key click Skip, in the next dialog accept the EULA by clicking I Accept:7.2) You will arrive once again in Welcome (OOBE) Sign In dialog:Do not enter a username or MS Account now, instead shut down the computer from it's Power button.
Note
Creating system image now, before any user accounts are created is recommended but optional. The Pros and Cons of creating an initial system image now:
Pros:
The image is hardware independent, thanks to the Generalize switch we used in Step 6.2 with Sysprep, required by customized default user profile. This means that it can be used on any hardware setup and computer capable of running Windows 10 to perform a clean install by restoring the image which does not contain any user profiles but has all the software already installed and Windows theme customizations done.
It is a lot of faster to restore this image than do a traditional clean install followed by software installation and theme customization.
Cons:
Nothing I can think of :).
8.1) Boot the computer again, this time using the boot disk of your preferred imaging program. You can for instance use the free Macrium Reflect, excellent instructions in this tutorial on our sister site the Seven Forums: Imaging with free Macrium - Windows 7 Help Forums
8.2) I prefer using a WinPE disk with Macrium pre-installed, created by our resident WinPE creator Siw2. As the imaging process itself is exactly the same regardless which Windows version our image we have now created is, you can follow these steps on our sister site the Seven Forums:
- To create your own WinPE boot disk for imaging:
- To create a system image with above mentioned WinPE:Tip
The above links are to respective parts of a tutorial I have written at the Seven Forums, Windows 7 Image - Customize in Audit Mode with Sysprep. Although covering the same subject as this Windows 10 tutorial, it is far more in-depth and comprehensive.
If you are interested in Windows image customization in general and in Audit Mode and Sysprep in particular, I recommend you read it through. The main principles in customizing a Windows image are the same in Windows 7 through 10, the Windows 7 tutorial can be used almost as it is in Windows 10, this Windows 10 tutorial showing the main differences.
8.3) After creating the image reboot computer normally to complete the installation.
9.1) After the last reboot (Step 8.3) you have to go through the Welcome (OOBE) mode one last time. Set the language and region, skip the product key and accept the EULA as in Step 7.1. I recommend using a local account now, you can later change it to a Microsoft Account or create a new user with Microsoft Account.
9.2) When finally on Desktop you will notice that all your customizations are there. This is what I got when ready:Everything as I set in Step 4.2:
- Wallpaper, colors and theme
- Desktop icons
- Show Explorer ribbon, show Item check boxes
- Details view in Explorer
- IE favorites
- IE homepage
- OEM information as set in Steps 5.8 through 5.12
Information
We are done!
You have now a highly customized Windows setup, and a system image to be used instead of normal install media when you want to restore a "virgin" Windows without any user information and files but all software already installed and Windows customized.
Have fun :).
Kari
Related Tutorials
Customize Windows 10 Image in Audit Mode with Sysprep
-
New #1
You are a super geek
-
-
New #3
Another great one from Kari the Finn! You should be knighted "Sir Kari the Geek".
-
New #4
Thanks geeks. A bit bragging, I know, but this one really required hard work. Sysprep in build 9879 has some issues, I did 100+ Sysprep runs with various answer files on a Hyper-V vm in past few days failing over half of the runs, restoring a snapshot again and again and starting from beginning until getting it to work every time.
-
New #5
You should, (and will be), highly commended for this awesome contribution, sir!
Great work! :)
-
New #6
This is a superb piece of work. Thank you Kari.
Btw - what is that fancy snipping tool you are using.
-
New #7
Thanks geeks.
@whs, I use Screenpresso for screenshots: Screenpresso: The Ultimate Screen Capture Tool for Windows
-
-
-
New #9
Customize Windows 10 Image in Audit Mode with Sysprep
How to Create and Customize a Windows 10 Image in Audit Mode with Sysprep ToolPublished by Kari "Kalsarikänni" FinnCategory: Installation & Upgrade
15 Apr 2019
Tutorial Categories


Related Discussions














 Quote
Quote