

How to Repair System Files with SFC Command in Windows 10
If some Windows functions aren't working or Windows crashes, use the System File Checker to scan Windows and restore your files.
The SFC command scans the integrity of all protected system files and replaces incorrect (corrupted or modified) versions with correct Microsoft versions.
This tutorial will show you how to run the sfc command at boot or in Windows 10 to attempt to repair corrupted or modified system files.
If you get the Windows Resource Protection Could Not Start the Repair Service error when trying to run SFC, then make sure that the Windows Modules Installer service is enabled and set to Manual.
System File Checker (SFC) incorrectly flags Windows Defender PowerShell module files as corrupted | Windows Support
For a Windows 11 version of this tutorial, see:
Use System File Checker (SFC) to Repair System Files in Windows 11
Contents
- Option One: To Run SFC /SCANNOW Command at Boot
- Option Two: To Run SFC /SCANFILE Command at Boot
- Option Three: (recommended) To Run SFC /SCANNOW Command in Windows 10
- Option Four: To Run SFC /SCANFILE Command in Windows 10
- Option Five: (for log) To View Only the "SFC" Scan Results from the CBS.LOG
This option scans the integrity of all Windows system files at boot (offline) and repairs files with problems (ex: corrupted or modified) when possible.
Running SFC at boot will allow SFC to be able to repair files that are in use in Windows since SFC wouldn't be able to repair them in Windows.
1 Open a command prompt at boot.
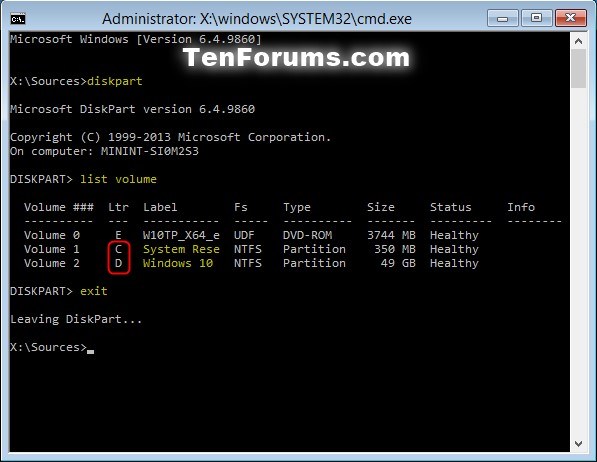
2 Typediskpartinto the command prompt, press Enter, typelist volumeinto the command prompt, and press Enter. (see screenshot below step 3)
3 Make note of the drive letters for your boot drive (ex: 350MB "System Reserved" or 500+MB "Recovery" partition) and Windows 10 drive, then type Exit and press Enter. (see screenshot below)
If you do not have a "System Reserved" (Legacy BIOS) or "Recovery" (UEFI) partition, and are not multi-booting with another operating system, then the boot drive and Windows 10 drive may be the same drive letter.
4 Type the command below into the command prompt, and press Enter. (see screenshot below step 5)
sfc /scannow /offbootdir=C:\ /offwindir=D:\windows
You will need to substitute the C drive letter in the /offbootdir (offline boot directory) command part above with what step 3 shows of the partition/volume where your system boot files are stored (ex: "System Reserved" or recovery partition) instead.
You will need to substitute the D drive letter in the /offwindir (offline windows directory) command part above with what step 3 shows as your Windows 10 partition/volume letter instead.
5 When the scan is complete, hopefully you will see a Windows Resource Protection did not find any integrity violations message unlike below. (see screenshot below)
You will see a blinking cursor at the prompt until finished. This will take a while to finish running though.
6 If no issues were found, then close the command prompt, and restart the computer to start Windows 10.
If SFC could not fix something, then run the command again to see if it may be able to the next time. Sometimes it may take running the sfc /scannow command up to 3 times with Fast Startup turned off and restarting the computer after each time to completely fix everything that it's able to.
If not, then run the Dism /Online /Cleanup-Image /RestoreHealth (requires Internet connection) command to repair any component store corruption, restart the PC afterwards, and try the sfc /scannow command again.
If still not, then do a system restore using a restore point dated before the bad system file occurred to fix it. You may need to repeat doing a system restore until you find a older restore point that may work.
If still not, then you could do a repair install without losing anything.
If still not, then you could refresh Windows 10.
When running SFC offline (at boot), SFC logging in the CBS.log file is not supported to be able to create a sfcdetails.txt file in OPTION FIVE below.
This option scans the integrity of a specified Windows system file at boot (offline) and repairs the file if it has problems (ex: corrupted or modified) when possible.
Running SFC at boot will allow SFC to be able to repair the file if it was in use in Windows since SFC wouldn't be able to repair the file in Windows.
1 Open a command prompt at boot.
2 Typediskpartinto the command prompt, press Enter, typelist volumeinto the command prompt, and press Enter. (see screenshot below step 3)
3 Make note of the drive letters for your boot drive (ex: 350MB "System Reserved" or 500+MB "Recovery" partition) and Windows 10 drive, then typeExitinto the command prompt, and press Enter. (see screenshot below)
If you do not have a "System Reserved" (Legacy BIOS) or "Recovery" (UEFI) partition, and are not multi-booting with another operating system, then the boot drive and Windows 10 drive may be the same drive letter.
4 Type the command below into the command prompt, and press Enter. (see screenshot below step 5)
sfc /scanfile="full path of file" /offbootdir=C:\ /offwindir=D:\windows
You will need to substitute full path of file in the command above with the actual full path of the Windows system file you want to scan. The drive letter will be the same as is shows in step 3 above for your Windows 10 partition/volume letter (ex: D)
For example:"D:\Windows\System32\imageres.dll"
You will need to substitute the C drive letter in the /offbootdir (offline boot directory) command part above with what step 3 shows of the partition/volume where your system boot files are stored (ex: "System Reserved" partition) instead.
You will need to substitute the D drive letter in the /offwindir (offline windows directory) command part above with what step 3 shows as your Windows 10 partition/volume letter instead.
5 When the scan is complete, hopefully you will see a Windows Resource Protection did not find any integrity violations message like below. (see screenshot below)
6 If no issues were found, then close the command prompt, and restart the computer to start Windows 10.
If SFC could not fix something, then run the command again to see if it may be able to the next time. Sometimes it may take running the sfc /scannow command up to 3 times with Fast Startup turned off and restarting the computer after each time to completely fix everything that it's able to.
If not, then run the Dism /Online /Cleanup-Image /RestoreHealth (requires Internet connection) command to repair any component store corruption, restart the PC afterwards, and try the sfc /scannow command again.
If still not, then you could refresh Windows 10, or do a system restore using a restore point dated before the bad system file occured to fix it. You may need to repeat doing a system restore until you find a older restore point that may work.
When running SFC offline (at boot), SFC logging in the CBS.log file is not supported to be able to create a sfcdetails.txt file in OPTION FIVE below.
This option scans the integrity of all system files and repairs files with problems (ex: corrupted or modified) when possible.
1 Open an elevated command prompt or an elevated Windows PowerShell.
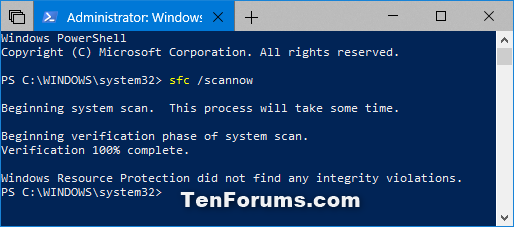
2 Type the sfc /scannow command into the elevated command prompt or PowerShell, and press Enter. (see screenshots below step 3)
3 When the scan is complete, hopefully you will see a Windows Resource Protection did not find any integrity violations message unlike below. (see screenshot below)
You will see a blinking cursor at the prompt until finished. This will take a while to finish running though.
4 If not issues were found, then close the elevated command prompt or PowerShell.
If SFC could not fix something, then run the command again to see if it may be able to the next time. Sometimes it may take running the sfc /scannow command up to 3 times with Fast Startup turned off and restarting the computer after each time to completely fix everything that it's able to.
If not, then run the Dism /Online /Cleanup-Image /RestoreHealth (requires Internet connection) command to repair any component store corruption, restart the PC afterwards, and try the sfc /scannow command again.
If still not, then do a system restore using a restore point dated before the bad system file occurred to fix it. You may need to repeat doing a system restore until you find a older restore point that may work.
If still not, and you would like to get help with your SFC issue before continuing with more drastic measure below, then you could upload and attach your sfcdetails.txt file created using OPTION FIVE below in a reply post in this tutorial.
If still not, then you could do a repair install without losing anything.
If still not, then you could refresh Windows 10.
This option scans the integrity of a specified Windows system file and repairs the file if it has problems (ex: corrupted or modified) when possible.
1 Open an elevated command prompt or elevated Windows PowerShell.
2 Type the command below into the elevated command prompt or PowerShell, and press Enter. (see screenshot below step 3)
sfc /scanfile="full path of file"
You will need to substitute full path of file in the command above with the actual full path of the Windows system file you want to scan.
For example:sfc /scanfile="C:\Windows\System32\imageres.dll"
3 When the scan is complete, hopefully you will see a Windows Resource Protection did not find any integrity violations message like below. (see screenshot below)
4 If no issues were found, then close the elevated command prompt or PowerShell.
If SFC could not fix something, then run the command again to see if it may be able to the next time. Sometimes it may take running the sfc /scannow command up to 3 times with Fast Startup turned off and restarting the computer after each time to completely fix everything that it's able to.
If not, then run the Dism /Online /Cleanup-Image /RestoreHealth (requires Internet connection) command to repair any component store corruption, restart the PC afterwards, and try the sfc /scannow command again.
If still not, then do a system restore using a restore point dated before the bad system file occurred to fix it. You may need to repeat doing a system restore until you find a older restore point that may work.
If still not, and you would like to get help with your SFC issue before continuing with more drastic measure below, then you could upload and attach your sfcdetails.txt file created using OPTION FIVE below in a reply post in this tutorial.
If still not, then you could do a repair install without losing anything.
If still not, then you could refresh Windows 10.
When SFC runs in Windows, it logs its actions into the C:\Windows\Logs\CBS\CBS.log file. The steps in this option will show you how to see only the specific SFC entries with the [SR] tags in this CBS.log to not have to see all the other unrelated entries in the CBS.log.
When running SFC offline (at boot) in OPTION ONE or OPTION TWO, SFC logging in the CBS.log file is not supported to be able to create a sfcdetails.txt file.
1 Open a command prompt or an PowerShell.
2 Copy and paste the appropriate command below into the command prompt or PowerShell, and press Enter. (see screenshot below step 3)
If you moved your Desktop folder location from the default "C:\Users\<username>\Desktop" location, you will need to substitute the command bit in red below with the actual full path of your new Desktop folder location instead.
Only for command prompt:
findstr /c:"[SR]" %windir%\Logs\CBS\CBS.log >"%userprofile%\Desktop\sfcdetails.txt"
OR
Only for PowerShell:
(sls [SR] $env:windir\Logs\CBS\CBS.log -s).Line >"$env:userprofile\Desktop\sfcdetails.txt"
3 Close the command prompt or PowerShell.
4 Open the sfcdetails.txt file on your desktop to only see the SFC scan details from the CBS.LOG file.
5 When finished, you can safely delete the sfcdetails.txt file afterwards if you like.
That's it,
Shawn Brink
Related Tutorials
- How to Add SFC SCANNOW Context Menu in Windows 10
- How to Do a System Restore of Windows 10
- How to Repair Windows 10 Image using DISM
- How to Add Repair Windows Image Context Menu in Windows 10
- How to Do a Repair Install of Windows 10 with an In-place Upgrade
Run SFC Command in Windows 10
-
New #1
Hi Shawn -Damage with bad performance from a Windows 10 Refresh. Running DISM to attempt to repair some SFC unfixable. Error: 0x800f081f The source files could not be found. Cannot extract SFC from CBS log to desktop (not found). Any suggestions?
-
New #2
Hey Greg,
It's been my experience that SFC will always find unrepairable files in Windows 10. I suspect that it's because it's still only a preview build and have many patched system files still.
Do you have a restore point available dated before the DISM error?
-
New #3
No Restore Points queued even though I apportioned 10% disk space.
was actually doing more repair than I usually have patience for before reinstalling (for practice) but now that you tell me that I'll cut to the reinstall. I did run the CBS log by Noel to see what he says, if he has time for it without being able to extract just the SFC log.
Thanks and Happy New Year~!
-
New #4
I'm experiencing the same issue. SFC /scannow always stops at 2%. I hope that MS fix it in build 100xx !
:)
-
New #5
Thanks Brink another great tutorial!
Sfc /scannow would not complete - after running the Dism /Online /Cleanup-Image /RestoreHealth the sfc /scannow worked and fully completed, also worked on Windows 8.1.
Microsoft Windows [Version 6.3.9600]
(c) 2013 Microsoft Corporation. All rights reserved.
C:\WINDOWS\system32>Dism /online /cleanup-image /restorehealth
Deployment Image Servicing and Management tool
Version: 6.3.9600.17031
Image Version: 6.3.9600.17031
[==========================100.0%==========================]
The restore operation completed successfully. The component store corruption was
repaired.
The operation completed successfully.
C:\WINDOWS\system32>sfc /scannow
Beginning system scan. This process will take some time.
Beginning verification phase of system scan.
Verification 100% complete.
Windows Resource Protection did not find any integrity violations.
C:\WINDOWS\system32>
-
New #6
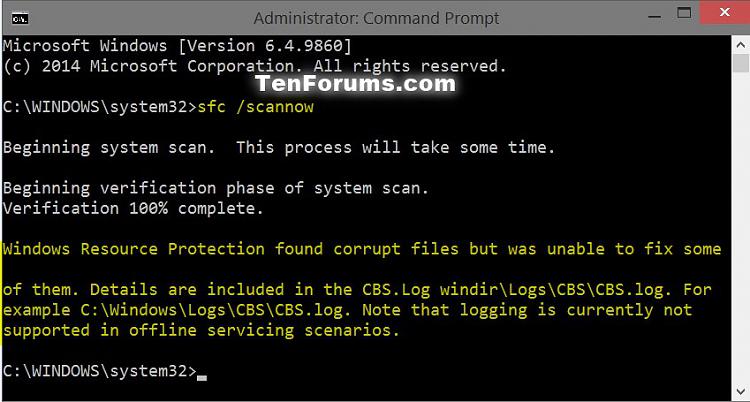
i ran SFC /scannow my result came like this "windows resource protection found corrupt files but was unable to fix some of them " is this was ok or something went wrong??
-
New #7
Hello Remostalin,
That means that SFC was unable to repairs some of your system files that were found to be corrupted or modified.
If you like, see if doing what's in the note box under OPTION THREE may allow SFC to be able to repair them afterwards.
If it still cannot, then you could perform OPTION FIVE to get your sfcdetails.txt log and upload it here. I'll be happy to take a look to see and let you know what SFC was unable to repair, and what we may be able to do from there. :)
-
New #8
-
-
New #9
Luckily, it's just part of the false hash mismatch for the MicrosoftEdgeSquare44x44.scale-125_contrast-white.png file from the KB3074667 update.
There's nothing that needs to be done or to worry about it. :)

Run SFC Command in Windows 10
How to Repair System Files with SFC Command in Windows 10Published by Shawn BrinkCategory: Performance & Maintenance
28 Nov 2023


 Quote
QuoteTutorial Categories

Related Discussions
