

How to Enable or Disable Credential Guard in Windows 10
Windows Defender Credential Guard uses virtualization-based security to isolate secrets so that only privileged system software can access them. Unauthorized access to these secrets can lead to credential theft attacks, such as Pass-the-Hash or Pass-The-Ticket. Windows Defender Credential Guard prevents these attacks by protecting NTLM password hashes, Kerberos Ticket Granting Tickets, and credentials stored by applications as domain credentials.
By enabling Windows Defender Credential Guard, the following features and solutions are provided:
- Hardware security NTLM, Kerberos, and Credential Manager take advantage of platform security features, including Secure Boot and virtualization, to protect credentials.
- Virtualization-based security Windows NTLM and Kerberos derived credentials and other secrets run in a protected environment that is isolated from the running operating system.
- Better protection against advanced persistent threats When Credential Manager domain credentials, NTLM, and Kerberos derived credentials are protected using virtualization-based security, the credential theft attack techniques and tools used in many targeted attacks are blocked. Malware running in the operating system with administrative privileges cannot extract secrets that are protected by virtualization-based security. While Windows Defender Credential Guard is a powerful mitigation, persistent threat attacks will likely shift to new attack techniques and you should also incorporate other security strategies and architectures.
Hardware and software requirements
To provide basic protections against OS level attempts to read Credential Manager domain credentials, NTLM and Kerberos derived credentials, Windows Defender Credential Guard uses:
- Support for Virtualization-based security (required)
- Secure boot (required)
- TPM (preferred - provides binding to hardware) versions 1.2 and 2.0 are supported, either discrete or firmware
- UEFI lock (preferred - prevents attacker from disabling with a simple registry key change)
The Virtualization-based security requires:
- 64-bit CPU
- CPU virtualization extensions plus extended page tables
- Windows hypervisor (does not require Hyper-V Windows Feature to be installed)
See also:
- Protect derived domain credentials with Windows Defender Credential Guard | Microsoft Docs
- How Windows Defender Credential Guard works | Microsoft Docs
- Manage Windows Defender Credential Guard | Microsoft Docs
- Windows Defender Credential Guard protection limits | Microsoft Docs
- Considerations when using Windows Defender Credential Guard | Microsoft Docs
- Windows Credential Guard: Additional mitigations | Microsoft Docs
- Windows Defender Credential Guard: Known issues | Microsoft Docs
- Windows Defender Credential Guard hardware requirements | Microsoft Docs
- Windows 10 Device Guard and Credential Guard Demystified
- Windows 10 Enterprise Security: Credential Guard and Device Guard | Dell US
- ThinkPad support for Device Guard and Credential Guard in Microsoft Windows 10 - ThinkPad
- HP Manageability Integration Kit Supported Platforms | HP Client Management Solutions
This tutorial will show you how to enable or disable Credential Guard virtualization based security on Windows 10 Enterprise and Windows 10 Education PCs.
You must be signed in as an administrator to enable or disable Credential Guard.
Here's How:
1 Open the Local Group Policy Editor.
If you enable Windows Defender Credential Guard by using Group Policy, the steps to enable the Hyper-V -> Hyper-V Platform > Hyper-V Hypervisor and Isolated User Mode Windows Features through Control Panel or DISM are not required. Group Policy will install Windows Features for you.
2 Navigate to the key below in the left pane of Local Group Policy Editor. (see screenshot below)
Computer Configuration\Administrative Templates\System\Device Guard
3 In the right pane of Device Guard in Local Group Policy Editor, double click/tap on the Turn On Virtualization Based Security policy to edit it. (see screenshot above)
4 Do step 5 (disable) or step 6 (enable) below for what you would like to do.
A) Select (dot) Not Configured or Disabled, click/tap on OK, and go to step 7 below. (see screenshot below)
Not Configured is the default setting.
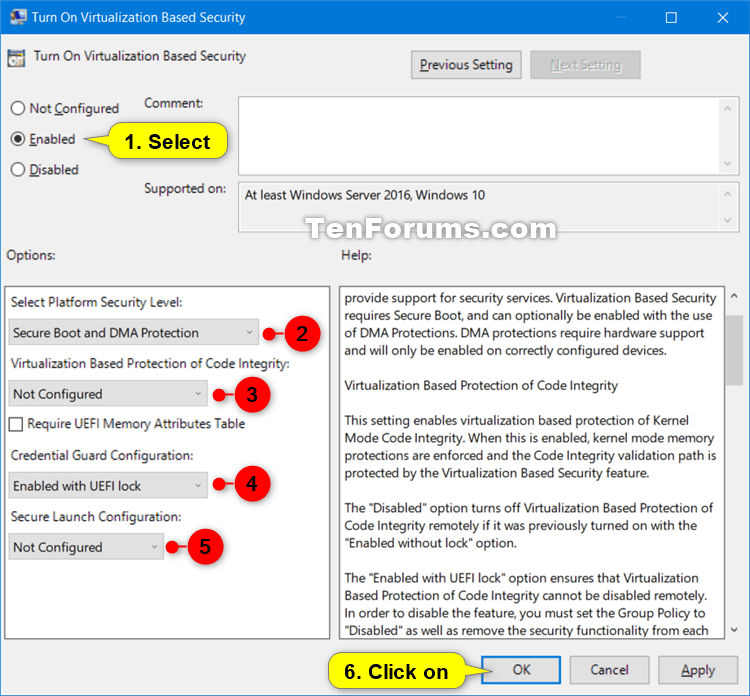
A) Select (dot) Enabled, and go to Options. (see screenshot below)
B) In the Select Platform Security Level drop menu, choose Secure Boot or Secure Boot and DMA Protection for what you want.
The Secure Boot option provides secure boot with as much protection as is supported by a given computers hardware. A computer with input/output memory management units (IOMMUs) will have secure boot with DMA protection. A computer without IOMMUs will simply have secure boot enabled.
The Secure Boot with DMA will enable secure bootand VBS itselfonly on a computer that supports DMA, that is, a computer with IOMMUs. With this setting, any computer without IOMMUs will not have VBS (hardware-based) protection, although it can have code integrity policies enabled.
C) If you like, you could also enable Device Guard by selecting Enabled with UEFI lock or Enabled without lock in the Virtualization Based Protection of Code Integrity drop menu for what you want.
The Enabled with UEFI lock option ensures that Virtualization Based Protection of Code Integrity cannot be disabled remotely. In order to disable the feature, you must set the Group Policy to "Disabled" as well as remove the security functionality from each computer, with a physically present user, in order to clear configuration persisted in UEFI.
The Enabled without lock option allows to be able to turn off Windows Defender Credential Guard remotely.
D) In the Credential Guard Configuration drop menu, select Enabled with UEFI lock or Enabled without lock for what you want.
The Enabled with UEFI lock option ensures that Credential Guard cannot be disabled remotely. In order to disable the feature, you must set the Group Policy to "Disabled" as well as remove the security functionality from each computer, with a physically present user, in order to clear configuration persisted in UEFI.
The Enabled without lock option allows Credential Guard to be disabled remotely by using Group Policy.
E) In the Secure Launch Configuration drop menu, choose Not Configured, Enabled, or Disabled for what you want.
This setting sets the configuration of Secure Launch to secure the boot chain.
The "Not Configured" setting is the default, and allows configuration of the feature by Administrative users.
The "Enabled" option turns on Secure Launch on supported hardware.
The "Disabled" option turns off Secure Launch, regardless of hardware support.
F) Click/tap on OK, and go to step 8 below.
7 Close the Local Group Policy Editor.
8 Restart the computer to apply.
That's it,
Shawn
Related Tutorials
- How to Verify if Credential Guard is Enabled or Disabled in Windows 10
- How to Enable or Disable Device Guard in Windows 10
- How to Enable or Disable Secure Boot in UEFI
- How to Turn On or Off Microsoft Defender Antivirus in Windows 10
Enable or Disable Credential Guard in Windows 10
-
New #1
Shawn, what if it doesn't turn off? Let me quote my question on How to disable Windows 10 Credential Guard? | Experts Exchange
----
On win10 1909, I tested credential guard (activated the feature via GPO). It worked and I finished my test by deactivating it via GPO and I rebooted - it stayed on.
I verified that the disabling GPO was applied - it was, but it stayed on:

So I uninstalled Hyper-V - it shouldn't work without. It stayed on.
So I restored an image backup of c: (definitely, in this backup it wasn't on) - it stayed on.
Who knows how to disable it?
[I am able to deactivate Intel Virtualization bios features and yes, that solved it, but it won't let me use Hyper-V, which I need).
- - - Updated - - -
Found the solution below at
https://docs.microsoft.com/en-us/win...l-guard-manage
- If you used Group Policy, disable the Group Policy setting that you used to enable Windows Defender Credential Guard (Computer Configuration -> Administrative Templates -> System -> Device Guard -> Turn on Virtualization Based Security).
- Delete the following registry settings:
- HKEY_LOCAL_MACHINE\System\CurrentControlSet\Control\LSA\LsaCfgFlags
- HKEY_LOCAL_MACHINE\Software\Policies\Microsoft\Windows\DeviceGuard\LsaCfgFlags
- If you also wish to disable virtualization-based security delete the following registry settings:
- HKEY_LOCAL_MACHINE\Software\Policies\Microsoft\Windows\DeviceGuard\EnableVirtualizationBasedSecurity
- HKEY_LOCAL_MACHINE\Software\Policies\Microsoft\Windows\DeviceGuard\RequirePlatformSecurityFeatures[COLOR=var(--text)][COLOR=var(--primary-dark)] Important[/COLOR]
If you manually remove these registry settings, make sure to delete them all. If you don't remove them all, the device might go into BitLocker recovery.
[/COLOR]
- Delete the Windows Defender Credential Guard EFI variables by using bcdedit. From an elevated command prompt, type the following commands:
Code:mountvol X: /s copy %WINDIR%\System32\SecConfig.efi X:\EFI\Microsoft\Boot\SecConfig.efi /Y bcdedit /create {0cb3b571-2f2e-4343-a879-d86a476d7215} /d "DebugTool" /application osloader bcdedit /set {0cb3b571-2f2e-4343-a879-d86a476d7215} path "\EFI\Microsoft\Boot\SecConfig.efi" bcdedit /set {bootmgr} bootsequence {0cb3b571-2f2e-4343-a879-d86a476d7215} bcdedit /set {0cb3b571-2f2e-4343-a879-d86a476d7215} loadoptions DISABLE-LSA-ISO bcdedit /set {0cb3b571-2f2e-4343-a879-d86a476d7215} device partition=X: mountvol X: /d - Restart the PC.
- Accept the prompt to disable Windows Defender Credential Guard.
- Alternatively, you can disable the virtualization-based security features to turn off Windows Defender Credential Guard.
Last edited by Comport Colin; 02 Sep 2020 at 16:20.

Enable or Disable Credential Guard in Windows 10
How to Enable or Disable Credential Guard in Windows 10Published by Shawn BrinkCategory: Security System
02 Sep 2020


 Quote
QuoteTutorial Categories

Related Discussions
