

How to Open Elevated Windows PowerShell in Windows 10
Windows 10 comes with Windows PowerShell 5.0 included.
Windows PowerShell is a task-based command-line shell and scripting language designed especially for system administration. Built on the .NET Framework, Windows PowerShell helps IT professionals and power users control and automate the administration of the Windows operating system and applications that run on Windows.
For more details about Windows PowerShell, see:
- Microsoft PowerShell Documentation
- What's New in Windows PowerShell
- Cool Stuff about PowerShell 5 in Windows 10 - Hey, Scripting Guy!
This tutorial will show you different ways to open an elevated Windows PowerShell in Windows 10.
You must be signed in as an administrator to be able to open an elevated Windows PowerShell.
Contents
- Option One: Open Elevated Windows PowerShell from All apps in Start Menu
- Option Two: Open Elevated Windows PowerShell in Search
- Option Three: Open Elevated Windows PowerShell from Task Manager
- Option Four: Open Elevated Windows PowerShell from Win+X Menu
- Option Five: To "Open Elevated Windows PowerShell Here" in File Explorer
- Option Six: Open Elevated Windows PowerShell from File Explorer
EXAMPLE: Elevated Windows PowerShell
1 Open All apps in the Start menu .
2 Scroll down and expand open the Windows PowerShell folder, right click or press and hold on Windows PowerShell, click/tap on More, and click/tap on Run as administrator. (see screenshot below)
1 Press the Win+ S keys to open Search.
2 Type powershell into the search box, click/tap on Run as administrator in the right pane for Windows PowerShell in the search results at the top. (see screenshot below)
1 Open Task Manager (Ctrl+Shift+Esc).
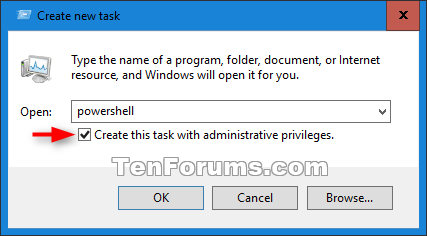
2 Click/tap on File (menu bar), and click/tap on Run new task. (see screenshot below)
3 Type powershell, check the Create this task with administrative privileges box, and click/tap on OK in the search results at the top. (see screenshot below)
1 If you have the Win+X menu set to show Windows PowerShell instead of Command Prompt, then press the Win+ X keys to open the Win+X Quick Link menu.
2 Click/tap on Windows PowerShell (Admin). (see screenshot below)
1 Open File Explorer (Win+E).
2 Select or open a folder or drive that you want to open Windows PowerShell at that location. (see screenshot below)
3 Click/tap on the File tab on the ribbon, click/tap on Open Windows PowerShell to expand, and click/tap on Open Windows PowerShell as administrator. (see screenshot below)
1 Open File Explorer (Win+E).
2 Browse to the folder location below.
C:\Windows\System32\WindowsPowerShell\v1.0
3 Select the powershell.exe file, click/tap on the File tab on the ribbon, and click/tap on Run as administrator. (see screenshot below)
OR
4 Right click or press and hold on the powershell.exe file, and click/tap on the Run as administrator.
That's it,
Shawn
Related Tutorials
- How to Open Windows PowerShell in Windows 10
- How to Open an Elevated Command Prompt in Windows 10
- Show Command Prompt or Windows PowerShell on Win+X menu in Windows 10
- How to Add 'Open PowerShell window here' context menu in Windows 10
- How to Add 'Open PowerShell window here as administrator' context menu in Windows 10
- Enable or Disable Legacy Console for Command Prompt and PowerShell in Windows 10
- How to Enable or Disable Windows PowerShell 2.0 in Windows 10
- How to Check PowerShell Version in Windows
- Enable Mapped Drives to be Available in Elevated Command Prompt and PowerShell in Windows
- How to Search for Text in Command Prompt and PowerShell with Find Dialog Box in Windows 10
Open Elevated Windows PowerShell in Windows 10
-
-
-
New #3
Thank you Shawn for the great tute, as usual. However I have 2 problems on my Win 10 PRO 1703
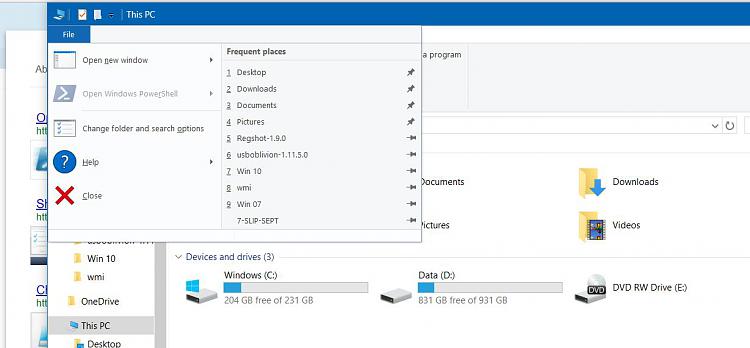
1) Option 6 (File Explorer) is unavailable as the "Open Windows Powershell" option is greyed out:
2) Option 4 is unavailable as I previously used a tweak or setting which replaced Powershell with Command Prompt and I cannot find the tweak or setting to change it back.
Any advice is welcome.
EDIT: For problem 2 I just found this :): Show Command Prompt or Windows PowerShell on Win+X menu in Windows 10 Windows 10 Customization Tutorials
-
New #4
Hello Joe, :)
Q1) It looks like you may not have a folder or drive selected in the "This PC" window for the "Open Windows PowerShell" option to be available.
Q2) Yep, that's the one.
-
New #5
-
-
New #7
I'd like to add the easiest way to open anything elevated. Hold ctrl + shift and click your application or double click icon on desktop or explorer.
 Run as Administrator in Windows 10 Windows 10 Apps Features Tutorials
Last edited by Brink; 22 Sep 2017 at 21:51. Reason: added tutorial link for more info
-
-
-
New #9
So, any reason not to deselect PowerShell 2.0 in "Turn Windows features on and off" ?Brink said:

Open Elevated Windows PowerShell in Windows 10
How to Open Elevated Windows PowerShell in Windows 10Published by Shawn BrinkCategory: Apps & Features
07 Jun 2020


 Quote
Quote

Tutorial Categories

Related Discussions
